1 Global Position Variable Address Structure Description
1.1 Address Code Structure
Each point occupies 16 addresses, allocated as follows:
| Address allocation | Description | Number of occupied addresses |
|---|---|---|
| Coordinate system | Coordinate system type | 1 |
| Pose | Pose information | 1 |
| Coordinate values | Coordinate value of each axis, each axis occupies 2 addresses | 14 (7 axes) |
1.2 Address Occupation for Different Numbers of Axes
Taking 7 axes as an example: 7 axes occupy 16 addresses, 6 axes occupy 14, and so on; 4 axes occupy 10, used according to the address code.
Calculation formula:
Total number of addresses = 1 (coordinate system) + 1 (pose) + number of axes × 2 (each axis occupies 2 addresses)Address occupation for different numbers of axes:
| Number of axes | Coordinate system | Pose | Coordinate values | Total addresses |
|---|---|---|---|---|
| 7 axes | 1 | 1 | 14 | 16 |
| 6 axes | 1 | 1 | 12 | 14 |
| 5 axes | 1 | 1 | 10 | 12 |
| 4 axes | 1 | 1 | 8 | 10 |
| 3 axes | 1 | 1 | 6 | 8 |
| 2 axes | 1 | 1 | 4 | 6 |
1.3 Detailed Address Code Reference
For the detailed address codes, see the attachment: modbus100个.xlsx
2 Configuration Method for Variables Above GP100
Note: The above covers up to GP100. To change values above GP100, follow the steps below.
2.1 Exporting the Controller Configuration
Modification path: Insert a USB drive into the teach pendant → Click [Settings] → [System Settings] → [Export Controller Configuration]
Operation steps:
Insert the USB drive into the teach pendant
Click the [Settings] button on the teach pendant
Select [System Settings]
Click [Export Controller Configuration]
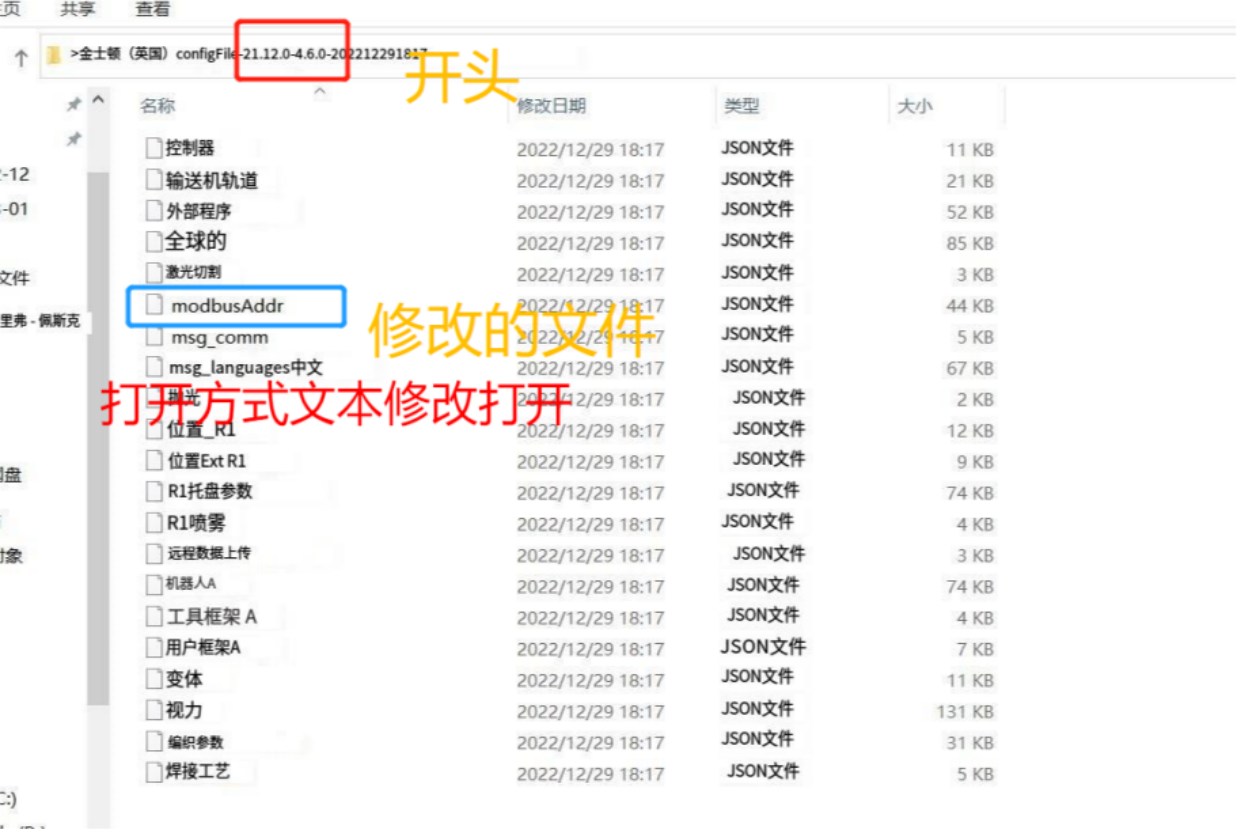
In the exported folder starting with
configFile, find themodbusAddr.jsonfile
Exported file example:
configFile/
├── controller.json
├── modbusAddr.json          ← The file to be modified
├── globalParam.json
├── robot1.json
└── ... (other configuration files)
2.2 Modifying the Starting Variable Name
Tool to use: Open the modbusAddr.json file with a text editor such as Notepad or Notepad++.
How to open the file: Right-click the file → Select [Open With] → Select [Notepad] or [Notepad++]
2.2.1 Original Configuration Example
The original configuration shown in Figure 1 (starting from GP001 by default): 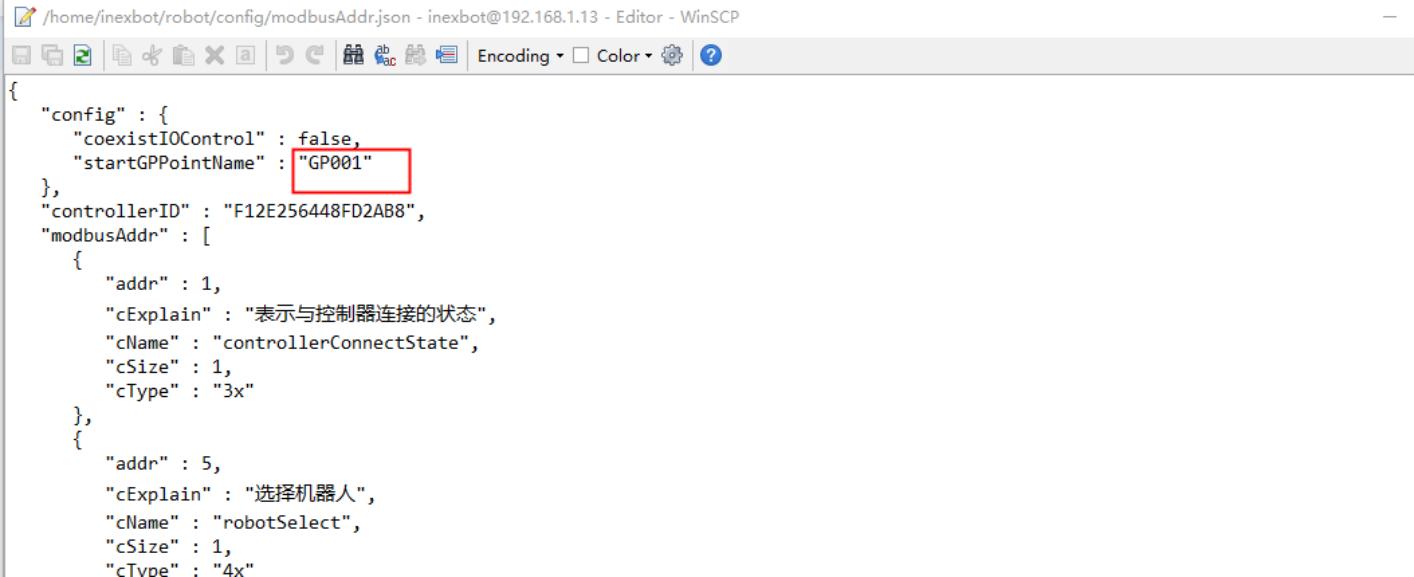
{
  "config": {
    "coexistControl": false,
    "startGPPointName": "GP001"
  },
  "controllerID": "F12E256448FD2AB8",
  "modbusAddr": {
    "addr": 1,
    "cExplain": "表示与控制连接的状态",
    "cName": "controllerConnectState",
    "cSize": 1,
    "cType": "3x"
  }
}
Parameter description:
| Parameter | Description |
|---|---|
| startGPPointName | The starting global point variable name, default is "GP001" |
| coexistControl | Whether Modbus and TCP are allowed to control at the same time |
| controllerID | The unique controller identifier |
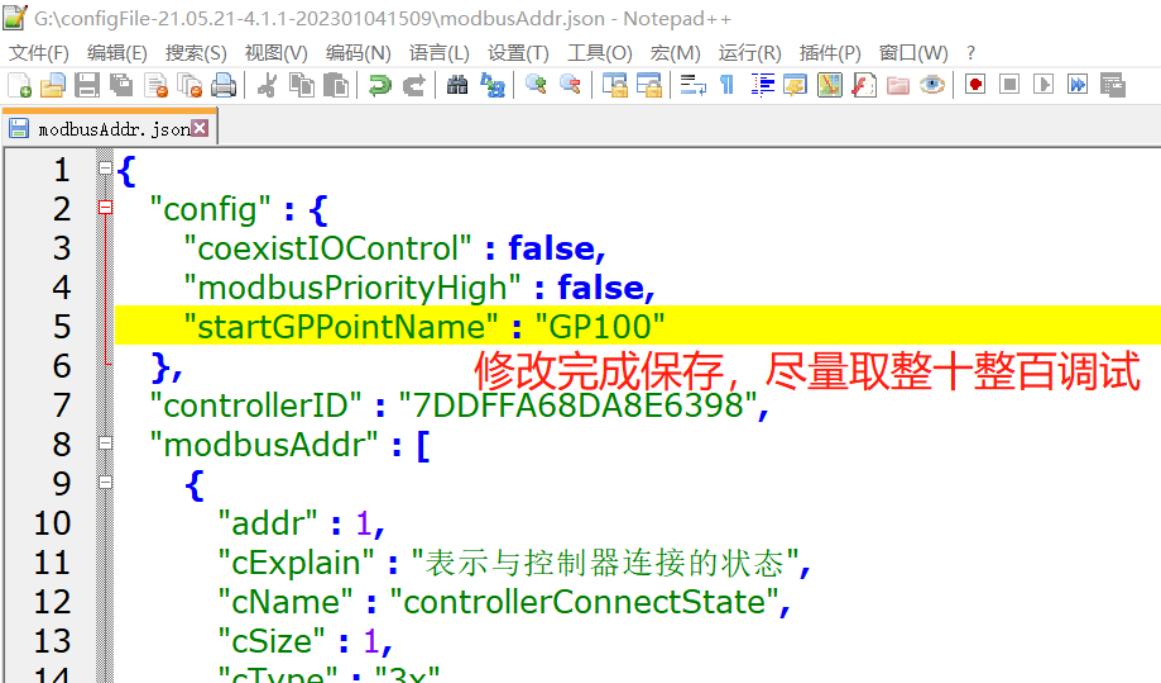
2.2.2 Changing to Start from GP100
Modification steps:
Find the
startGPPointNameparameter under theconfignodeChange the default "GP001" to "GP100"
Modified configuration:
{
  "config": {
    "coexistControl": false,
    "modbusPriorityHigh": false,
    "startGPPointName": "GP100"    ← Changed to GP100
  },
  "controllerID": "F12E256448FD2AB8",
  "modbusAddr": {
    "addr": 1,
    "cExplain": "表示与控制连接的状态",
    "cName": "controllerConnectState",
    "cSize": 1,
    "cType": "3x"
  }
}Note: The part marked in red in the figure can be changed to any variable name you want. The address codes after it increment by 100.
2.3 Saving and Importing the Configuration
Operation steps:
Save the file: After modification, save the
modbusAddr.jsonfileSuggestion: Try to use round numbers (multiples of ten or hundred) for debugging, which is easier to remember and manage
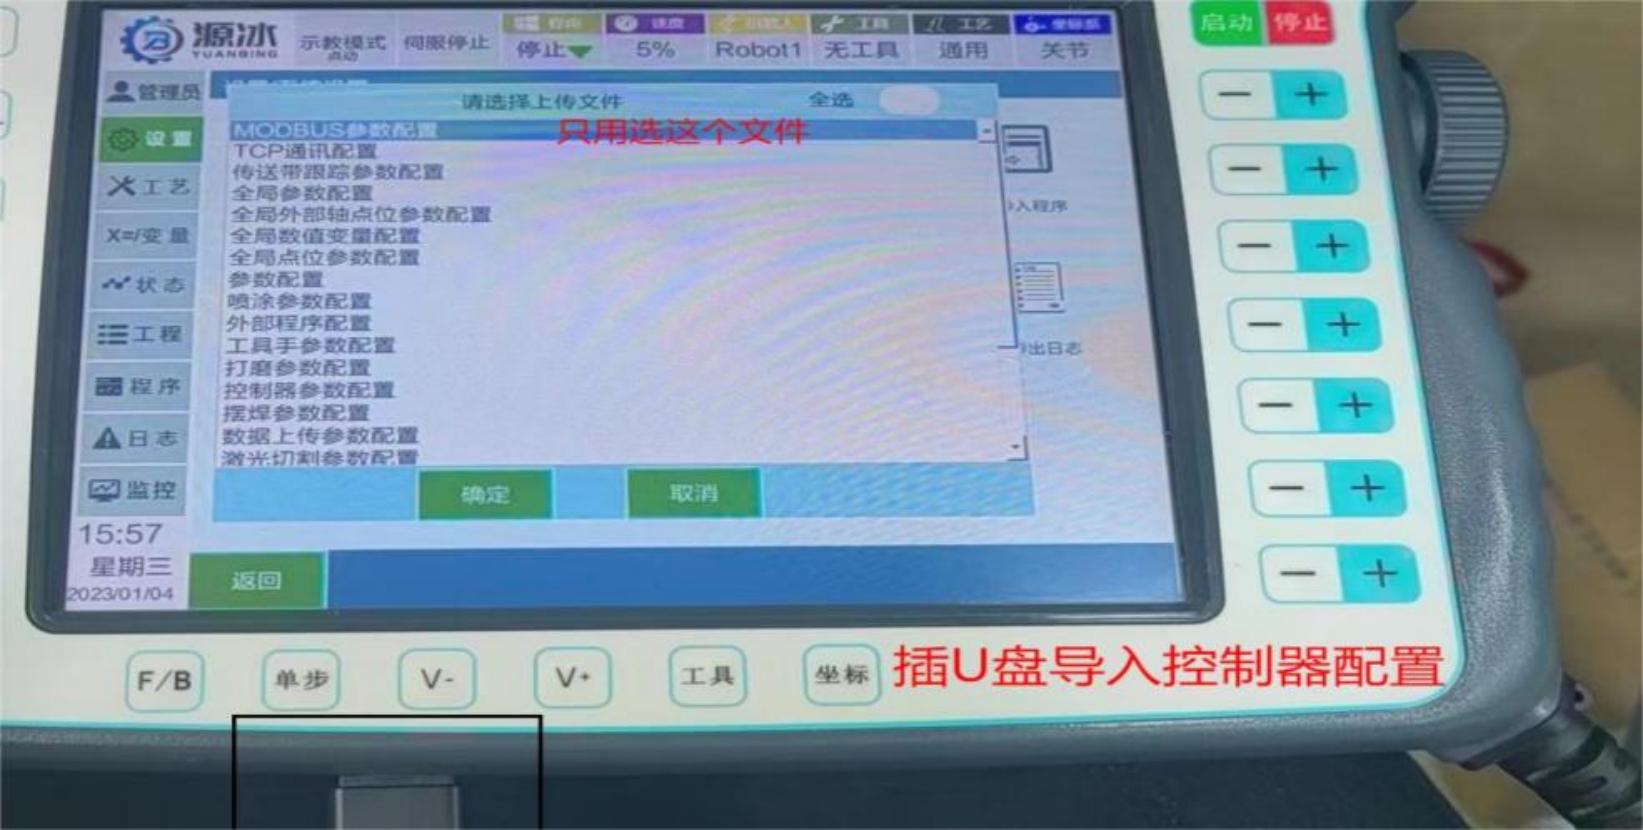
Insert the USB drive: Insert the USB drive into the teach pendant
Import the configuration:
- Click [Settings] → [System Settings] → [Import Controller Configuration] on the teach pendant
- In the pop-up file selection screen, select only the
modbusAddr.jsonfile - Click [OK] to start the import
Import screen description:
| Option | Description |
|---|---|
| MODBUS parameter configuration | Only this file (modbusAddr.json) needs to be selected |
| TCP communication configuration | Other configuration files |
| Conveyor tracking parameter configuration | Other configuration files |
| Global parameter configuration | Other configuration files |
| Global external-axis point parameter configuration | Other configuration files |
| Global numeric variable configuration | Other configuration files |
| Global point parameter configuration | Other configuration files |
System restart: After the import is complete, the system restarts automatically
Power-off restart: After the restart is complete, power off and restart the teach pendant and system again
3 Modbus Address Starting Address Configuration
Note: This function is not very important; it is briefly covered here.
3.1 Modifying the Starting Address
Default configuration: The default starting address for Modbus read/write is 3000
Modification principles:
- The modified read/write starting address must be greater than 3000 to avoid conflicts with other address codes
- Take 3100 as an example
Address range limits:
| Limit condition | Value |
|---|---|
| Maximum starting address | 3400 (modifiable) |
| Starting address + 1600 | Cannot be greater than 5000 |
| Default starting address | 3000 |
Warning: If starting address + 1600 is greater than 5000, it will become unusable.
3.2 Address Range Limits
Calculation rule:
Starting address + 1600 ≤ 5000
Starting address ≤ 3400Example:
| Starting address | Starting address + 1600 | Usable |
|---|---|---|
| 3000 | 4600 | ✓ Usable |
| 3100 | 4700 | ✓ Usable |
| 3200 | 4800 | ✓ Usable |
| 3300 | 4900 | ✓ Usable |
| 3400 | 5000 | ✓ Usable |
| 3500 | 5100 | ✗ Not usable |
3.2.1 Modification Method
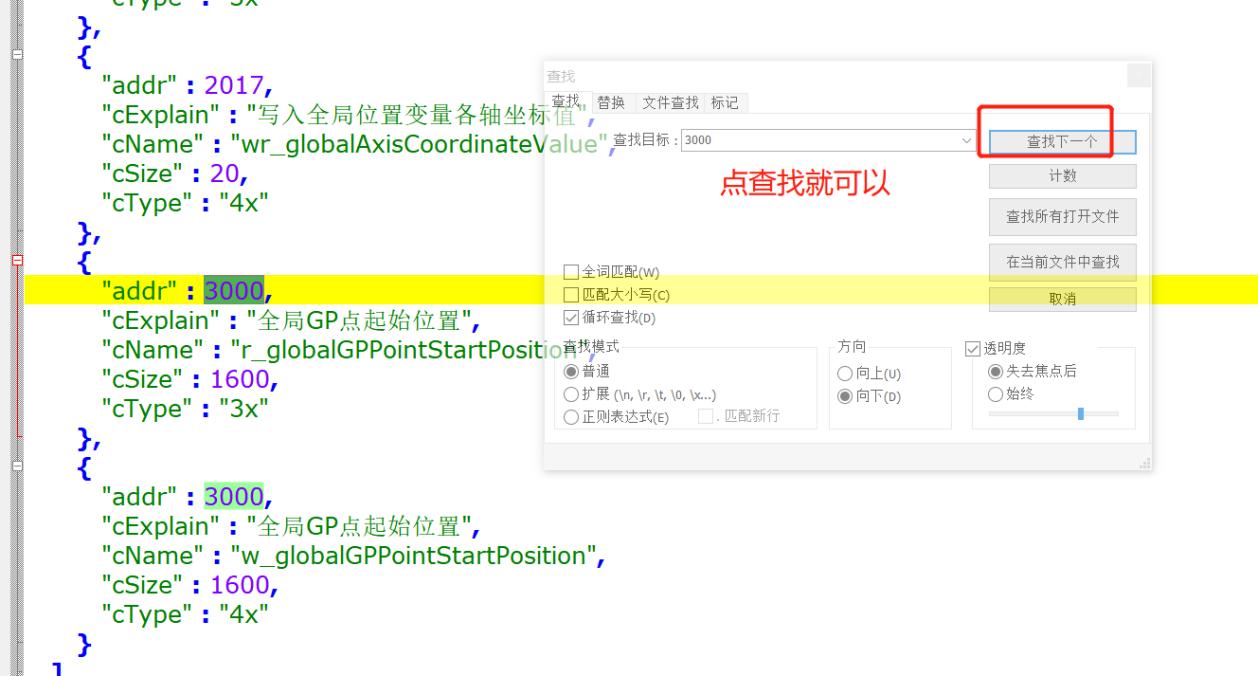
How to find it: Search for the default value 3000 in the file
Original configuration:
{
  "addr": 3000,
  "cExplain": "写入全局位置变量各轴坐标值",
  "cName": "writeGlobalAxisCoordinateValue",
  "cSize": 20,
  "cType": "4x"
},
{
  "addr": 3000,
  "cExplain": "全局GP点起始位置",
  "cName": "globalGPPointStartPosition",
  "cSize": 1600,
  "cType": "3x"
},
{
  "addr": 3000,
  "cExplain": "全局GP点起始位置",
  "cName": "globalGPPointStartPosition",
  "cSize": 1600,
  "cType": "4x"
}
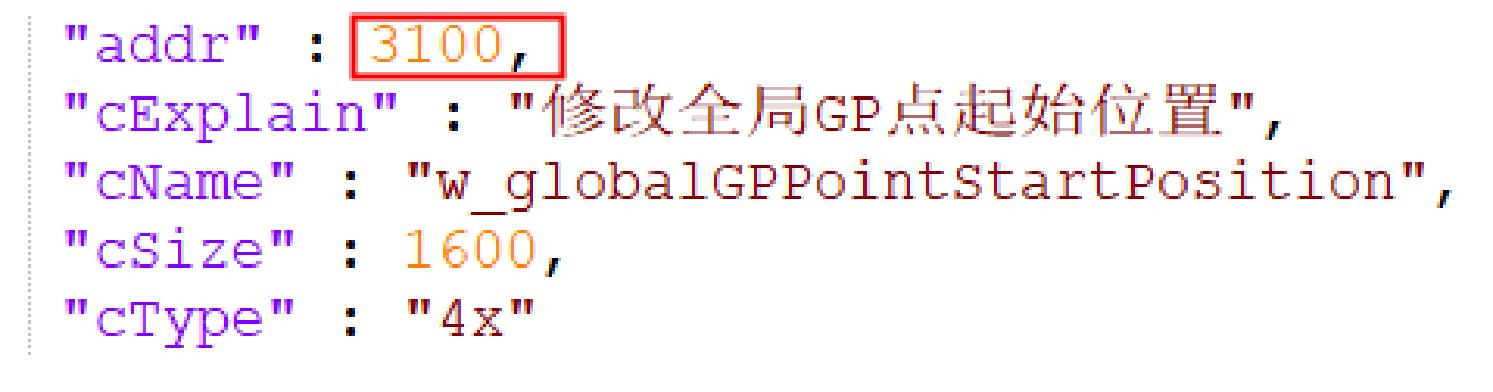
Changing to start from address code 3100:
Important: Change every value that is 3000, up to a maximum of 3400. Important things are said three times.
Modified configuration:
{
  "addr": 3100,    ← Changed to 3100
  "cExplain": "修改全局G点起始位置",
  "cName": "globalGPPointStartPosition",
  "cSize": 1600,
  "cType": "4x"
}
Modification steps:
Press [Ctrl+F] in the text editor to open the find function
Enter the search target:
3000Click [Find Next] or [Find All]
Replace all found 3000 values with 3100
Save the file
3.3 System Restart Requirements
After modifying the global variable positions, the system must be power-cycled and restarted for the configuration to take effect.
Restart steps:
Save the configuration file
Import the configuration into the controller
Wait for the system automatic restart to complete
Power off and restart the teach pendant and system again
Confirm the configuration has taken effect
4. Configuration Precautions
4.1 File Modification Precautions
| Precaution | Description |
|---|---|
| Back up the original file | It is recommended to back up the original configuration file before modification |
| Use a text editor | Notepad++ or other professional text editors are recommended |
| Correct JSON format | Ensure the modified JSON format is correct to avoid syntax errors |
| Round numbers | Try to use round numbers (multiples of ten or hundred) for the starting variable name, which is easier to remember and manage |
| No address conflicts | Ensure the modified addresses do not conflict with other function addresses |
4.2 Import/Export Precautions
| Precaution | Description |
|---|---|
| USB drive format | A FAT32-formatted USB drive is recommended |
| File integrity | Ensure the exported configuration files are complete and not missing |
| Select the correct file | When importing, select only the configuration file to be modified |
| Wait for completion | Do not power off or unplug the USB drive during the import |
| Restart order | First wait for the system automatic restart, then manually power off and restart |
4.3 Address Allocation Precautions
| Precaution | Description |
|---|---|
| Address range | The starting address must be within the valid range |
| Address conflicts | Avoid conflicts with other function addresses |
| Address increment | The address codes after it increment |
| Axis number matching | The address occupation is calculated according to the actual number of axes |
| Address reservation | Reserve enough address space for other functions |
5. Configuration Examples
5.1 Example of Starting Configuration from GP200
If the global point variables need to start from GP200, the configuration is as follows:
{
  "config": {
    "coexistControl": false,
    "modbusPriorityHigh": false,
    "startGPPointName": "GP200"
  },
  "controllerID": "F12E256448FD2AB8",
  "modbusAddr": {
    "addr": 1,
    "cExplain": "表示与控制连接的状态",
    "cName": "controllerConnectState",
    "cSize": 1,
    "cType": "3x"
  }
}
5.2 Example of Address 3200 Configuration
If the Modbus starting address needs to be set to 3200, the configuration is as follows:
{
  "addr": 3200,
  "cExplain": "修改全局G点起始位置",
  "cName": "globalGPPointStartPosition",
  "cSize": 1600,
  "cType": "4x"
}Verification:
Starting address + 1600 = 3200 + 1600 = 4800 ≤ 5000 ✓ Usable6. FAQ
6.1 The System Cannot Start After Configuration
Possible causes:
- Incorrect JSON file format
- Address range exceeds the limit
- Incomplete file
Solutions:
- Check whether the JSON format is correct
- Confirm the address range is within the valid range
- Restore the backed-up configuration file
6.2 Address Conflicts After Modification
Possible causes:
- The starting address overlaps with other function addresses
- Incorrect address range calculation
Solutions:
- Check the address mapping table
- Adjust the starting address
- Recalculate the address range
6.3 Configuration Import Failure
Possible causes:
- Incompatible USB drive format
- Incorrect file path
- Corrupted file
Solutions:
- Use a FAT32-formatted USB drive
- Confirm the file path is correct
- Re-export the configuration file
Q&A
Q: How many addresses does each global position variable point occupy?
A: Each global position variable point occupies 16 addresses: the coordinate system occupies 1 address, the pose occupies 1 address, and the coordinate values total 7 axes, with each axis occupying 2 addresses, arranged in sequence.
Q: How many addresses do global position variables occupy for different numbers of axes?
A: 7 axes occupy 16 addresses, 6 axes occupy 14, and so on; 4 axes occupy 10. The calculation formula is: total number of addresses = 1 (coordinate system) + 1 (pose) + number of axes × 2 (each axis occupies 2 addresses).
Q: How do I modify the starting variable name of the global position variables?
A: After exporting the controller configuration, find the modbusAddr.json file in the folder starting with configFile, open it with Notepad or Notepad++, change the value of startGPPointName from the default "GP001" to the desired variable name (such as "GP100"), save it, and then import the configuration.
Q: What are the prerequisites for modifying the starting variable name of the global position variables?
A: A USB drive needs to be inserted into the teach pendant, and the configuration file must be exported via [Settings] - [System Settings] - [Export Controller Configuration], then the modbusAddr.json file must be modified.
Q: How do I import the configuration after modifying the starting variable name of the global position variables?
A: Insert the USB drive into the teach pendant, click [Settings] - [System Settings] - [Import Controller Configuration], and in the pop-up file selection screen, select only the modbusAddr.json file, then click [OK] to start the import.
Q: Will the system restart automatically after modifying the global position variable configuration?
A: Yes, the system restarts automatically after modification. After waiting for it to complete, the teach pendant and system need to be powered off and restarted again.
Q: What is the default starting address for Modbus read/write?
A: The default starting address for Modbus read/write is 3000.
Q: What are the requirements for modifying the Modbus starting address?
A: The modified read/write starting address must be greater than 3000 to avoid conflicts with other address codes; the maximum starting address is 3400, and starting address plus 1600 cannot be greater than 5000, otherwise it will become unusable.
Q: How do I modify the Modbus starting address?
A: In the modbusAddr.json file, change all values with addr 3000 to the desired starting address (such as 3100), save the file, and then import the configuration.
Q: What needs to be done after modifying the Modbus starting address?
A: After modifying the global variable positions, the system must be power-cycled and restarted.
Q: Is starting address 3100 usable?
A: Yes, starting address 3100 is usable because 3100 + 1600 = 4700 ≤ 5000.
Q: Is starting address 3500 usable?
A: No, it is not usable because 3500 + 1600 = 5100 > 5000, which exceeds the address range limit.
Q: What tool is recommended for modifying the configuration file?
A: It is recommended to open the modbusAddr.json file with a text editor such as Notepad or Notepad++.
Q: What value is recommended when modifying the starting variable name?
A: It is recommended to use round numbers (multiples of ten or hundred) for debugging, which is easier to remember and manage.
Q: What should be noted when modifying the configuration file?
A: Note that the original file should be backed up, the JSON format must be correct to avoid syntax errors, and the modified addresses must not conflict with other function addresses.
Q: If the starting variable name is changed to GP200, how do the address codes after it increment?
A: If the starting variable name is changed to GP200, the address codes after it increment by 100.
Q: Which files need to be selected when importing the configuration?
A: When importing the configuration, in the MODBUS parameter configuration option, only the modbusAddr.json file needs to be selected.
Q: Why must the system be power-cycled and restarted after modifying the configuration?
A: After modifying the configuration, the system must be power-cycled and restarted to make the new configuration take effect.
Q: What should I do if the system cannot start after configuration?
A: If the system cannot start after configuration, it may be due to an incorrect JSON file format, an address range exceeding the limit, or an incomplete file. You can check the JSON format, confirm the address range, and restore the backed-up configuration file.
Q: What should I do if there are address conflicts after modification?
A: If there are address conflicts after modification, the starting address may overlap with other function addresses or the address range calculation may be wrong. You can check the address mapping table, adjust the starting address, and recalculate the address range.
Q: What are the requirements for the USB drive format?
A: A FAT32-formatted USB drive is recommended.
Q: Can the power be turned off or the USB drive unplugged during the import?
A: No. Do not power off or unplug the USB drive during the import; wait for the import to complete before operating.
Q: How do I find the default address values in the modbusAddr.json file?
A: Press [Ctrl+F] in the text editor to open the find function, enter the search target "3000", and click [Find Next] or [Find All] to find all default address values.
Q: How many times are important things said?
A: Important things are said three times: change every value that is 3000, up to a maximum of 3400.
Q: Can the starting address be set to 3000?
A: Yes, 3000 is the default starting address. 3000 + 1600 = 4600 ≤ 5000, so it is usable.
Q: Can the starting address be set to 3400?
A: Yes, 3400 is the maximum starting address. 3400 + 1600 = 5000 ≤ 5000, so it is usable.
Q: How many addresses does the coordinate system occupy?
A: The coordinate system occupies 1 address.
Q: How many addresses does the pose occupy?
A: The pose occupies 1 address.
Q: How many addresses does each axis coordinate value occupy?
A: Each axis coordinate value occupies 2 addresses.
Q: What is the path for exporting the controller configuration?
A: The path for exporting the controller configuration is: insert a USB drive into the teach pendant → click [Settings] - [System Settings] - [Export Controller Configuration].
Q: In which folder are the exported configuration files?
A: The exported configuration files are in the folder starting with configFile.
Q: Which configuration file needs to be modified?
A: The modbusAddr.json file in the configFile folder needs to be modified.
Q: How do I save the file after modification?
A: After modification, save the file in the text editor.
Q: Does the system need to be restarted when importing the configuration?
A: Yes, the system restarts automatically after importing the configuration. After waiting for it to complete, the teach pendant and system need to be powered off and restarted again.
Q: How do I verify whether the configuration has taken effect after configuration?
A: After configuration, power-cycle and restart the system, then check whether the global position variables start from the configured starting variable name to verify.