Special Process
1 Usage Steps
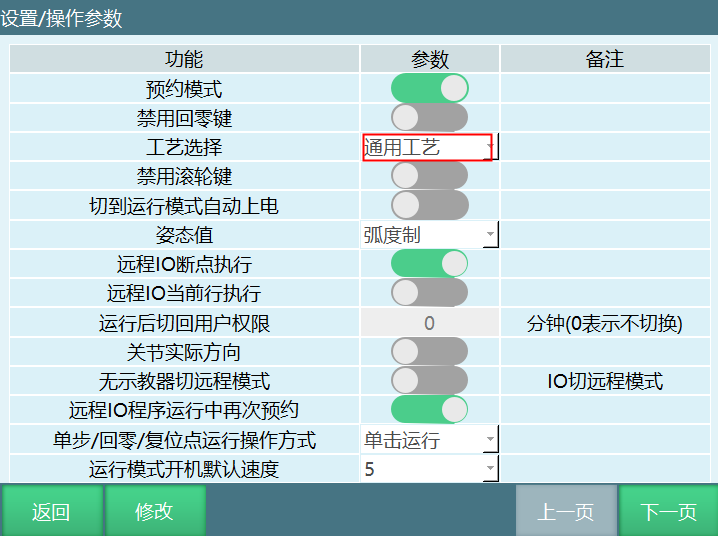
1.1 Click Settings - Operation Parameters, enter the Operation Parameters interface, and select General Process for process selection. The interface is shown below:
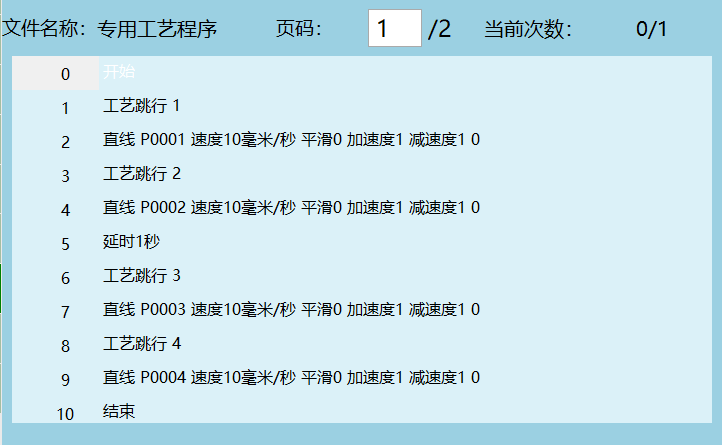
1.2 Write job files in General Process mode, as shown:
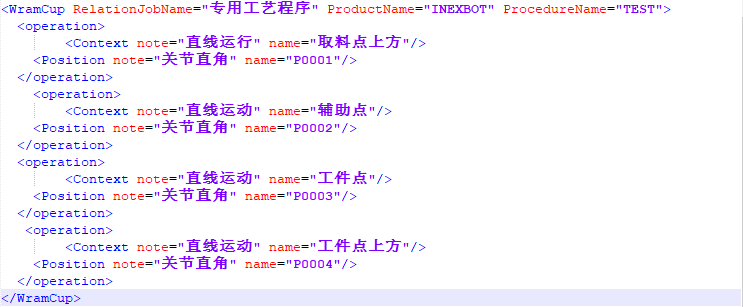
1.3. Write the XML file, modify parameters and save;
The following example is for illustration only and has no actual meaning:
1.4. Switch the process selection in the Operation Parameters interface to Special Process.
1.5. Click Process - Special Process - Import (import XML file; the XML file must be placed in the importxml folder on the USB drive), select the file to import, and click "OK" (the XML file only stores point positions — which point is referenced, e.g., P0001, not the actual position values; the actual position values are stored by program instructions).
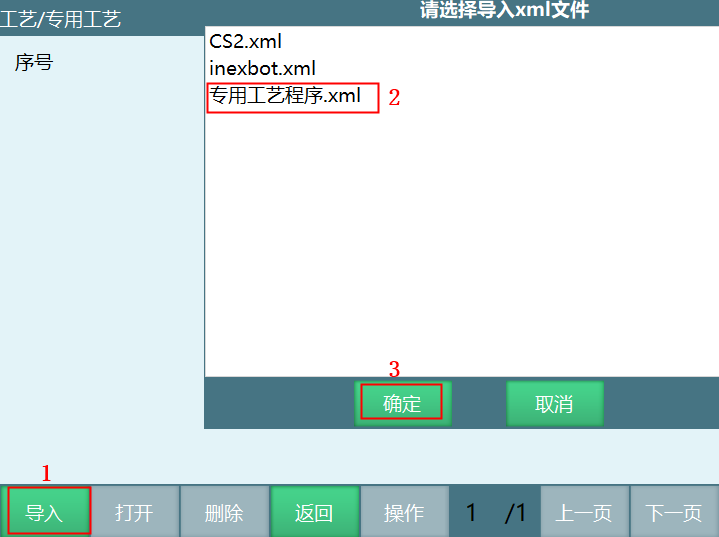
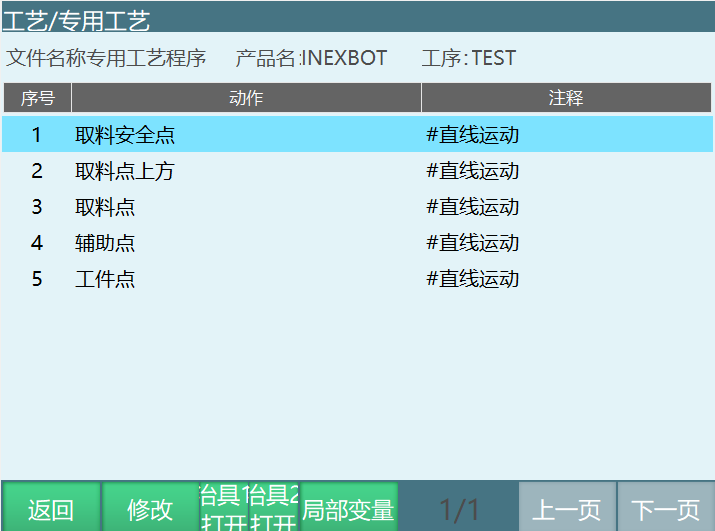
1.6. After the job file is successfully imported, open the imported job file as shown below:
2 Interface Description
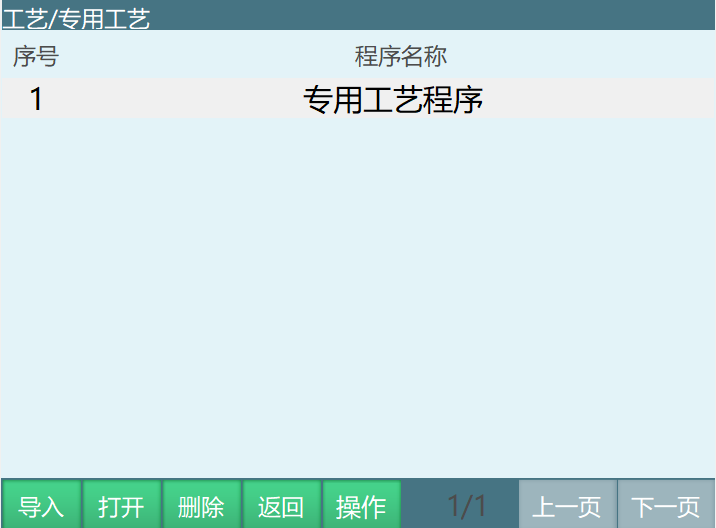
2.1 Import
Import XML file. The file format will be introduced later in this manual.
2.2 Open
Open the imported file, as shown below:
Return: Exit the current interface.
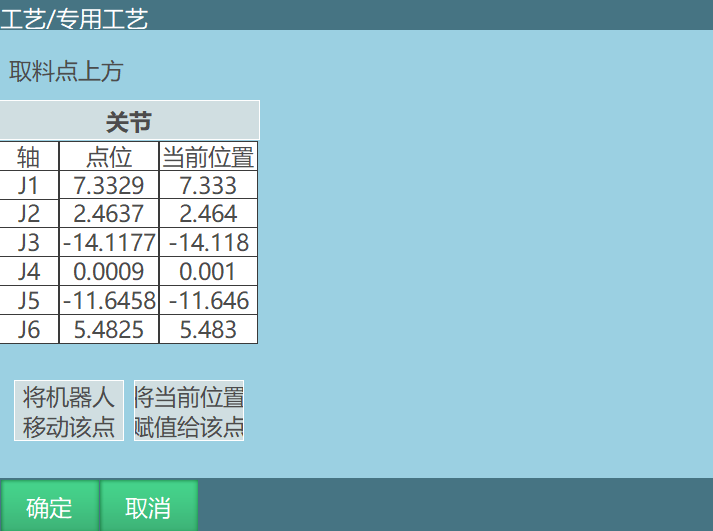
Modify: Modify the defined position variable point. When the robot is moved to the target position, click [Assign Current Position to This Point] to successfully modify the point.
Fixture 1 Open: Controls global variable GB005. Pressing the Fixture 1 Open button sets GB005=1, releasing sets GB005=0.
Fixture 2 Open: Controls global variable GB006. Pressing the Fixture 2 Open button sets GB006=1, releasing sets GB006=0.
Local Variables: View the point information of defined local variables. In teach mode, clicking [Local Variables] allows modifying the target position points.
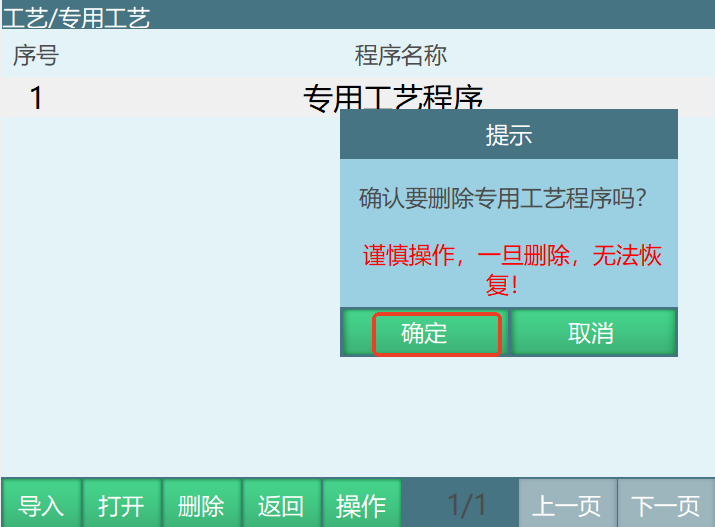
2.3 Delete
Delete the selected special process program. Click [Delete], then click the [OK] button in the prompt dialog to delete the program. As shown:
2.4 Return
Return to the process interface.
2.5 Operation
Click [Operation] to copy and rename the currently selected program.
3 Special Process XML File Format
The figure below shows the XML file format:
| 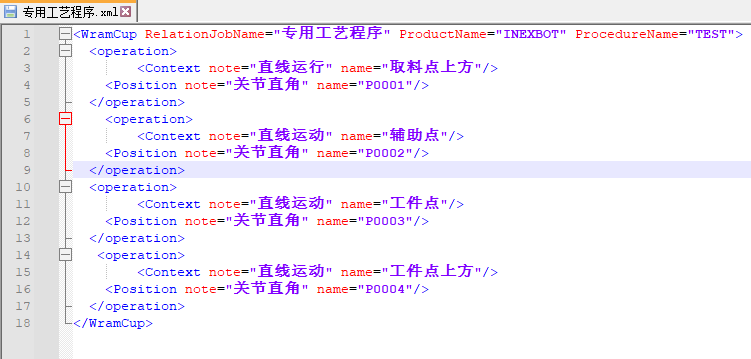
| - The red text parts are user-modifiable sections. When writing, <operation> and </operation> represent one process skip. | - Motion instructions correspond to this type of code.
4 Example Description
4.1 Writing the Program
(1) The program is written in General Mode. Create a new program (the program name must match the program name in the XML file code and the job file name. For example: if the new job name is "Special Process Program", then RelationJobName="Special Process Program" in the XML file).
(2) Open the "Special Process Program" job file and insert process skip instructions as shown below (process skip is only used for program cursor jumping in the special process interface; the actual program execution order follows the sequence in the program).
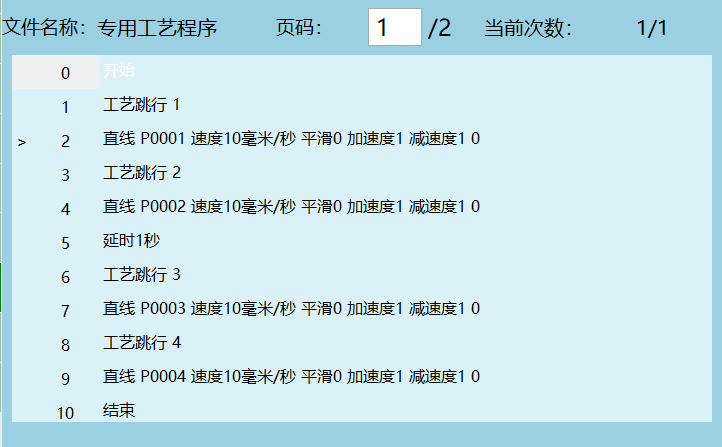
(3) When inserting motion instructions, the selected points should correspond to the points in the XML file.
4.2 Writing the XML File
(1) Create a new XML file and edit/modify it using Notepad++. As shown below:
(2) After importing the XML file, switch the teach pendant from General Process mode to Special Process mode, then click "Project", select the "Special Process Program" job file, switch to Run mode, and click Start to run.
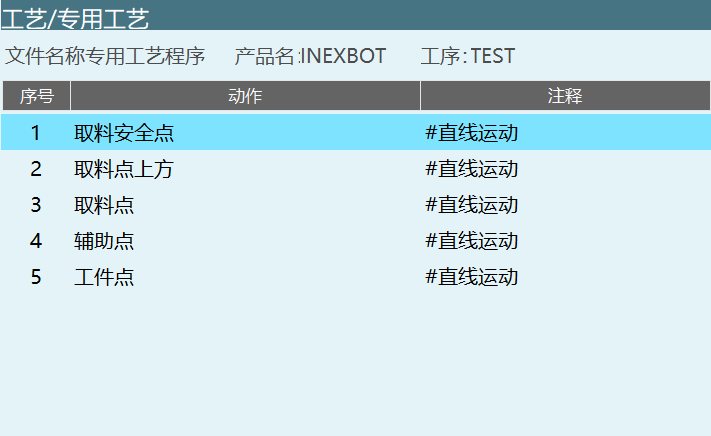
First row: As shown above, the special process program interface displays as sequence number 1.
Corresponds to the first process skip in General Process mode: instructions 1 and 2, robot moves to point P0001 (above the pickup point).
Second row: Displays as sequence number 2.
Corresponds to the second process skip in General Process mode: runs instructions 3 and 4, robot moves to point P0002 (auxiliary point).
Third row: Displays as sequence number 3.
Corresponds to the third process skip in General Process mode: runs instructions 6 and 7, robot moves to point P0003 (workpiece point).
Fourth row: Displays as sequence number 4.
Corresponds to the fourth process skip in General Process mode: runs instructions 7 and 8, robot moves to P0004 (above the workpiece point).
5 Program Execution
Switch the operation mode to Run mode, press the "Start" button on the teach pendant to begin program execution.
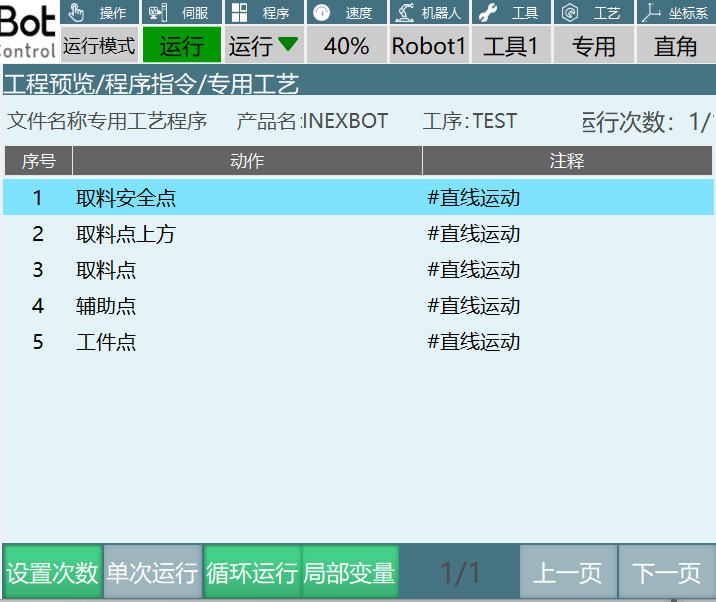 Set Count: The number of times the program runs. After completing the set number of runs, the program stops.
Single Run: The program runs only once.
Loop Run: The program runs in an infinite loop.
Local Variables: During program execution, you can only view target point information and cannot modify points.
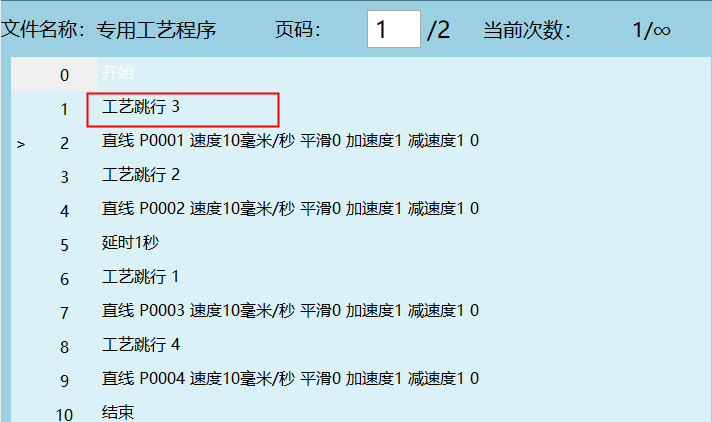
Note: The process skip instruction line numbers correspond to the sequence numbers in the special process program interface. As shown below, the first instruction corresponds to line number 3. When running the special process program, it will first jump to sequence number 3, then jump to the first row to start running the program.
When process skips are not consecutive, single-step execution of the special process program is not possible.
6 Frequently Asked Questions (FAQ)
Q1: What is the difference between Special Process mode and General Process mode?
A1: In General Process mode, users can directly write and edit job files, while Special Process mode configures process parameters and points through importing XML files, making it suitable for standardized and batch production scenarios. In Special Process mode, program execution follows the process skips defined in the XML.
Q2: How to import an XML file?
A2: Place the XML file in the importxml folder on the USB drive, then click the "Import" button in the Special Process interface, select the file and confirm the import. After import, the point information in the XML file will be loaded into the system.
Q3: How to modify points during program execution?
A3: In teach mode, you can use the "Modify" button to assign the robot's current position to the target point. In run mode, you can only view local variables and cannot modify points.
Q4: What is the purpose of the process skip instruction?
A4: Process skip instructions are used to mark program execution sequence points in the special process program interface. During actual execution, the robot follows the instruction order in the program, not strictly by skip sequence numbers.
Q5: What might cause an XML file import failure?
A5: Possible causes include XML file format errors, incorrect file path (must be in the importxml folder on the USB drive), program name mismatch (RelationJobName in XML must match the job file name), or system permission issues. Please check the file format and path before re-importing.
Q6: Can the special process program be run in single-step mode?
A6: If process skips are not consecutive, the special process program cannot be run in single-step mode. Ensure process skip instructions are arranged consecutively to support single-step debugging.
Q7: How to delete an imported special process program?
A7: Select the program to delete in the Special Process interface, click the "Delete" button, then confirm the deletion in the prompt dialog. After deletion, the program will be removed from the system.
Q8: What is the role of global variables in Special Process?
A8: Global variables such as GB005 and GB006 are used to control external devices, such as fixture switches. In the Special Process interface, pressing the corresponding buttons sets the variable value to 1 (open) or 0 (closed) for controlling external IO.
Q9: How to set the program run count?
A9: In Run mode, you can set "Set Count" (specify run count), "Single Run", or "Loop Run" (infinite loop). The program will automatically stop after completing the specified number of runs.
Q10: What should I do if the robot cannot reach the target point?
A10: Check if the point coordinates are correct; you can re-teach points in teach mode. Ensure the robot safety zone settings are correct to avoid collisions. Contact technical support for debugging if necessary.