Multi-Machine Mode and Dual-Robot Collaboration
Multi-Machine Mode
Multi-machine mode refers to controlling multiple robots through a single teach pendant. This product supports controlling up to 4 robots simultaneously.
Multi-Machine Mode Slave Connection
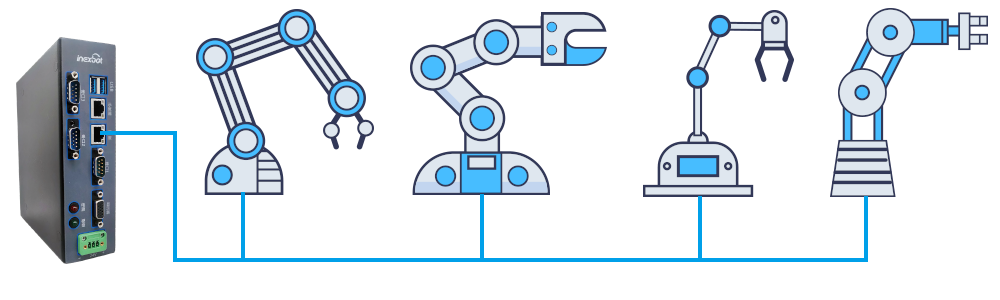
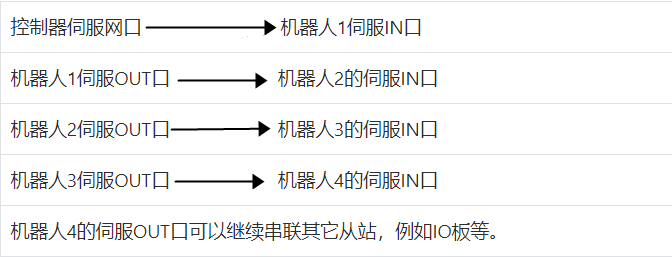

When connecting slaves in series, use Ethernet cables for direct connection. Do not use a switch (using a switch may cause the robot to run away)!
Multi-Machine Mode Robot Configuration
Switch user permissions to "Manufacturer".
Click "Settings - Robot Parameters - Slave Configuration" to enter the configuration interface, as shown in Figure 1-1; click [Robot] to enter the robot configuration interface, as shown in Figure 1-2.
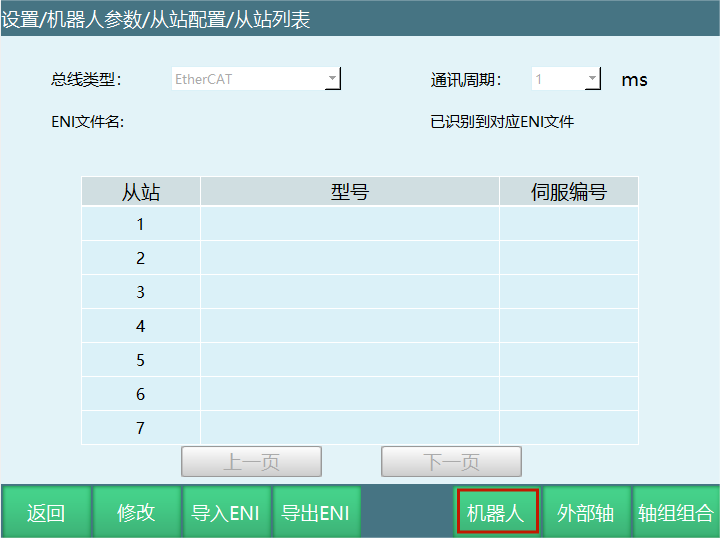
Figure 1-1
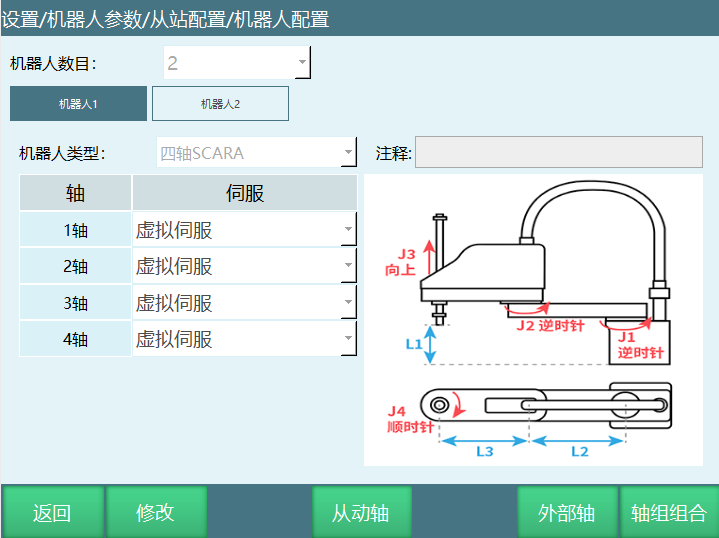
Figure 1-2
- Click [Modify] to set the number of robots, up to 4 robots can be set. After selecting the number, you need to set the model of each robot and its corresponding servo model, then click [Save].
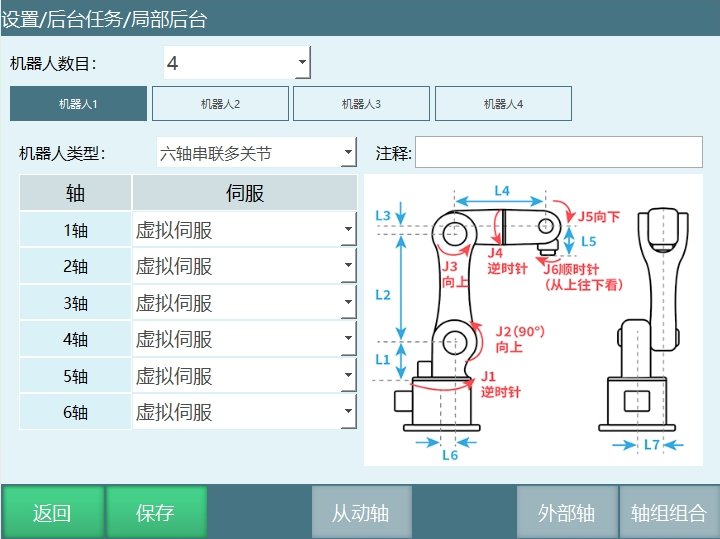
- Click [OK] in the prompt box to restart the system.
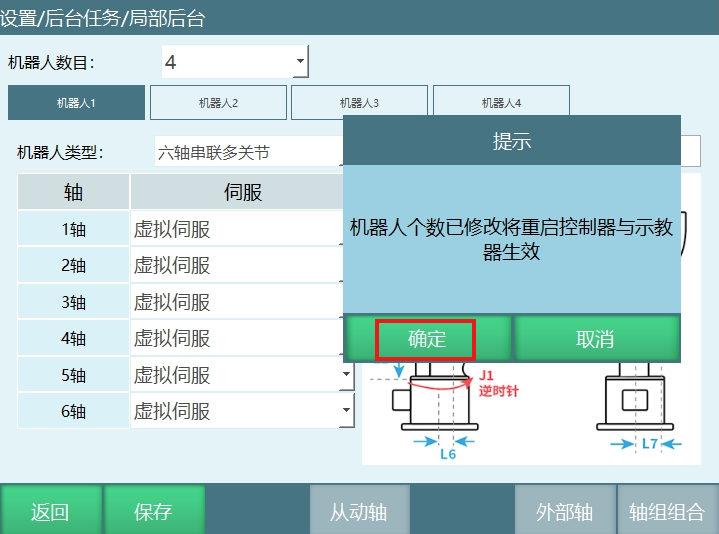
- After restarting the system, the robot count modification is successful. After restart, the order of slaves is determined by the sequence of connections between the controller and the robots.
Multi-Machine Mode Import Configuration
Import configuration according to the robot type set in the robot configuration interface.
For example: Robot 1 and Robot 2 are 6-axis serial multi-joint, Robot 3 and Robot 4 are 4-axis SCARA robots.
Import configuration steps:
Create a new folder (configFile folder).
Copy the 6-axis serial multi-joint configuration file Robot_A.json for Robot 1 to this folder; copy the 6-axis serial multi-joint configuration file Robot_A.json for Robot 2 to this folder and rename it to Robot_B.json; copy the SCARA robot configuration file Robot_A.json for Robot 3 to this folder and rename it to Robot_C.json; copy the SCARA robot configuration file Robot_A.json for Robot 4 to this folder and rename it to Robot_D.json.
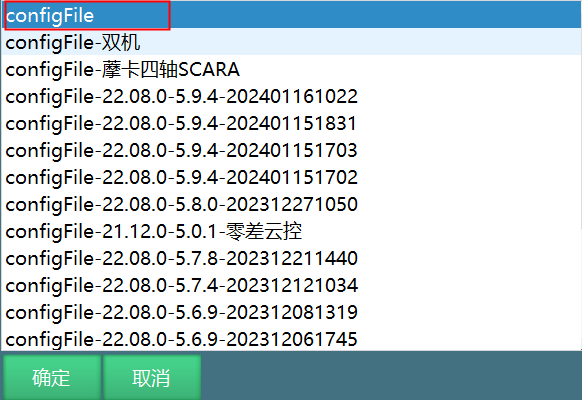
Insert the USB drive into the teach pendant's USB port, click Settings - System Settings - Import Controller Configuration, select the configuration folder, and click [OK]. The operation is shown below.
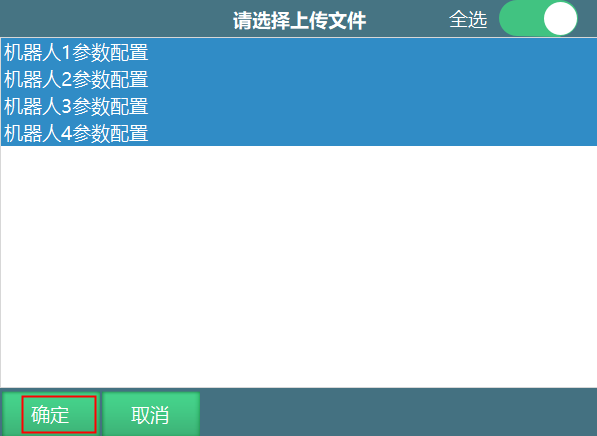
- After selecting the 4 parameter configuration files, click [OK]. After the configuration files are uploaded successfully, restart the controller.
- After restart, check the robot joint parameters to verify if the DH parameters were imported successfully. After successful import, you can operate the robot.
The configuration file must correspond to the robot's configuration!
Multi-Machine Mode Insert Instructions
Operating steps:
Under "Administrator" or "Manufacturer" permissions, click "Project" on the left side of the teach pendant.
Click [New] and enter the job file name.
Open the newly created job file, click [Insert] in the program instruction interface to insert the required instructions.
Instructions for inserting instructions for Robot 2, Robot 3, Robot 4:
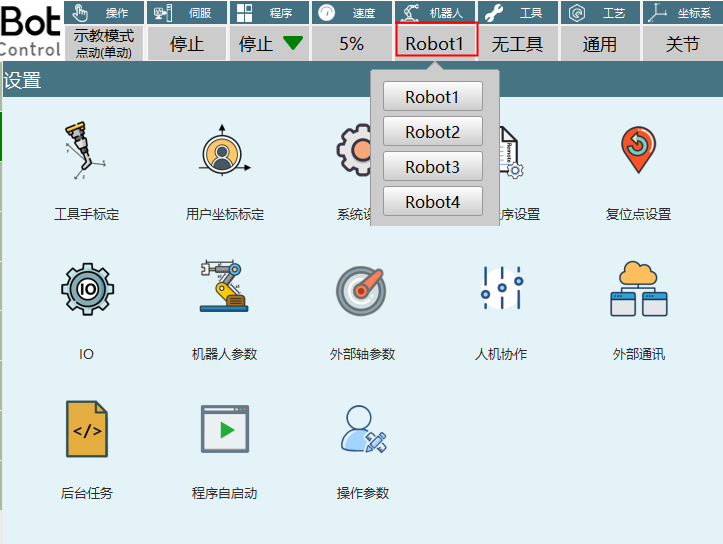
In teach mode, switch robots. You can switch robots in the status bar or through the [Robot] button on the teach pendant.
Click "Robot" at the top of the teach pendant. If you need to insert instructions for Robot 2, click Robot2; for Robot 3, click Robot3; for Robot 4, click Robot4.
After successfully switching robots, the steps for inserting instructions are the same as described above. The following figure shows the operation interface.
| 
- When the mode selection key is in the "Teach Mode" position, pressing the [Robot] button allows switching between robots for individual teaching. The "Robot" column in the upper status bar will display the current robot number, for example: when switching to Robot 3, the status bar will display "Robot3". Job files are not shared between robots; switching robots also switches the job file.
Multi-Machine Mode Run Program
After job file programming is complete, first run instructions step-by-step in teach mode. After confirming the program has no issues, switch to run mode to run the program. Click the "Robotall" button to enter the multi-machine mode robot program running interface, as shown below:
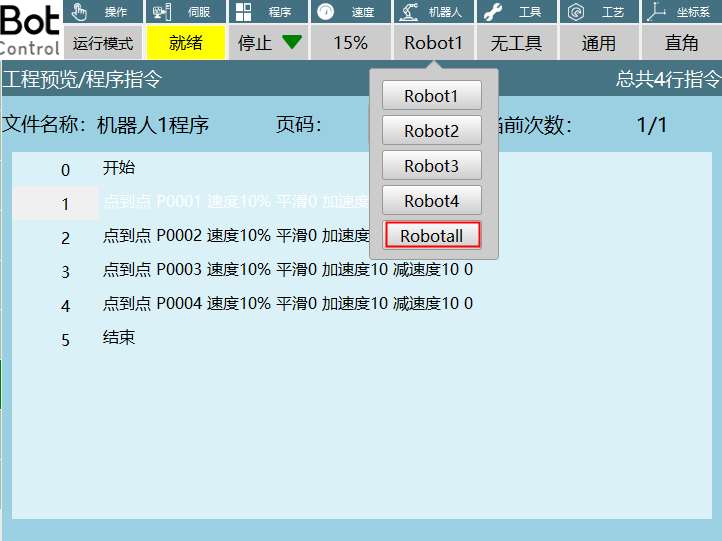
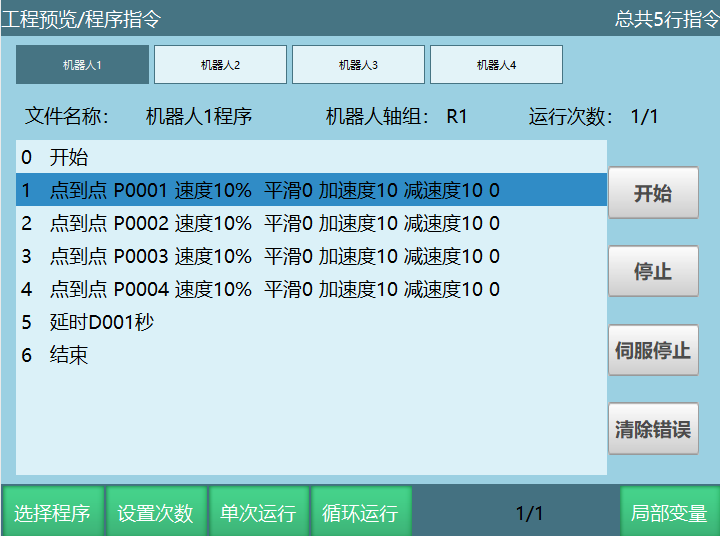
To start all four robots simultaneously, press the [Start] key on the teach pendant. To pause all four robots simultaneously, press the [Stop] key on the teach pendant.
Start: Individually start the current robot's program. To start other robot programs, click the corresponding robot number (Robot 1, Robot 2, Robot 3, Robot 4), switch to the selected robot's program interface, then click "Start".
Stop: Click "Stop" to pause the current program. To stop other robot programs, click the corresponding robot number (Robot 1, Robot 2, Robot 3, Robot 4), switch to the selected robot's program interface, then click "Stop".
Servo Stop: Switch servo state (Ready, Stop). To switch other robot servo states, click the corresponding robot number (Robot 1, Robot 2, Robot 3, Robot 4), switch to the selected robot's program interface, then click "Servo Stop".
Clear Error: When an error occurs during program execution, click "Clear Error" to clear the error so the program can continue running. To clear errors for other robots, click the corresponding robot number (Robot 1, Robot 2, Robot 3, Robot 4), switch to the selected robot's program interface, then click "Clear Error".
Select Program: Select a different program for the current robot. To select programs for other robots, click the corresponding robot number (Robot 1, Robot 2, Robot 3, Robot 4), switch to the selected robot's program interface, then click "Select Program".
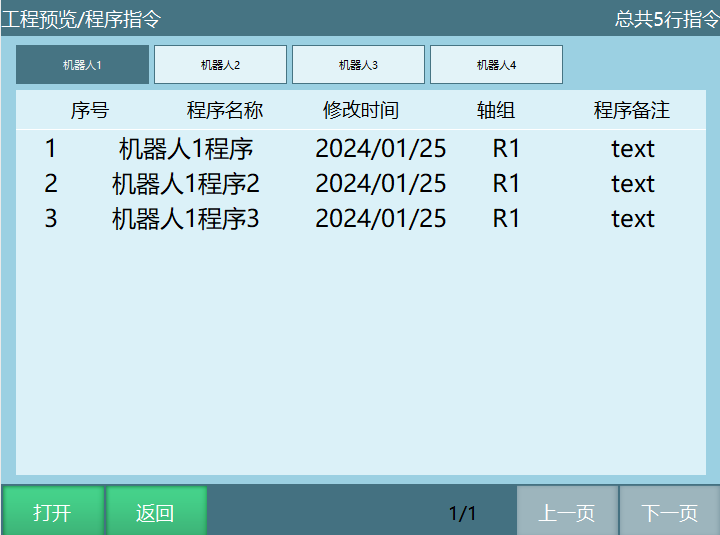
Set Count: Set the run count for the current program. After running the specified number of times, the program stops. To set run counts for other robot programs, click the corresponding robot number (Robot 1, Robot 2, Robot 3, Robot 4), switch to the selected robot's program interface, then click "Set Count".
Single Run: The current program runs only once. To set other robot programs, click the corresponding robot number (Robot 1, Robot 2, Robot 3, Robot 4), switch to the selected robot's program interface, then click "Single Run".
Loop Run: The current program runs in an infinite loop. To set other robot programs, click the corresponding robot number (Robot 1, Robot 2, Robot 3, Robot 4), switch to the selected robot's program interface, then click "Loop Run".
Local Variables: Click "Local Variables" to view the current program's position variables and numeric variables. To view local variables for other robots, click the corresponding robot number (Robot 1, Robot 2, Robot 3, Robot 4), switch to the selected robot's program interface, then click "Local Variables".
Dual-Robot Collaboration
Dual-robot collaboration must use two 6-axis serial multi-joint robots.
Dual-Robot Mode Slave Connection
Controller servo port Robot 1 servo IN port
Robot 1 servo OUT port Robot 2 servo IN port
Robot 2 servo OUT port can be connected to other slaves in series
When connecting slaves in series, use Ethernet cables for direct connection. Do not use a switch (using a switch may cause the robot to run away)!
Dual-Robot Mode Robot Configuration
Switch user permissions to "Manufacturer".
Click "Settings - Robot Parameters - Slave Configuration" to enter the configuration interface, as shown in Figure 2-1. Click [Robot] to enter the robot configuration interface, as shown in Figure 2-2.
Figure 2-1
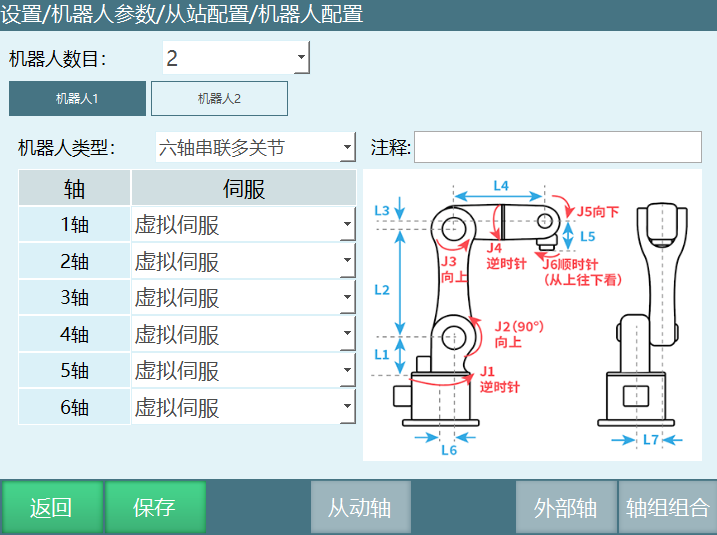
Figure 2-2
- Click [Modify] to set 2 robots. Select 6-axis serial multi-joint for robot type. Set the servo model corresponding to each axis, click [Save], then click [OK] in the prompt box to restart the system.
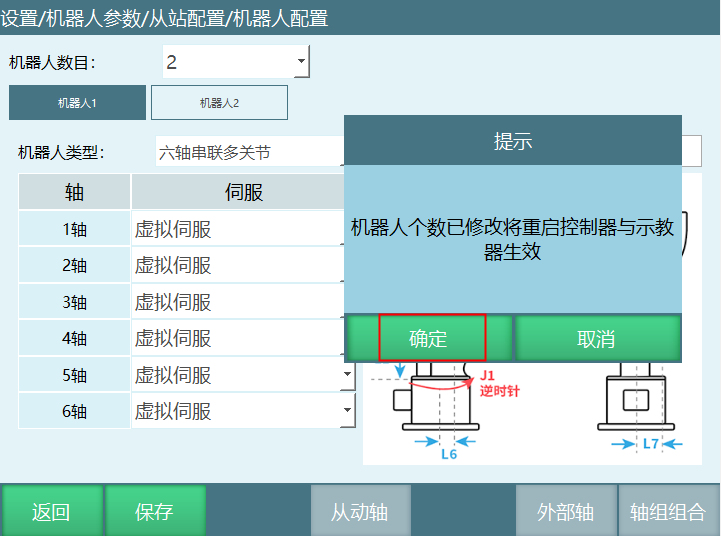
After restarting the system, the robot count modification is successful.
Click Settings - Robot Parameters - Motion Parameters, turn on the "Enable Dual-Robot Synchronous Mode" switch. Turning on the switch completes the dual-robot mode setup.
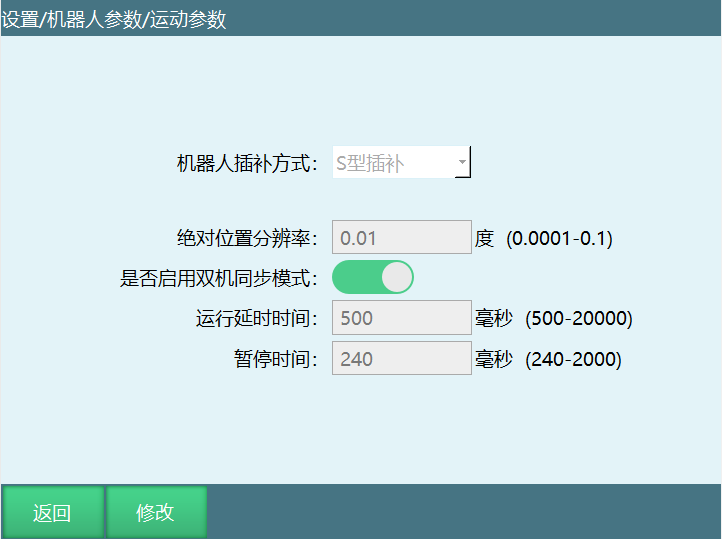
Note:

Turning off the dual-robot collaboration button requires restarting the controller system; turning it on does not require a restart.
When the robot count exceeds 2, dual-robot collaboration will be automatically disabled on restart.
Dual-robot mode cannot be used simultaneously with multi-machine mode.
Dual-robot mode and external axes cannot be used simultaneously.
Dual-Robot Mode Import Configuration
Import configuration steps:
Create a new folder (configFile folder).
Copy the 6-axis serial multi-joint configuration file Robot_A.json for Robot 1 to this folder; copy the 6-axis serial multi-joint configuration file Robot_A.json for Robot 2 to this folder and rename it to Robot_B.json.
Insert the USB drive into the teach pendant's USB port, click Settings - System Settings - Import Controller Configuration, select the configuration folder, and click [OK].
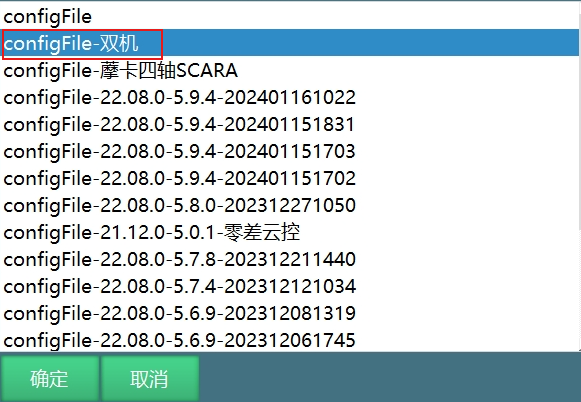
- After selecting the 2 parameter configuration files, click [OK]. After the configuration files are uploaded successfully, restart the controller.
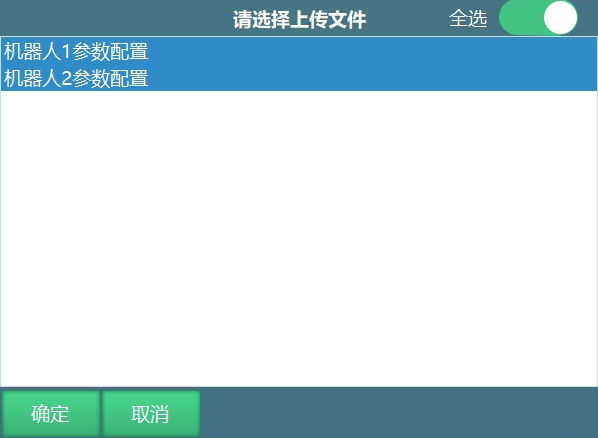
- After restart, check the robot joint parameters to verify if the DH parameters were imported successfully. After successful import, you can operate the robot.
Dual-Robot Mode Insert Instructions
Dual-robot working mode: Dual-robot collaboration is performed by two 6-axis serial robots working together. Throughout the entire working process, the robots coordinate with each other to complete the final task objective.
For dual-robot instruction introduction, please refer to the instruction manual chapter: Motion Control.
Question: How to teach point positions after inserting dual-robot instructions?
Answer:
Insert dual-robot instructions in Robot 1's instruction interface;
Jog Robot 1 to the target position;
Switch to Robot 2, jog Robot 2 to the target position;
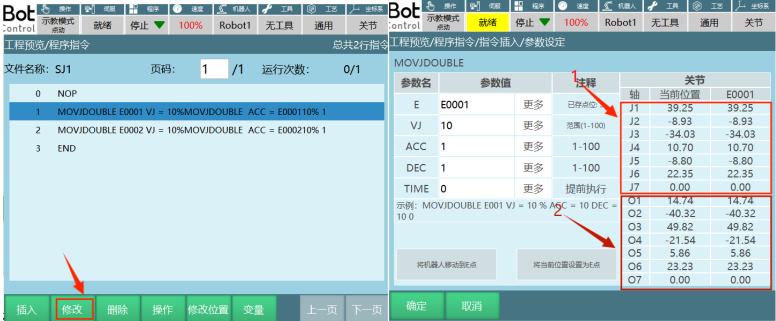
In Robot 1's program instruction interface, select the instruction to modify and click [Modify], then in the parameter definition interface click [Set Current Position as E Point]. A prompt box will appear saying "Continue modifying point position?" Click [OK] to save the current position to the target variable, or click [Cancel] to not record the robot's current position to the target variable, allowing you to continue moving the robot to the desired position.
Note: Dual-robot point-to-point, dual-robot linear, dual-robot arc, and dual-robot full circle instructions only support insertion in Robot 1.
In the figure below, Part 1 shows Robot 1's current position and the position stored in the variable, and Part 2 shows Robot 2's current position and the position stored in the variable.
Dual-Robot Mode Run Program
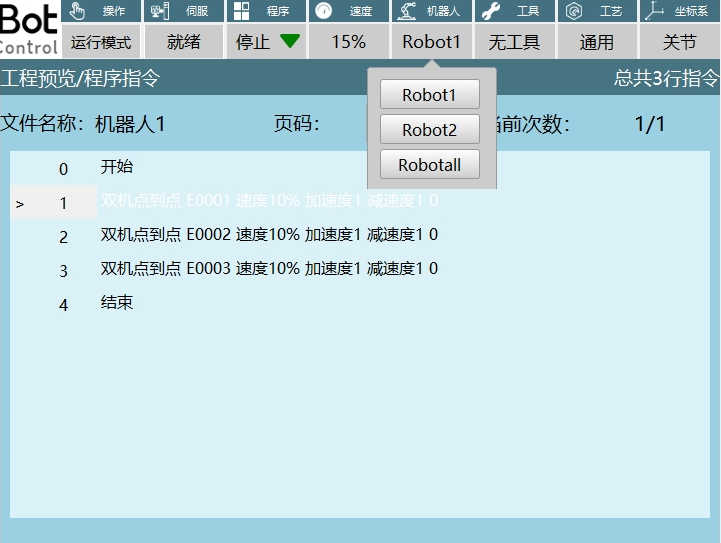
After job file programming is complete, first run instructions step-by-step in teach mode. After confirming the program has no issues, switch to run mode to run the program. Click "Robotall" to enter the multi-machine mode robot program running interface, as shown below:
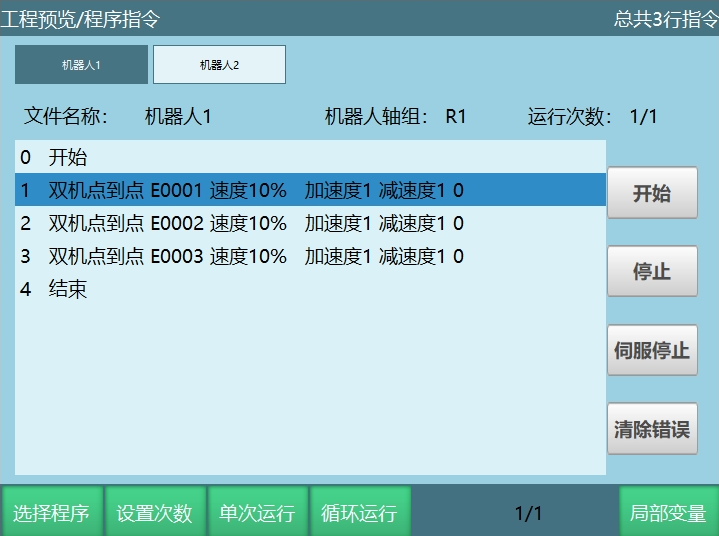
To start both robots simultaneously, press [Start] on the teach pendant.
To pause both robots simultaneously, press [Stop] on the teach pendant.
To individually start Robot 1, click [Robot 1], then click [Start] as shown in the figure. Robot 1 starts working. Click [Stop] to pause Robot 1.
To individually start Robot 2, first click [Robot 2], then click [Start]. Robot 2 starts working. Click [Stop] to pause Robot 2.
For descriptions of other parameters, refer to Multi-Machine Mode Run Program.
Copy Parameters
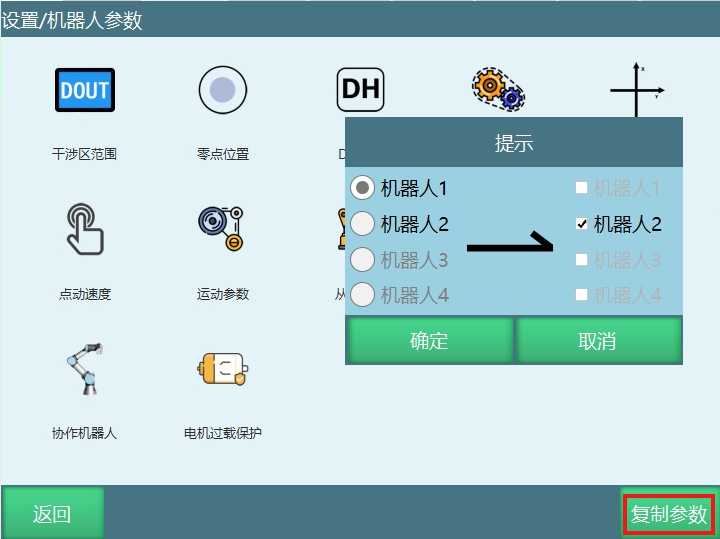
Function: Copy the current robot's parameters to other robots. Click Copy Parameters, select the source robot and destination robot, then click [OK] in the prompt box to copy parameters successfully.
Precautions:
Copy Parameters does not include: robot home position, slave configuration, NP parameters, servo parameters, collaborative robot parameters.
The Copy Parameters function can only be used when the robot count is greater than 1.
Copy Parameters cannot select the current robot. For example, Robot 1's parameters can only be copied to Robot 2, Robot 3, or Robot 4.
AI Retrieval Q&A (Q&A for Retrieval)
Q: Can multi-machine job files be shared between robots?
A: No, they are not shared. Job files switch synchronously when switching robots.
Q: How to start multiple robots simultaneously?
A: Switch to the Robotall interface and press the [Start] key on the teach pendant.
Q3: Can external axes be used simultaneously in dual-robot mode?
A: No, dual-robot mode and external axes cannot be used simultaneously.
Q4: Can external axes be used simultaneously in dual-robot mode?
A: No, dual-robot mode and external axes cannot be used simultaneously.