Data Upload Tutorial
The data upload function can automatically collect and upload the current robot operating status and parameters at timed intervals, integrating data into csv or txt files and uploading them to a specified server.
Environment Preparation
- Install an FTP server
- Log in to the FTP server
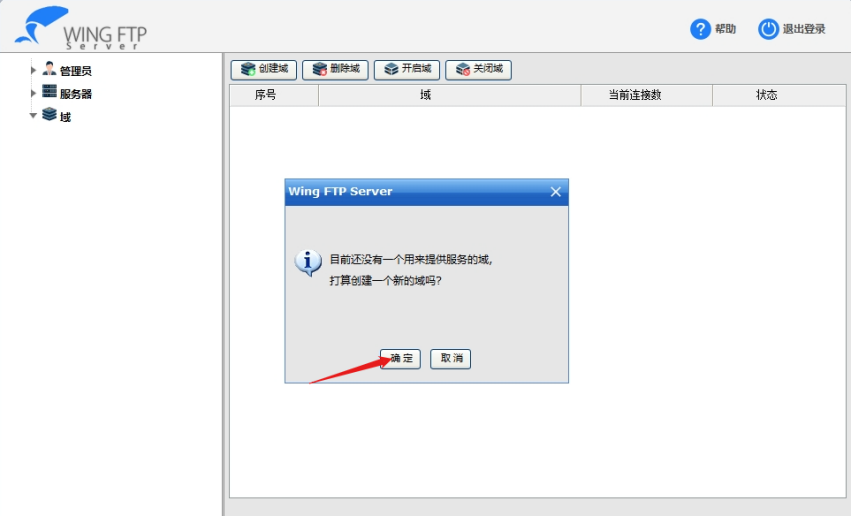
- Create a domain
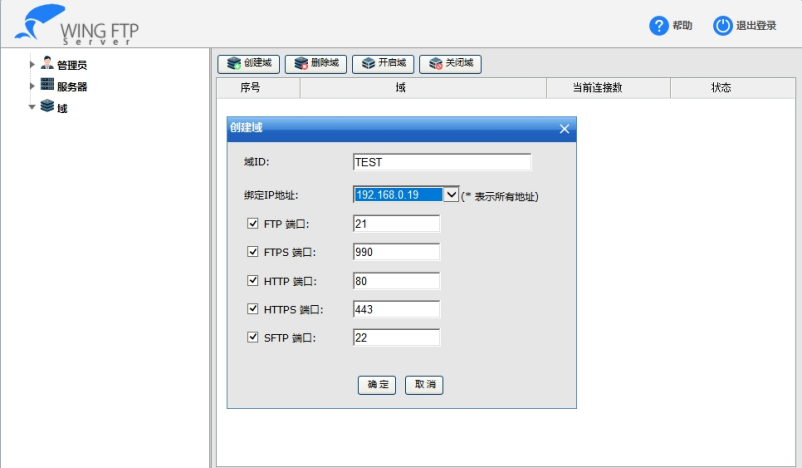
Domain ID: Created by the user.
Bound IP address: Local IPv4 address. Select and click OK.
Create User
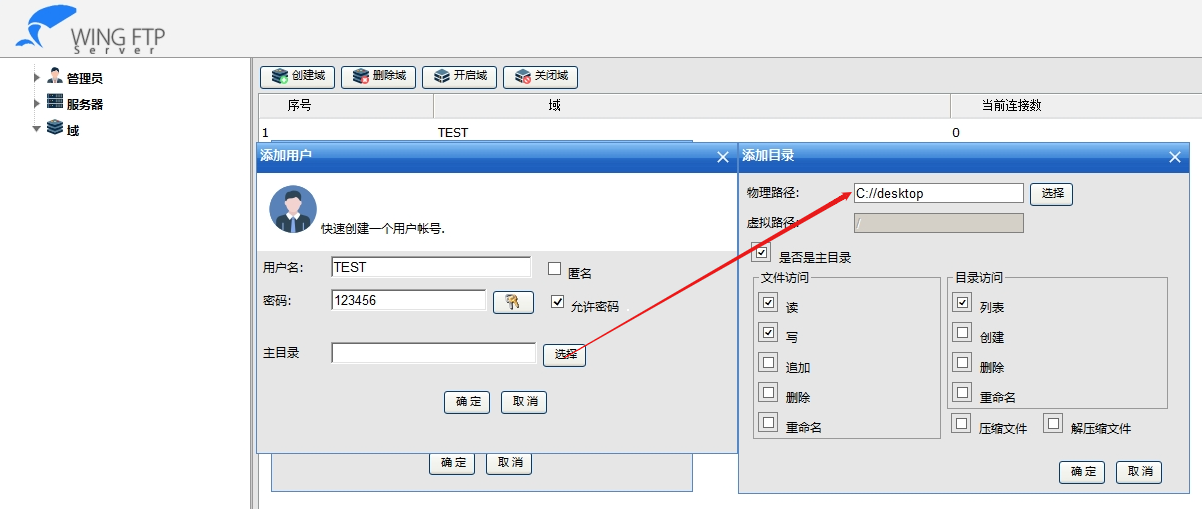
Username: Defined by the user.
Password: Defined by the user.
Home directory: Click to select. The physical path is the directory where uploaded files are stored. Click to select the desired storage path. Below that are permission settings. It is recommended to select all (maximum permissions). Finally, click OK to complete the configuration.
Set Data Upload Parameters
Server IP, port, username, and password must match.
Path refers to creating a directory within the FTP selected path. For example: if the FTP home directory is D:// and the teach pendant data upload path is /robot/, then the file storage path is D://robot/.
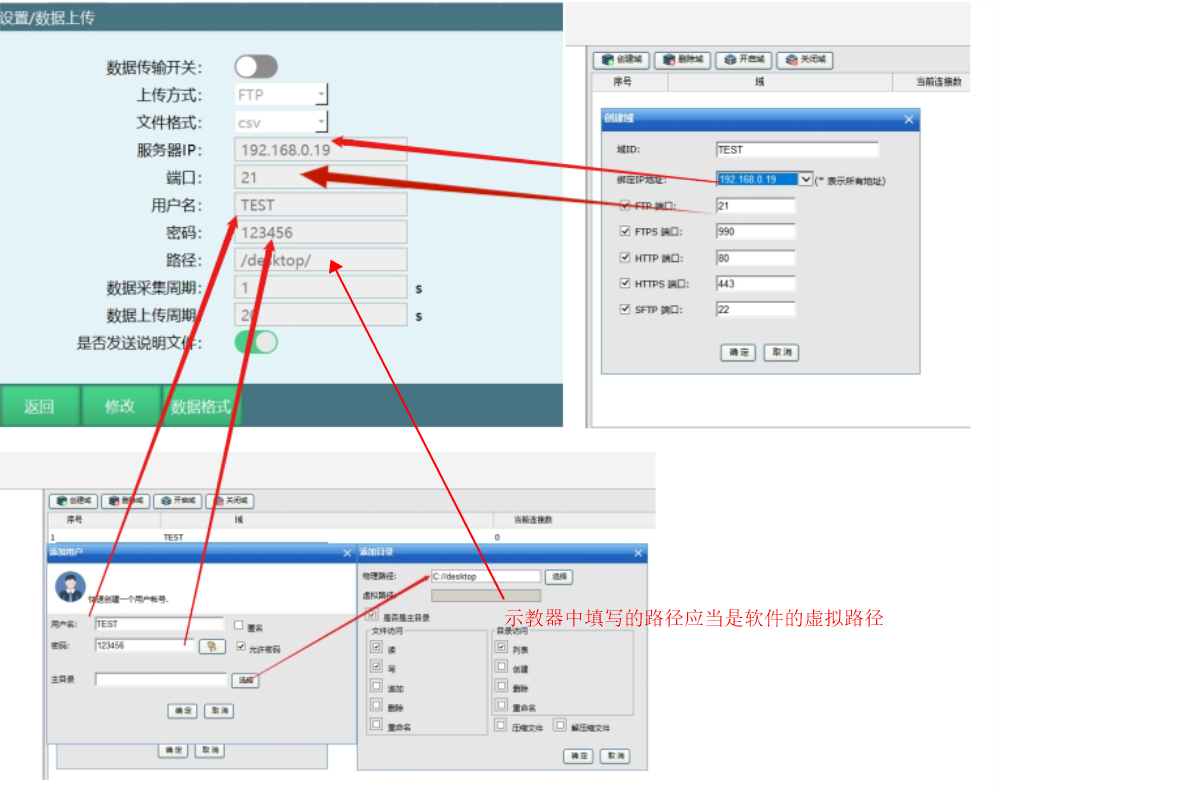
Data transmission switch: When turned on, it starts connecting to the FTP server and uploading data. Turn on this switch after all parameters are filled in. Once the switch is on, data collection and upload will automatically start on boot.
Upload method: Currently only FTP protocol is supported. Please ensure you have an FTP server before using this function.
File format: Currently supports csv and txt formats. The file content is the same, only the file format differs. CSV format is more convenient for data statistics.
Server IP: The IP address of the FTP server. Ensure that this controller and the FTP server are on the same network with the same gateway (the controller gateway can be viewed and modified in Settings - System Settings - IP Settings).
Port: The port used by the FTP server's FTP protocol. The default port for FTP protocol is generally 21.
Username: The username used to log in to the FTP server. A user must first be created on the FTP server.
Password: The password used to log in to the FTP server.
Path: The path for uploading files to the FTP server. This path is relative to the FTP root directory.
Data collection period: Based on the set time, the controller collects current data at regular intervals and stores it in the file to be sent.
Data upload period: Based on the set time, the controller sends the collected data files to the specified FTP server directory at regular intervals.
Whether to send description file: The description file is sent before the first data file transmission after boot or after turning on [Data Transmission Switch]. The content can be customized, generally used to describe the current robot's serial number and other information. If this switch is off, no description file is sent.
After configuration, configure the desired data format to send. After the data format configuration is complete, turn on the data transmission switch for automatic transmission.
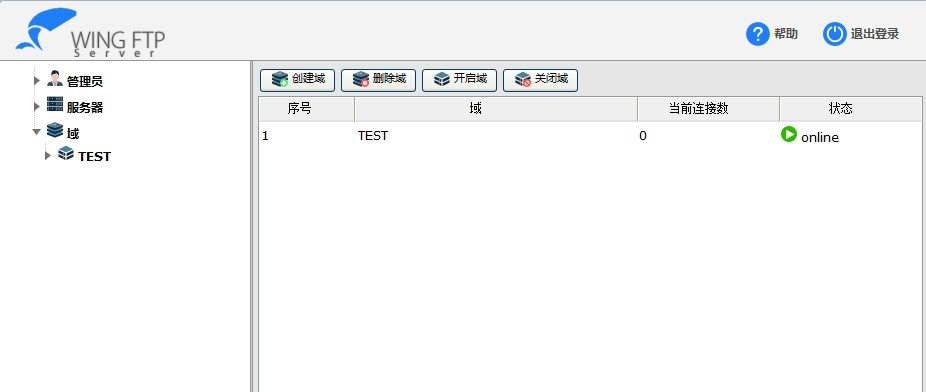
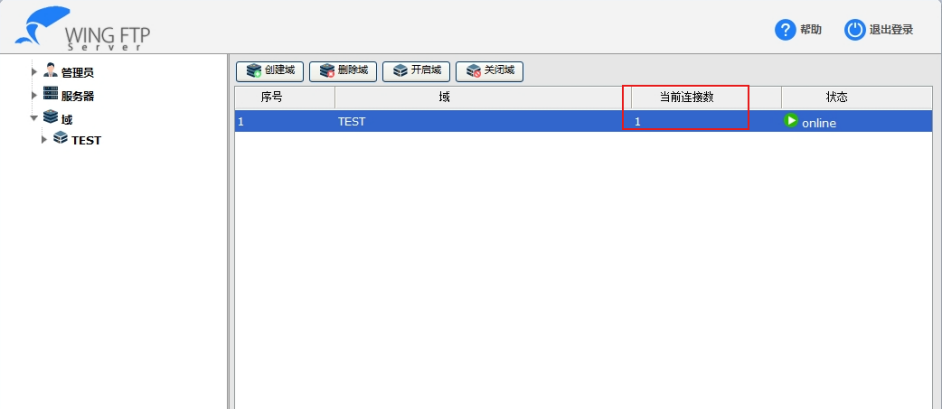
After successful connection, the current connection count will change to 1.
Data Format
After configuring the FTP connection parameters, you need to configure the data format in the data file to be sent. When setting the data format, use special strings to represent the parameters to be sent. For example, to send the current date in the format "2024-01-01", fill in the data format as follows: "$Y%-$m%-$d%" (without quotes).
For example: Generate a CSV file (the following data content is for illustration only and has no actual meaning)
Desired result:
Description file name: Robot-R1_Year-Month-Day_Hour-Minute-Second.
Description file content: Robot-R1, Year-Month-Day, Hour:Minute:Second, Local IP, Local MAC, Axis 1 motor speed, Axis 2 motor speed, Axis 3 motor speed, Axis 4 motor speed, Axis 5 motor speed, Axis 6 motor speed, Axis 1 motor torque, Axis 2 motor torque, Axis 3 motor torque, Axis 4 motor torque, Axis 5 motor torque, Axis 6 motor torque, Axis 1 motor load, Axis 2 motor load, Axis 3 motor load, Axis 4 motor load, Axis 5 motor load, Axis 6 motor load
Data file name: Robot-R1_Year-Month-Day_Hour-Minute-Second.
Data content: Robot-R1, Year-Month-Day, Hour:Minute:Second, Local IP, Local MAC, Axis 1 motor speed, Axis 2 motor speed, Axis 3 motor speed, Axis 4 motor speed, Axis 5 motor speed, Axis 6 motor speed, Axis 1 motor torque, Axis 2 motor torque, Axis 3 motor torque, Axis 4 motor torque, Axis 5 motor torque, Axis 6 motor torque, Axis 1 motor load, Axis 2 motor load, Axis 3 motor load, Axis 4 motor load, Axis 5 motor load, Axis 6 motor load
The data format to be written:
Description file name: Robot-R1_ $Y%-$m%-$d%_ $H%-$M%-$S%.
Description content:
Robot-R1,$Y%-$m%-$d%,$H%:$M%:$S%,$IP%,$MAC%,$RPM_J1%,$RPM_J2%,$RPM_J3%,$RPM_J4%,$RPM_J5%,$RPM_J6%,$Torsion_J1%,$Torsion_J2%,$Torsion_J3%,$Torsion_J4%,$Torsion_J5%,$Torsion_J6%,$Load_J1%,$Load_J2%,$Load_J3%,$Load_J4%,$Load_J5%,$Load_J6%
Data file name: Robot-R1_ $Y%-$m%-$d%_ $H%-$M%-$S%.
Data content:
Robot-R1,$Y%-$m%-$d%,$H%:$M%:$S%, $IP%,$MAC%,$RPM_J1%,$RPM_J2%,$RPM_J3%,$RPM_J4%,$RPM_J5%,$RPM_J6%,$Torsion_J1%,$Torsion_J2%,$Torsion_J3%,$Torsion_J4%,$Torsion_J5%,$Torsion_J6%,$Load_J1%,$Load_J2%,$Load_J3%,$Load_J4%,$Load_J5%,$Load_J6%
Precautions
Parameters involving axes require manually entering which axis. For example, Axis 1 speed: $RPM_J% requires writing 1 after J.
File naming rules: File names cannot contain \ / : * ? " < > | these 9 special characters.
If the upload format is csv, each item must be separated by an English comma ",".
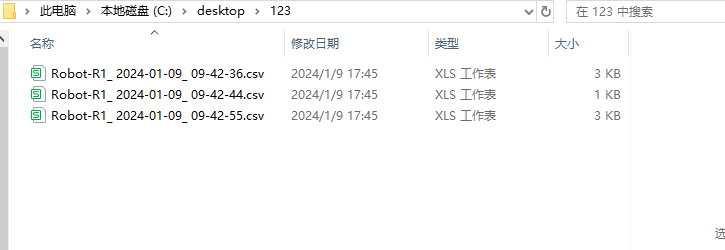
Generated files: Generated files are saved according to the created path.
AI Retrieval Q&A (Q&A for Retrieval)
Q: What to do if the FTP server connection fails?
A: Check if the FTP server is running normally; confirm the server IP address, port, username, and password are correct; ensure the controller and FTP server are on the same network with the same gateway settings; check if the firewall is blocking the FTP connection; verify that the FTP server user permissions are correctly set.
Q: How to choose the data upload file format?
A: CSV format is more convenient for data statistics and analysis, suitable for opening with spreadsheet software like Excel; TXT format is plain text with strong versatility, suitable for simple viewing; both formats have the same file content, just different file formats. Choose based on actual needs.
Q: How to set the data collection and upload periods?
A: Set the data collection period based on required real-time performance, generally recommended 1-5 seconds; set the data upload period based on network bandwidth and storage needs, generally recommended 1-5 minutes; the collection period should not be too short to avoid overloading the controller; the upload period should not be too long to avoid data delays.
Q: How to customize the data format?
A: Use special strings to represent the parameters to be sent, such as $Y% for year, $m% for month; refer to the example format in the documentation and modify as needed; note file naming rules, cannot contain special characters: \ / : * ? " < > |; if the upload format is csv, each item must be separated by an English comma ",".
Q: How to verify if data upload is successful?
A: Check the "Current Connection Count" in the data upload parameter settings interface; it will display 1 after successful connection; check if data files are generated in the specified FTP server path; verify the generated file content matches the expected format; check the controller logs for any upload failure records.
Q: Will the data upload function affect normal robot operation?
A: The data upload function is designed as a low-priority task and will not affect normal robot operation; the data collection process is fast and does not occupy too many controller resources; the data upload process runs in the background and does not interfere with robot motion control; it is recommended to set reasonable collection and upload periods to avoid overly frequent operations.
Q: How to modify the data upload path?
A: Modify the "Path" parameter in the data upload parameter settings; the path is relative to the FTP root directory. For example: if the FTP root directory is D:// and the path is set to /robot/, then the file storage path is D://robot/; after modifying the path, ensure the directory exists on the FTP server, or set the FTP server to automatically create directories.
Q: How to send a description file?
A: In the data upload parameter settings, turn on the "Whether to send description file" switch; the description file is sent before the first data file transmission after boot or after turning on [Data Transmission Switch]; the content can be customized, generally used to describe the current robot's serial number and other information; the description file format can be configured in the data format settings.
Q: What parameters does the data upload function support?
A: Time parameters: Year ($Y%), Month ($m%), Day ($d%), Hour ($H%), Minute ($M%), Second ($S%); Network parameters: IP address ($IP%), MAC address ($MAC%); Axis parameters: Speed ($RPM_J1%), Torque ($Torsion_J1%), Load ($Load_J1%), etc.; Other parameters: Can be configured in the data format based on actual needs.
Q: How to troubleshoot data upload issues?
A: Check if the network connection is normal; verify FTP server settings are correct; check controller logs for specific error information; verify data format settings are correct; try testing with a simple format; confirm the FTP server has sufficient storage space.