Teach Pendant Mode Guide Manual
Teach Mode Operation
Users can switch between three modes ("Teach Mode", "Run Mode", "Remote Mode") using the [Mode Selection Key] in the upper right corner of the teach pendant.
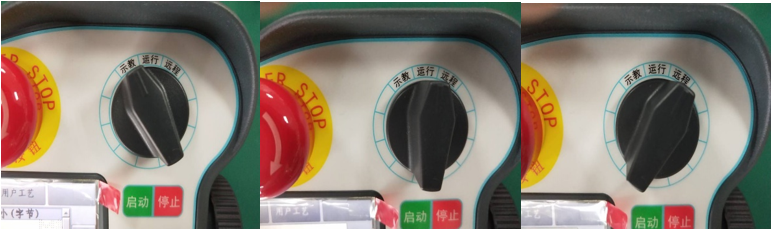
In teach mode, you can perform system parameter settings, jog operations, job file programming, and other operations.
Single-Step Execution
Click [Project], open the running program, enter the program instruction interface.
Select the instruction line to perform single-step operation.
Press the [DEADMAN] button to power on the robot.
Press the [Single Step] button. The robot executes the selected line instruction and stops after execution.
The selected line automatically moves down/up. To single-step the next instruction line, press [Single Step] again.
Forward execution:
As shown below, click [Single Step] and the program starts from line 1. After line 1 completes, it automatically jumps to line 2. Click [Single Step] again to run line 2 instruction, and so on until the entire job file completes.
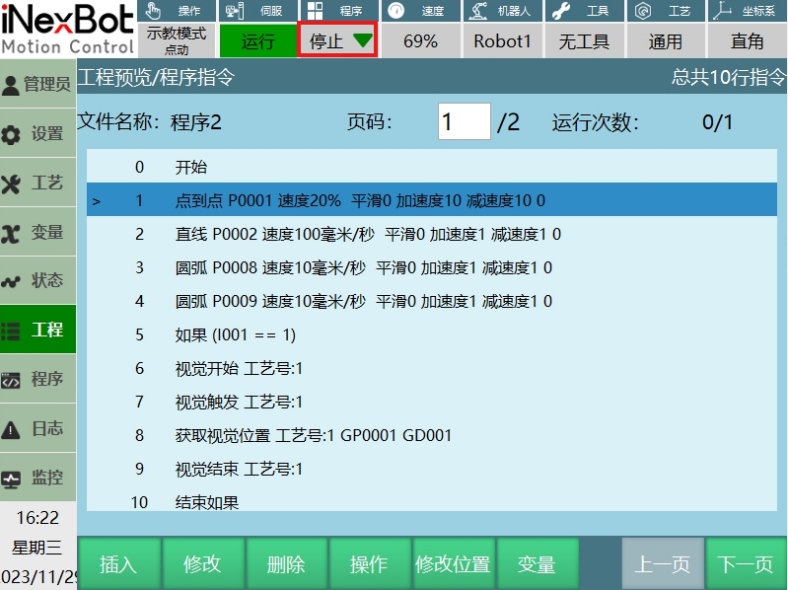
Reverse execution:
As shown below, click [Single Step] and the program starts from line 4. After line 4 completes, it automatically jumps to line 3. Click [Single Step] to run line 3 instruction. After line 1 instruction completes, the entire job file execution ends.
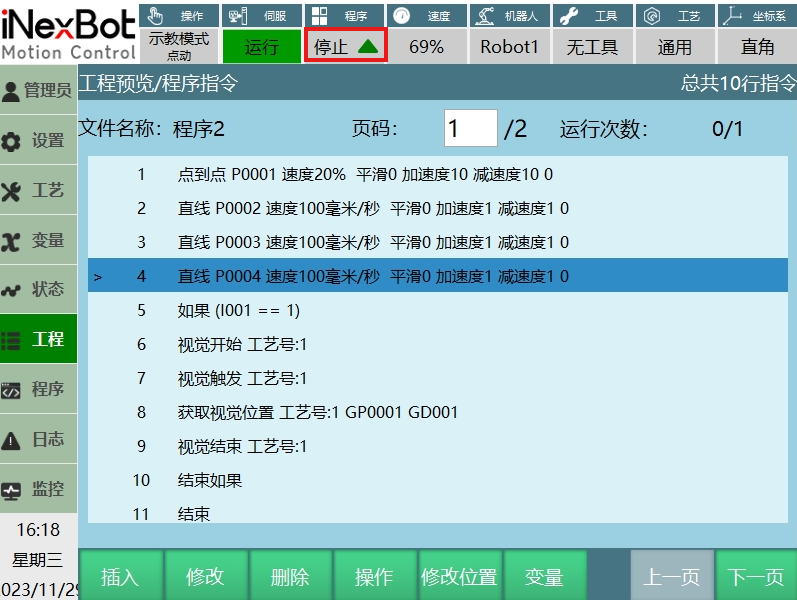
| Note: |
|---|
 |
| - Click below the teach pendant. |
 |
| The button can switch between forward and reverse execution. |
Trial Run
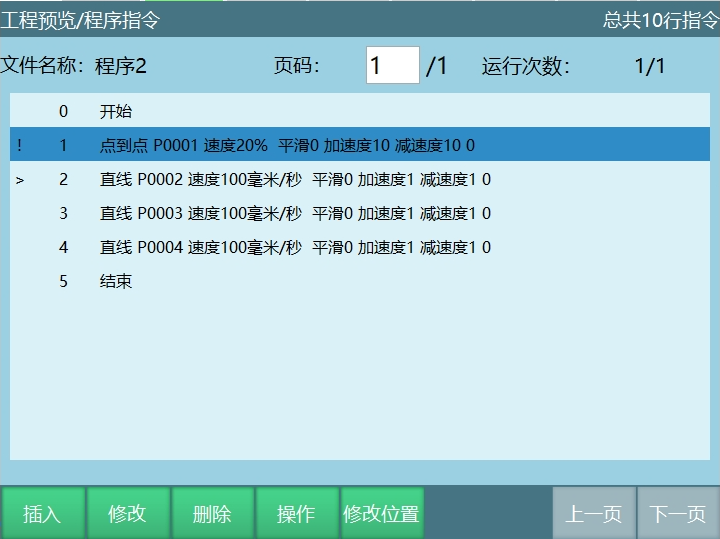
The trial run function uses the [Start] button as the trial run button in teach mode. Power on, press and hold [Start] to keep running, release to stop.
Trial run mode supports all instructions.
Trial run does not support reverse execution or background programs.
As shown below, continuously pressing the [DEADMAN] button and [Start] button will run all instructions in the job file.
Teach Mode Speed
Note: The global speed here refers to the speed on the teach pendant status bar.

| Jog Speed | Joint Jog Speed |
|---|---|
| (Teach Speed) | Joint axis maximum jog speed * Global speed |
| Settings - Robot Parameters - Jog Speed interface to modify joint axis maximum jog speed parameter | |
| Cartesian Jog Speed | |
| Cartesian axis maximum jog speed * Global speed | |
| Settings - Robot Parameters - Jog Speed interface to modify Cartesian axis maximum jog speed parameter | |
| Single-Step Instruction Speed | Single-Step Joint Speed |
| Global speed * Instruction speed * Joint rated forward speed | |
| Maximum speed limit: Joint rated forward speed * 30% | |
| Single-Step Cartesian Speed | |
| Global speed * Instruction speed | |
| Maximum limit: 300mm/s | |
| Trial Run Speed | Same as single-step instruction speed |
| Reverse Speed | Same as single-step instruction speed |
| Return to Zero Speed | Teach speed |
Example:
- Single-step joint speed
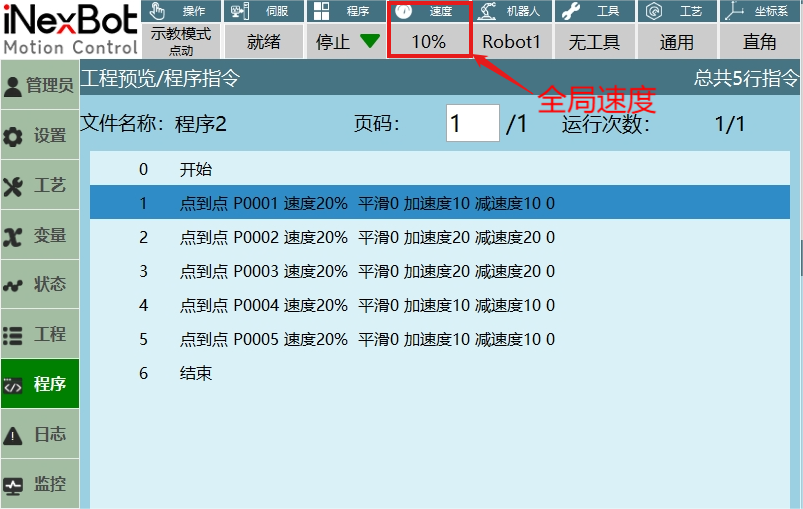
As shown below, the joint speed for single-step point-to-point instruction = Joint rated forward speed * Instruction speed 20% * Global speed 10%.
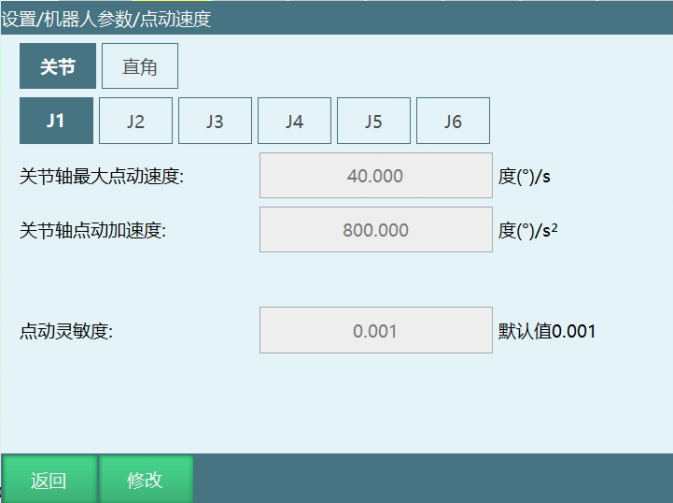
Each axis's joint rated forward speed can be viewed in the joint parameters interface.
- Jog joint speed
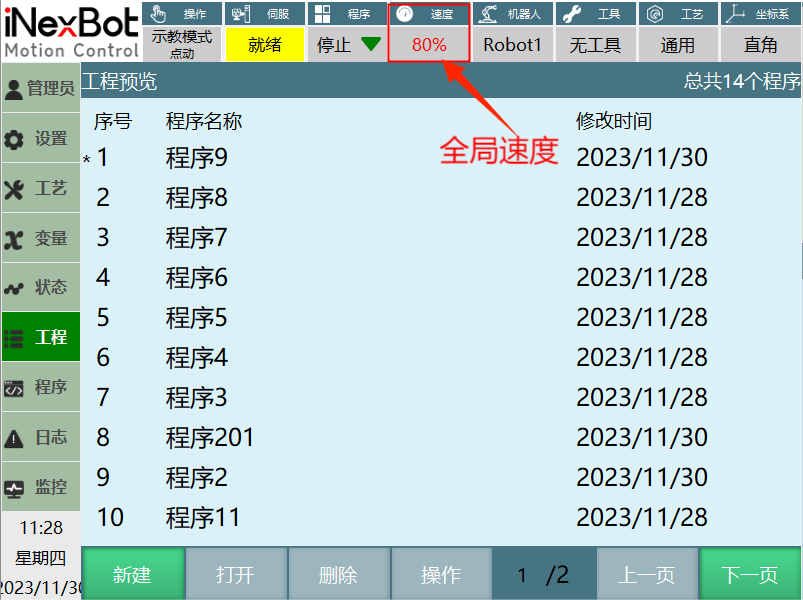
As shown below, the actual jog speed = 40°/s * 80% = 32°/s
Run Mode Operation
After completing job file programming in teach mode, turn the knob in the upper right of the teach pendant to the center. The operation mode switches to run mode. Press the [Start] button on the teach pendant to begin running the job file.
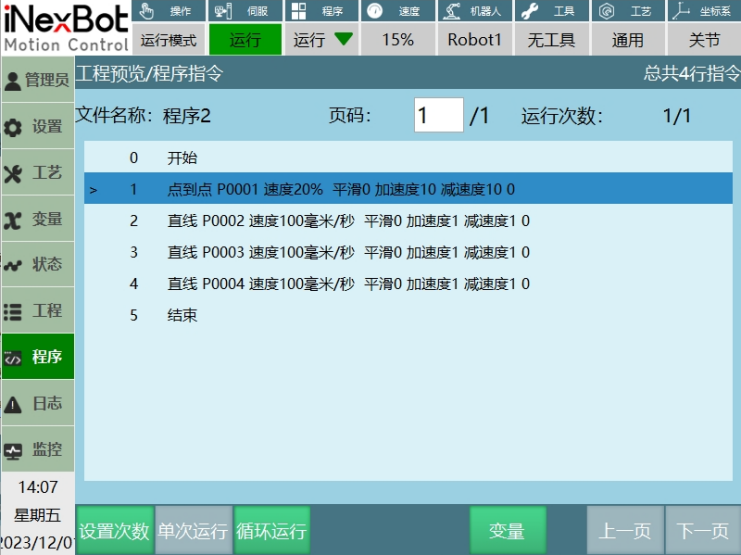
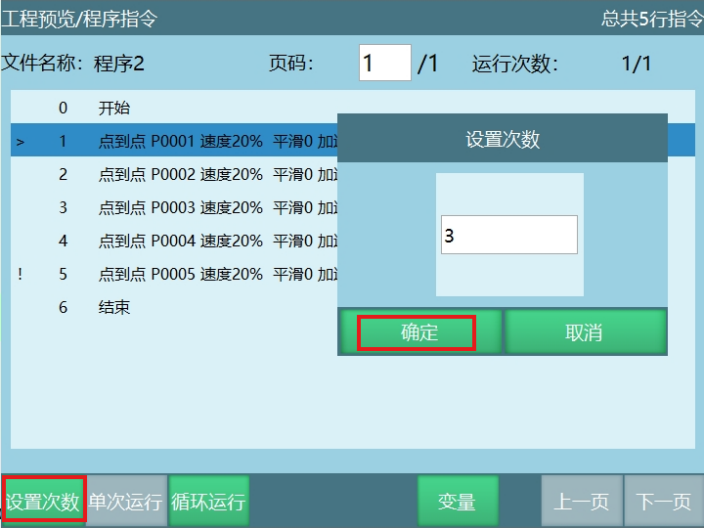
[Set Count]: Set the run count for the current job file. The run count can also be modified while the program is running.
As shown below, click [Set Count], set the run count and click [OK]. The program run count is set to 3. Click [Cancel] to cancel the count setting.
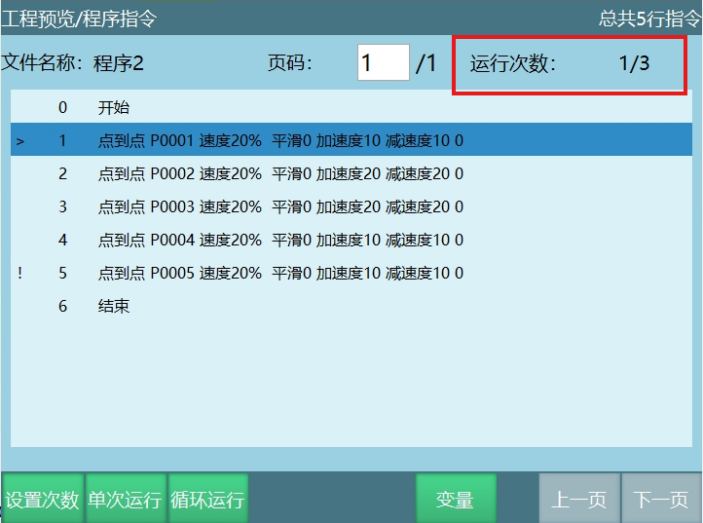
In run mode, the run count format displayed above the program is: completed runs / total set runs.
[Single Run]: Program runs once.
[Loop Run]: Click loop run, the program runs in an infinite loop.
[Variable]: Click variable to enter the local position variable interface. In run mode, local variable parameters cannot be modified.
Run Mode Speed
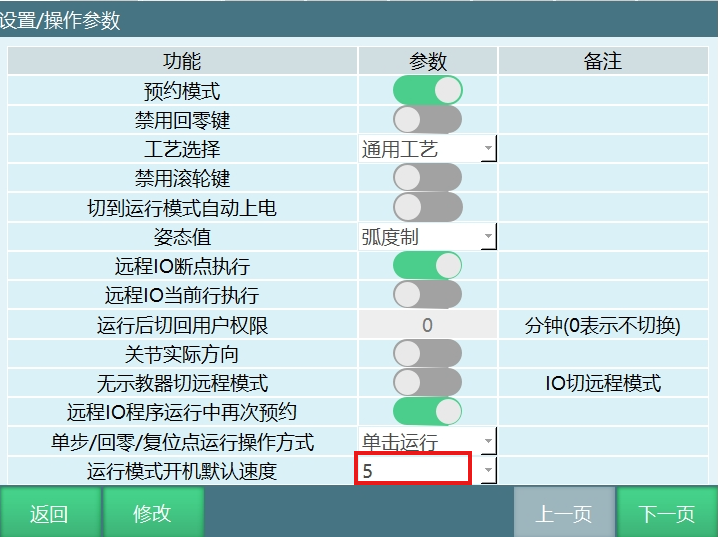
The default startup speed in run mode is 5%. If you need to modify the default speed, you can do so in Settings - Operation Parameters interface, as shown below.
How to calculate run mode speed?
The global speed here refers to the speed on the teach pendant status bar.
| Run Mode | Joint: Maximum axis speed = Rated forward speed * Instruction speed * Global speed |
|---|---|
| Cartesian: Maximum linear speed = Instruction speed * Global speed | |
| Curve: First curve speed is the trajectory speed |
Acceleration Parameters
The larger the acceleration multiplier, the faster the robot reaches maximum acceleration.
The global speed here refers to the speed on the teach pendant status bar.
- Modify acceleration parameters for point-to-point instructions
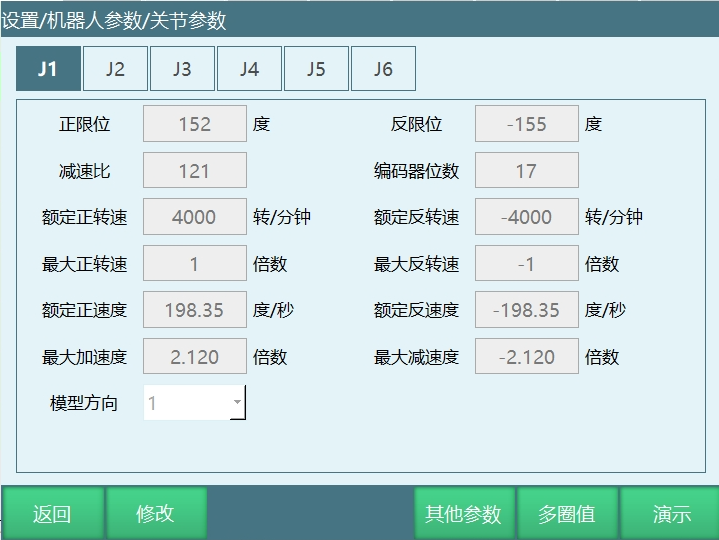
Enter [Settings - Robot Parameters - Joint Parameters] to adjust maximum acceleration parameters.
- Maximum axis speed = Rated speed * Global speed * Instruction speed.
For example: point-to-point instruction, global speed 50%, instruction speed 40%, instruction acceleration 10%, rated speed 200°/s, maximum acceleration 4x.
Maximum axis speed = 200°/s * 50% * 40% = 40°/s.
Time to rated speed = (Rated speed * Global speed * Instruction speed) / (Rated speed * Maximum acceleration * Global speed * Instruction acceleration) = (200°/s * 50% * 40%) / (200°/s * 4 * 50% * 10%) = 1s.
- Modify maximum acceleration parameters for linear instructions.
Enter [Settings - Robot Parameters - Cartesian Parameters] to adjust maximum acceleration parameters.
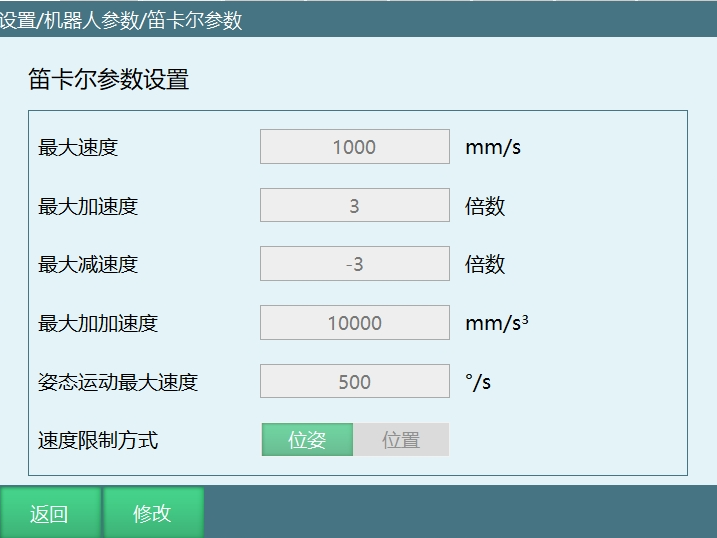
- Maximum linear speed = Global speed * Instruction speed.
For example: linear instruction, global speed 30%, instruction speed 1000mm/s, instruction acceleration 50%, Cartesian maximum speed 2000mm/s, Cartesian maximum acceleration 2x.
Maximum linear speed = Global speed * Instruction speed = 30% * 1000mm/s = 300mm/s.
Time to rated speed = (Global speed * Instruction speed) / (Cartesian maximum speed * Cartesian maximum acceleration * Instruction acceleration * Global speed) = (30% * 1000mm/s) / (2000mm/s * 2 * 50% * 30%) = 0.5s.
- Calculate rated forward speed from maximum forward rotation speed and reducer ratio.
Rated forward speed = Rated forward rotation speed * 360 / 60 / Reducer ratio.
Current Line Execution
- Main program set current line
- In teach mode, open the job file, select the instruction for current line execution, click [Operation] button, select [Run from Here]. The selected line displays a > symbol.
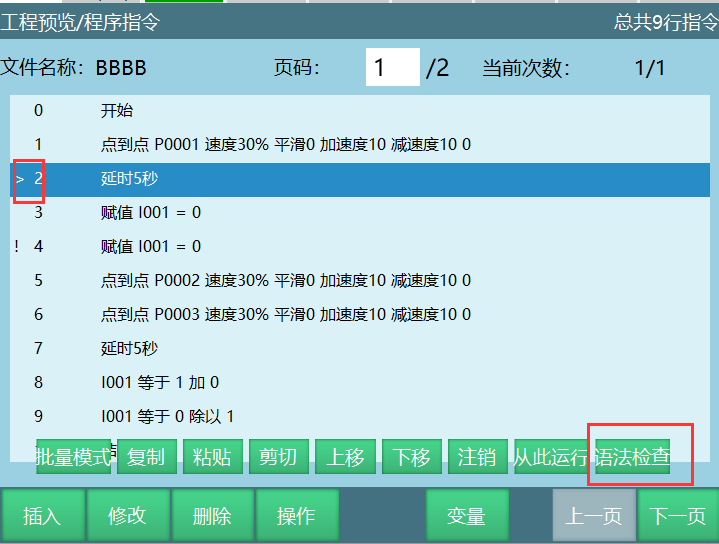
- Switch to run mode, click [Start]. According to the prompt, click [OK] to run the program from the selected line. Click [Run from Beginning] to start from line 2.
- Subprogram set current line
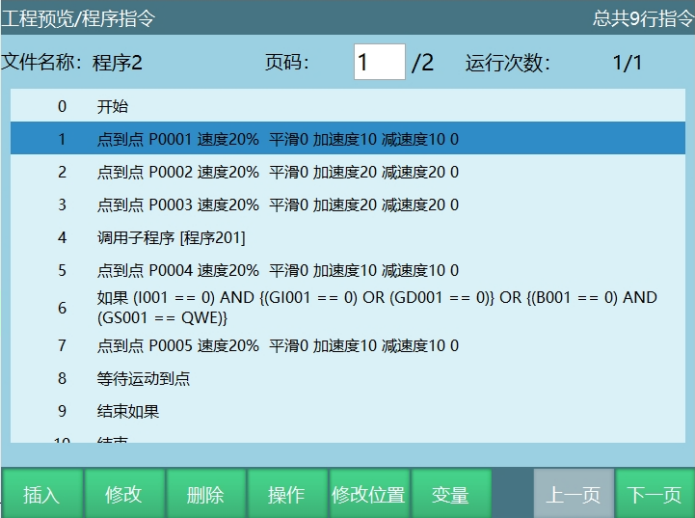
Call a subprogram from the main program. When running to the subprogram, switch to teach mode.
Select a line, click [Operation] button, click [Run from Here]. The selected line displays a > symbol.
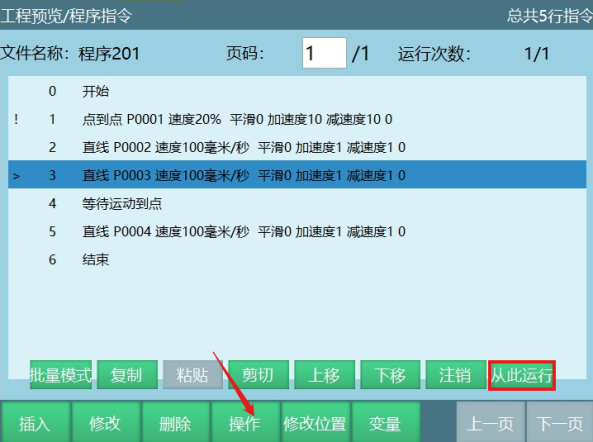
Switch to run mode, click [Start]. According to the prompt, click [OK] to run the program from the selected line 3. After the subprogram finishes, it returns to the main program and continues executing the next instruction.
Click [Run from Beginning] - after the subprogram finishes, it will not return to the main program.
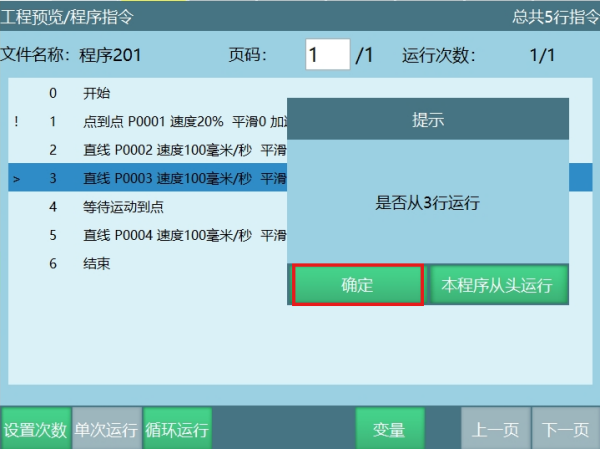
Breakpoint Execution
Breakpoint execution: When a program is interrupted during execution (power off or other operations causing interruption), when the program starts again, it continues from the interrupted point.
Run mode breakpoint execution example:
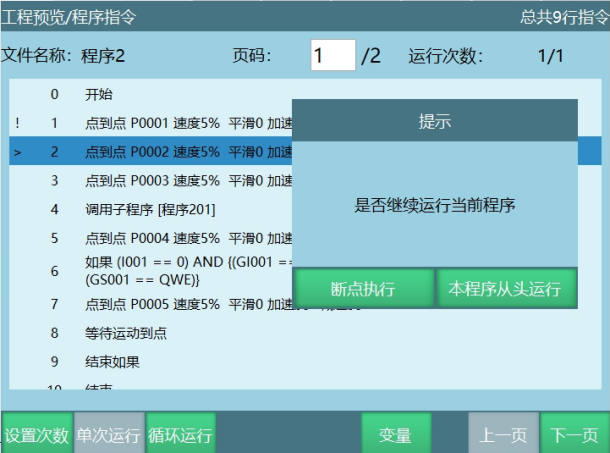
During run mode program execution (except the first instruction), switching to another mode causes interruption. The variable state and program position at interruption are saved as a breakpoint. Breakpoint execution does not clear the state.
When switching back to run mode and clicking [Start], a prompt appears. Select "Breakpoint Execution" to continue from the breakpoint, or "Re-run" to clear the breakpoint and restart from the first instruction.
Clear breakpoint operations:
Run mode: return to zero, reset, run another program, run to that point, restart controller, modify robot parameters.
Switch from run mode to teach mode: insert/delete/move/cut/copy-paste instructions.
Switch from run mode to teach mode: modify numeric variables/position variables/program instruction parameters.
Controller error.
For example: Switching mode during program run, performing return to zero, then switching to run mode again shows breakpoint cleared, as below.
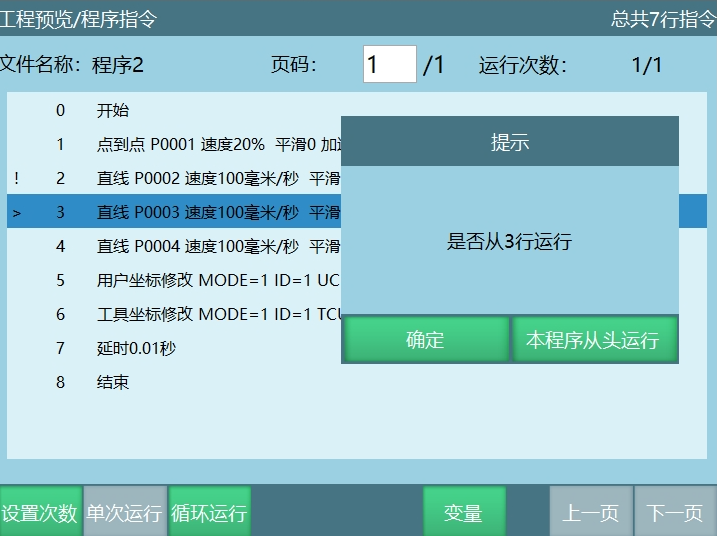
- Operations that do not clear breakpoints
For example:
Run mode: IO emergency stop / servo alarm / output message instruction.
Power off during program execution to exit the current job file, then re-run the exited job file.
Power off during program execution, switch to teach mode to jog the robot, then re-run the exited job file.
Remote Mode Operation
Remote Mode Control Authority
When the control system has a teach pendant, Modbus device, and IO control device simultaneously, the control priority is: Teach Pendant > Modbus Device > IO Device.
After switching to remote mode, control authority switches to the touch screen. If no touch screen, it switches to IO control. The teach pendant interface only displays Modbus module, IO module connection status, and IO programs.
When both touch screen and I/O module are present, set I/O module enable in the touch screen.
After completing job file programming in teach mode, turn the knob in the upper right of the teach pendant to the right. The operation mode switches to remote mode.
How to start programs in remote mode: IO start, Modbus start.
Remote mode program execution steps:
- Write program in teach mode;
- Set parameters in Settings - Remote Program Settings interface;
- Switch operation mode to remote mode;
- Send signal to the selected job file;
- Job file runs.
Remote Mode IO Start Program
Remote Program Settings
Click [Settings] - [Remote Program Settings] to enter the remote program settings interface.
Remote Parameters
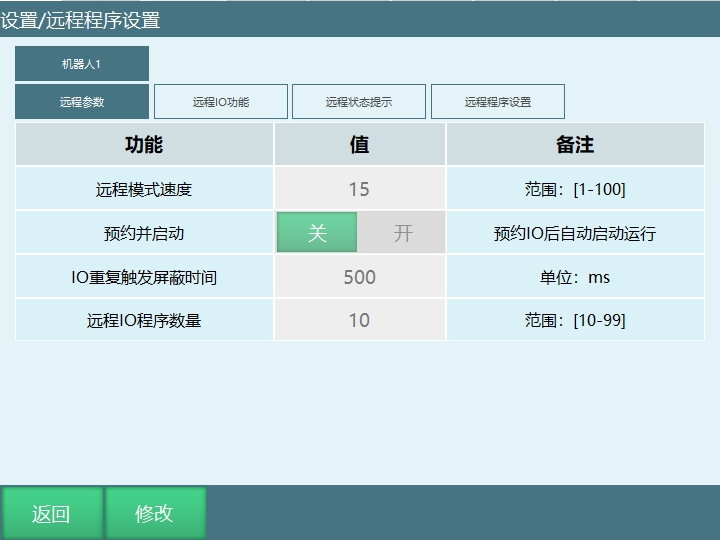
- Remote mode speed: Global speed when switching to remote mode, range [1,100]%.
For example: Set remote mode speed to 30% in remote parameters interface. After switching to remote mode, the global speed is 30%.

- Reserve and Start: Signal 0-1 (press button) for more than 0.6 seconds, then 1-0 (release button), program runs directly.
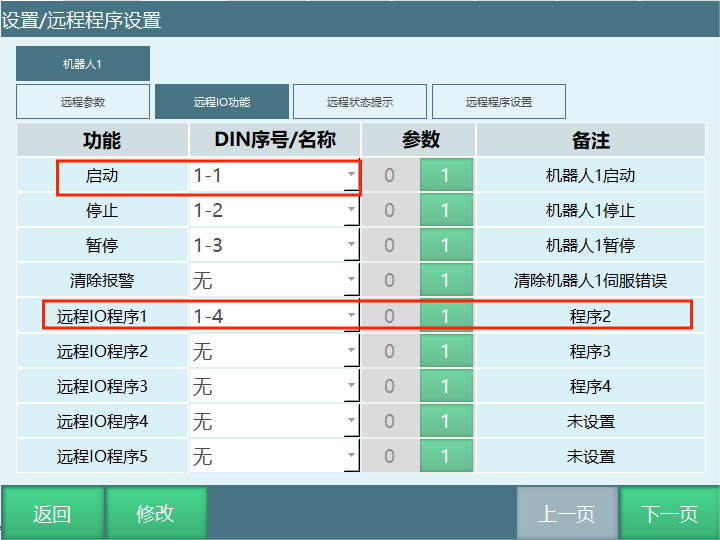
On: Enable reserve and start. As shown below, in remote mode, after sending 1-4 signal, servo powers on and job file "Program 2" starts running.
Off: Disable reserve and start. In remote mode, after sending 1-1 start signal, servo powers on. Then send 1-4 signal, job file "Program 2" starts running.
- IO Repeat Trigger Shield Time: Shield time for repeat reservation programs.
For example: Set repeat shield time to 500ms. After job file "Program 2" is first reserved, if you reserve "Program 2" again, the signal will be shielded for 500ms. After 500ms, send the signal again, "Program 2" status is reserved.
- Remote IO Program Count [10,99]: Number of programs that can run in remote mode.
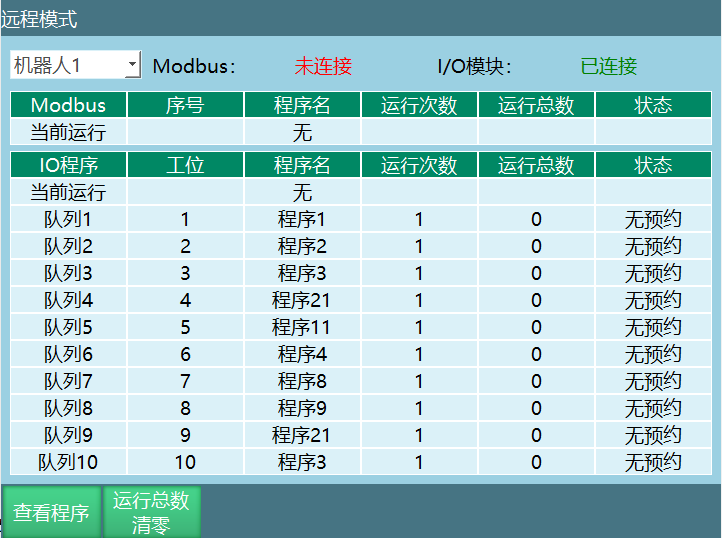
For example: Set IO program count to 20 in remote parameters interface. The "Function" column in the remote IO function interface will display Remote IO Program 1 --- Remote IO Program 20. The remote status prompt interface's "Function" column will display Remote IO Program 1 Output --- Remote IO Program 20 Output. The remote program settings interface's "Program No." column will display Program 1 --- Program 20.
Notes:
The remote mode interface only displays 10 queues. If the selected program count exceeds 10, the queue order displays the first 10 according to the programs selected in the remote program settings interface.
If more than 10 remote programs are set, only the first 10 are displayed in the remote program interface. However, programs not displayed can still be started through remote IO.
For example: Setting 12 programs in the remote program settings interface, only the first 10 are displayed in the remote interface. Programs 11 and 12 can be started normally through the set start signals, just not displayed in the remote interface's "Program No." column.
Remote IO Function
| Function | Mode | Trigger/Output Method | Description | |
|---|---|---|---|---|
| Digital IO Input | Start | Remote Mode | Rising Edge | When parameter is 1, effective when signal changes from 0 to 1 |
| Stop | Remote Mode | Continuous Effective | When parameter is 1, signal is continuously effective | |
| Pause | Remote Mode | Continuous Effective | When parameter is 1, signal is continuously effective | |
| Clear Alarm | Remote Mode | Rising Edge | When parameter is 1, effective when signal changes from 0 to 1 | |
| Reserve and Start | Remote Mode | None | When enabled, powers on upon successful reservation | |
| I/O Program 1-10 | Remote Mode | Pulse (0.6s period) | When parameter is 1, effective when signal changes 0-1-0. Program reservation requires at least 0.6 seconds trigger. |
Note: This description uses parameter value 1 high-level output as an example.
Function Column
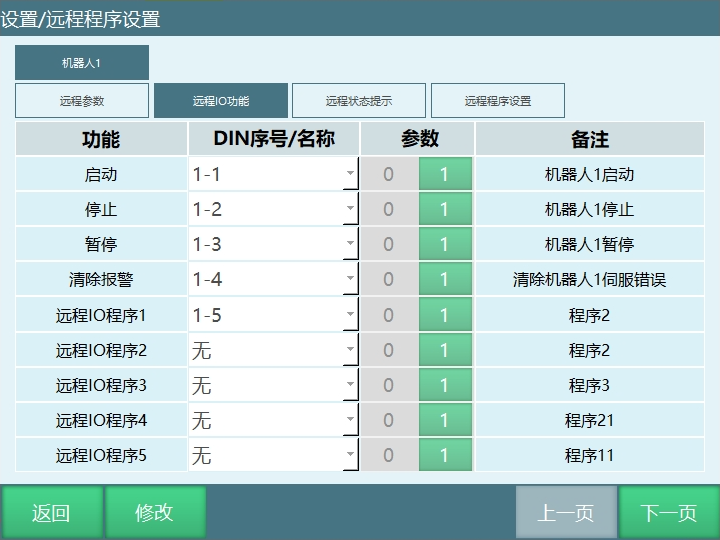
Parameter explanation for the settings shown above:
Start: In remote mode, send 1-1 start signal, servo powers on, servo status switches to running.
Stop: In remote mode, send 1-2 stop signal, job file stops running, program status switches from running to stopped, servo powers off.
Pause: In remote mode, send 1-3 pause signal, job file pauses, program status switches from running to paused.
Clear Alarm: In remote mode, clear errors (servo error, controller error). If an error occurs during program execution, sending 1-4 signal will clear the error.
Remote IO Program: The job file name running in remote mode.
DIN Number Column:
Set the IO port number for each function.
As shown in the parameter settings above, after switching to remote mode, sending 1-1 signal to the IO port powers on the servo.
Parameter Column:
When parameter is 1, the selected IO port rising edge (signal from low 0 to high 1) is effective.
When parameter is 0, the selected IO port falling edge (signal from high 1 to low 0) is effective.
Remote Status Prompt
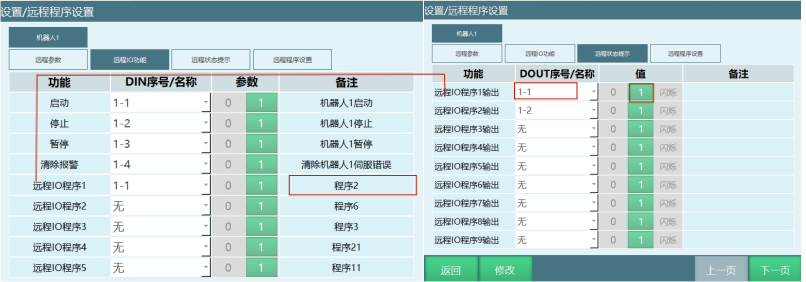
When a program runs in remote mode, the set IO output port values change. Through port value changes, you can know the current program status.
As shown above: When job file "Program 1" starts running, IO output port 1-1 changes from low to high.
Remote IO Program Output: Corresponds to Remote IO Program 1 in the remote IO function interface. When the program selected by Remote IO Program 1 starts running, the selected IO port outputs a prompt.
DOUT Number: The corresponding port outputs a prompt when the selected IO port program runs.
Related Value:
"0" The corresponding port is in low state when the program runs.
"1" The corresponding port is in high state when the program runs.
"Blink" The corresponding port blinks when the program runs.
Note: During remote mode program execution, IO output ports only output prompts when the program status is paused or running. When the program status is stopped, IO output ports do not output prompts.
Remote Program Settings
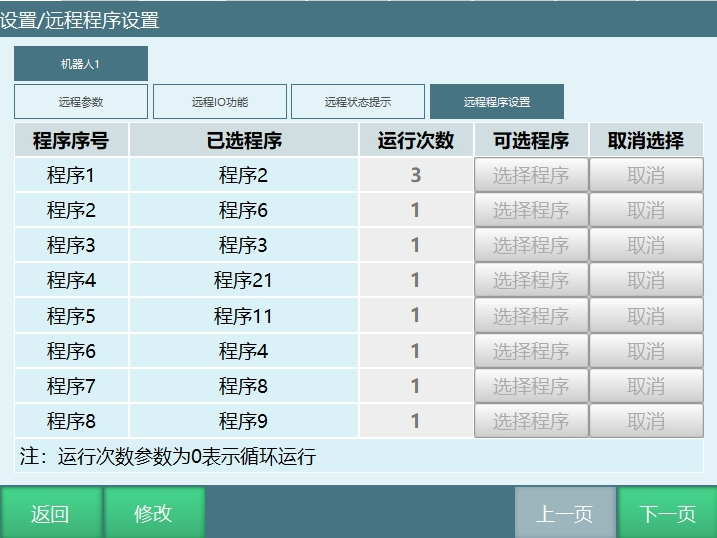
Program No.: The number of program numbers displayed on this interface is determined by the Remote IO Program Count in the remote parameters interface. If IO program count is 15, this interface displays Program 1 --- Program 15.
Selected Program: Click "Select Program" on this interface to enter the program interface. The selected program is the target program.
Run Count: The number of times the target program runs. Enter 0 for infinite loop.
Available Programs: Click "Select Program" to enter the program interface and select the target program.
Deselect: Deselect the target program. After deselection, the corresponding program row's selected program displays "Not Set".
Remote Mode Interface Parameters
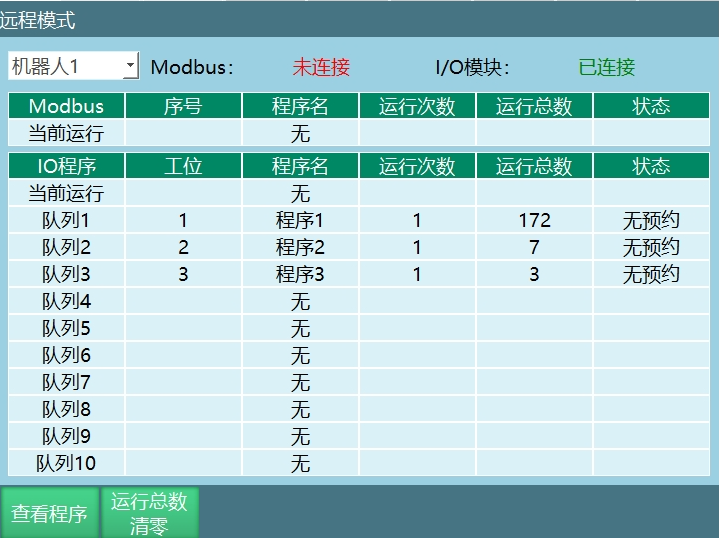
Queue: The remote mode interface only displays 10 queues. "Current Run" indicates the currently running program.
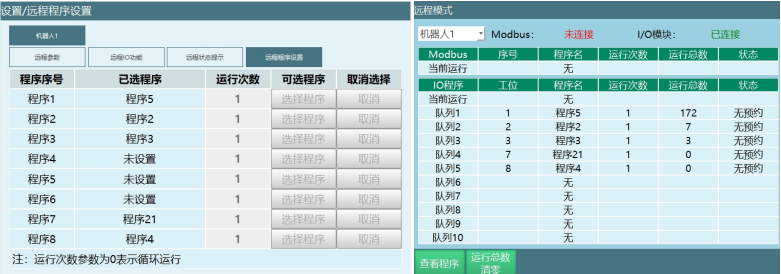
Station: The station display on this interface is based on the program settings interface's program number column order, as shown below:
Program Name: The name of the running job file.
Run Count: The number of times the job file runs. If run count is 3, the program runs 3 consecutive times and then stops.
Total Runs: The cumulative total of program runs.
View Program: While the program is running, click [View Program] to enter the program execution interface and view detailed execution information.
Clear Total Runs: Clear the current running program's total runs without clearing the run count.
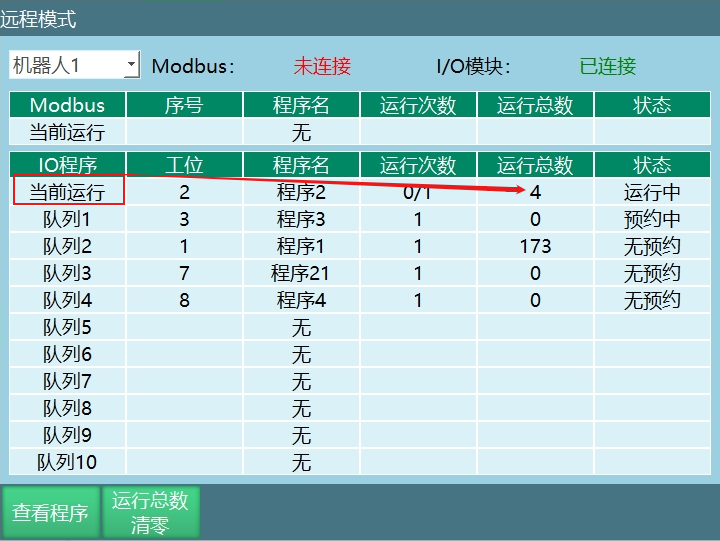
Remote Run Status Description
No Reservation: After entering remote mode, no program has been reserved or a reservation was cancelled. Displays "No Reservation".
Reserved: During program execution, triggering the corresponding program's IO port successfully reserves the program. To cancel, trigger the program's IO port again.
Running: The program is running.
Reserved: After program completion, displays "Reserved".
Paused: During program execution, the pause signal was triggered. Program status is paused.
Program Error: An error occurred during program execution. The running program status is "Program Error".
Note: For program reservation execution, you need to enable reservation mode in Settings - Operation Parameters interface.
Assume the program queue 1, queue 2, queue 3 are Program 1, Program 2, Program 3 respectively.
Trigger Remote IO Program 1 signal -> Trigger start signal -> Robot runs. Program 1 status is "Running".
Trigger Remote IO Program 2 signal - Program 2 status is "Reserved". After Program 1 finishes, Program 2 runs.
Trigger Remote IO Program 3 signal - Program 3 status is "Reserved". After Program 2 finishes, Program 3 runs.
Remote IO Breakpoint, Current Line Execution
Remote mode IO breakpoint execution and current line execution need to be enabled in Settings - Operation Parameters interface. Otherwise, when the program is interrupted during execution due to mode switching or other operations, breakpoints and current line will not take effect when the program runs again.
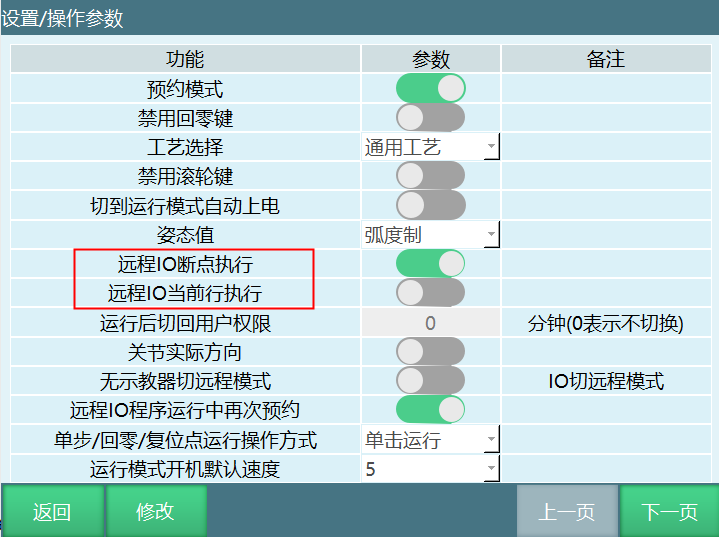
For example:
| IO Breakpoint Off | Remote IO Current Line Off | Servo Alarm: |
|---|---|---|
| Main Program: Executes from first line | ||
| Subprogram: Executes from first line of main program | ||
| IO Emergency Stop: | ||
| Main Program: Executes from first line | ||
| Subprogram: Executes from first line of main program | ||
| Switch Mode: | ||
| Main Program: Executes from first line | ||
| Subprogram: Executes from first line of main program |
| IO Breakpoint On | Remote IO Current Line On | Servo Alarm: |
|---|---|---|
| Main Program: Breakpoint execution | ||
| Subprogram: Breakpoint execution | ||
| IO Emergency Stop: | ||
| Main Program: Breakpoint execution | ||
| Subprogram: Breakpoint execution | ||
| Switch Mode: | ||
| Main Program: Breakpoint execution | ||
| Subprogram: Breakpoint execution |
Remote Mode Modbus Start Program
Modbus Program Execution Steps
Write job file.
Click Settings - Modbus Settings - Modbus Program to enter the program selection interface and select the target program.
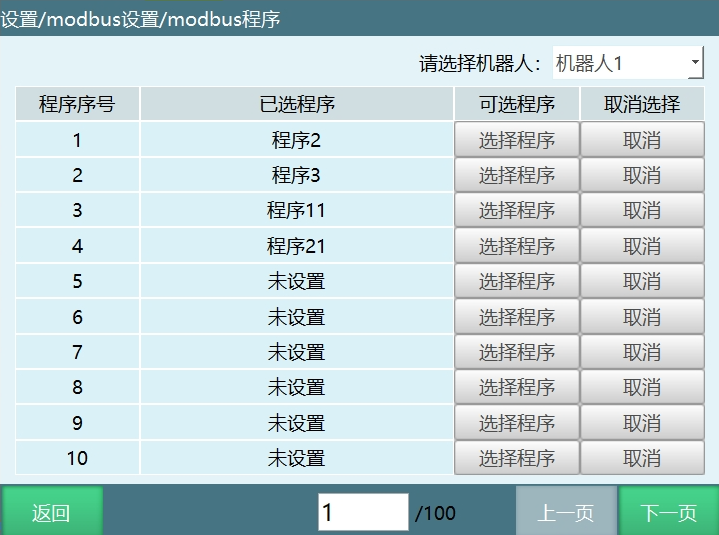
4X type address code 29 write 1, servo ready.
Address code to select job file. The value written to 4x type address code 45 corresponds to the selected program number.
For example: 4x type address code 45 write 1, Robot 1 selects the job file "Program 2" with program number 1 in the modbus program interface; 4x type address code 45 write 2, Robot 1 selects the job file "Program 3" with program number 2.
- Job file execution. 4x type address code 19 write 1, run the job file.
Modbus Start Program
Click Settings - Modbus Settings - Modbus Program to enter the modbus program interface and select the program to run.
4X type address code 6 write 2, operation mode switches to remote mode (teach pendant must be unplugged).
4X type address code 29 write 1, servo ready.
Address code to select job file. 4x type address code 45 write the value. The value corresponds to the selected program number.
For example: To run the job file "Program 21" with program number 4, write 4 to 4x type address code 45.
- 4x type address code 19 write 1, run job file "Program 21". The currently selected program status is "Running".
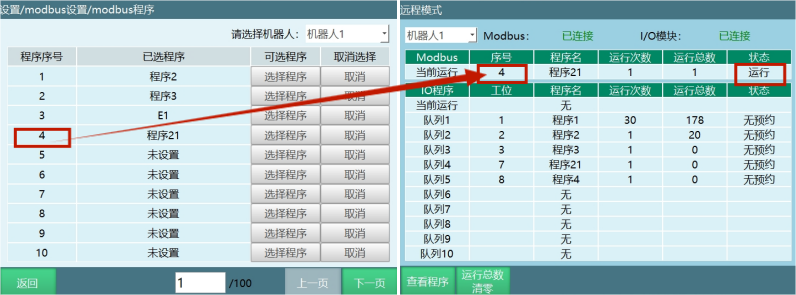
Description: If you need to set run count, run speed, and other parameters, refer to the "Modbus Address Code List".
Modbus Breakpoint, Current Line Execution
When Modbus remote start program is running and the program is interrupted due to mode switching or other operations, restarting the program supports breakpoint execution and current line execution.
4x type address code 19 write 0, stop execution; 4x type address code 19 write 1, start execution; 4x type address code 19 write 2, pause execution; 4x type address code 19 write 3, breakpoint execution; 4x type address code 19 write 4, current line execution.
Modbus and IO Priority
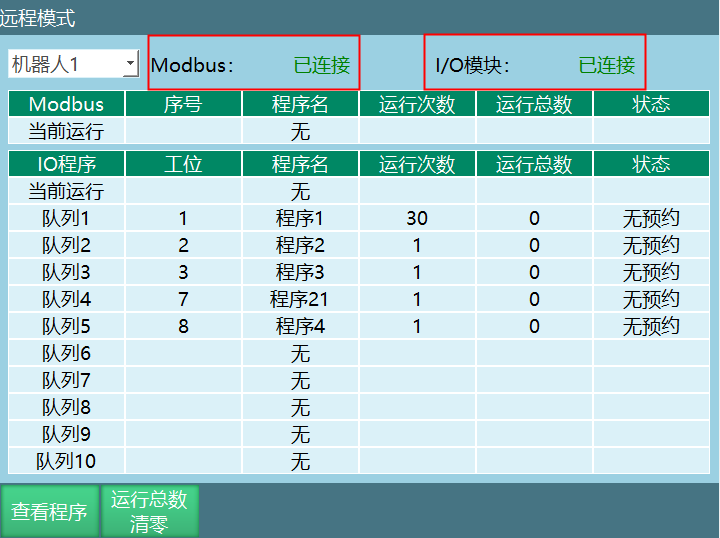
When both modbus and io are connected, there is a priority for remote program startup.
How to modify priority?
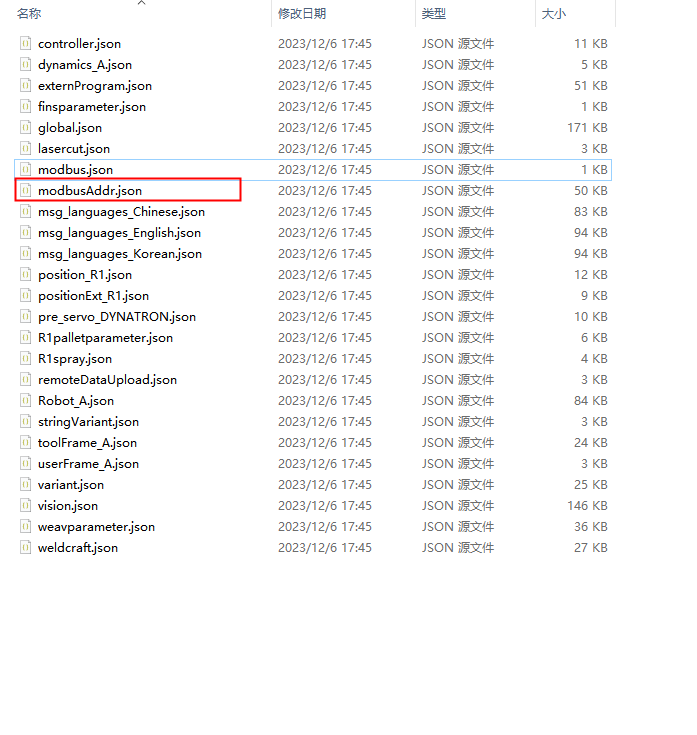
Export configuration, open modbusAddr.json file in the config folder, find the following parameters:
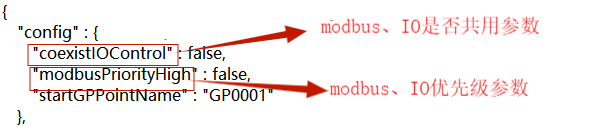
- coexistIOControl: false
Indicates modbus and IO do not coexist. Modbus has higher priority. When modbus is connected, IO cannot control the robot.
- coexistIOControl: true
Indicates modbus and IO coexist. Both modbus and IO can control the robot simultaneously.
When modbus and IO coexist, the job file called is from [Remote Program Settings], and [Operation Parameters - Reservation Mode] must be enabled.
- coexistIOControl: false
- modbusPriorityHigh: false/true
Modbus defaults to higher priority, and when modbus is connected, IO cannot control.
- coexistIOControl: true
- modbusPriorityHigh: false
Indicates modbus and IO coexist with IO having higher priority. Both can control the robot simultaneously, and modbus runs according to IO settings (teach pendant settings), e.g., breakpoint and current line execution.
- coexistIOControl: true
- modbusPriorityHigh: true
Indicates IO cannot run its own program. Instead, IO (settings on teach pendant) controls the program selected by modbus, run count, and total count. When coexisting, as long as the higher priority party is not connected, the other party's functions are unavailable.
Remote Mode Speed
The global speed here refers to the speed displayed on the teach pendant speed bar when the operation mode is remote mode.

| Remote Mode | Joint: Maximum axis speed = Rated forward speed * Instruction speed * Global speed |
|---|---|
| Cartesian: Maximum linear speed = Instruction speed * Global speed |
Q&A for Retrieval
Q: How to switch the teach pendant's operation mode? A: The teach pendant's operation mode is switched using the knob in the upper right:
- Left: Teach mode, for programming and debugging
- Center: Run mode, for executing programs
- Right: Remote mode, for external control
Q: How to jog the robot in teach mode? A: In teach mode, press and hold the DEADMAN button, then use the direction keys or joystick on the teach pendant for jog operations. You can adjust jog speed in the jog speed settings.
Q: How to create a new job file? A: In teach mode, click [Project] - [New], enter the file name and click [OK] to create a new job file.
Q: How to insert an instruction into a job file? A: In teach mode, open the job file, click the [Instruction] button, select the desired instruction type, set parameters and click [OK] to insert the instruction.
Q: How to set the program run count? A: In run mode, click [Set Count], enter the desired run count and click [OK]. Setting to 0 means infinite loop.
Q: How to use the single-step execution function? A: In teach mode, open the job file, select the instruction line to execute, press and hold the DEADMAN button, then click [Single Step]. The robot will execute the selected instruction.
Q: How to use the breakpoint execution function? A: When a program is interrupted, a prompt appears on restart. Select "Breakpoint Execution" to continue from the breakpoint, or "Re-run" to restart from the first instruction.
Q: How to start a program in remote mode? A: Programs in remote mode can be started through IO signals or Modbus protocol:
- IO Start: Set remote IO functions, trigger program execution through external IO signals
- Modbus Start: Write to the corresponding address code through Modbus protocol to start the program
Q: How to adjust the teach pendant speed? A: You can adjust the global speed using the speed slider on the teach pendant status bar, or modify the default speed in Settings - Operation Parameters.
Q: How to handle errors during program execution? A: When errors occur during program execution:
- View error information to understand the specific cause
- Clear alarm: Click [Clear Alarm] button or clear through remote IO signal
- Check program logic and parameter settings, fix the issue and re-run