Axis Control Function Guide
| Instruction Type | Foreground | Global Background | Local Background |
|---|---|---|---|
| Axis Point-to-Point | Supported | Supported | Supported |
| Axis Constant Speed | Supported | Supported | Supported |
| Axis Constant Torque | Supported | Supported | Supported |
| Axis Stop | Supported | Supported | Supported |
| Cancel Independent Control | Supported | Supported | Supported |
Notes:
Before using the axis control function, please pay attention to the following:
Before use, check whether the servo supports PP, CSP, PV, CSV, PT and other modes. Although some servo manuals indicate support for these modes, they may not actually support them. For example, most servos from Clearpath and Jiutong integrated drive-controller products.
If the control words for these modes are non-standard for the servos used on-site, they need to be re-adapted. Please refer to the corresponding servo manual for details.
If some servos have correct control words but use inconsistent units, they need to be re-adapted. Please refer to the corresponding servo manual for details.
Configure ENI parameters according to the PP, CSP, PV, CSV, PT mode descriptions of different servos. Please refer to the corresponding servo manual for details.
If motion still cannot be performed normally after confirming the above configuration notes, please verify whether the servo parameters are correct.
Axis control motion cannot be test-run.
Notes:
When continuously calling global and local programs from the main program, a delay needs to be added in between. When multi-threading is enabled without adding a delay, the axis motion in that thread may not start, causing failure to run (this is the phenomenon when an external axis runs for the first time after canceling independent control).
When the main program calls a local program, if the local program does not have an axis stop instruction, the axis cannot stop when the local program ends. It is recommended to follow the normal axis instruction usage flow.
Motion in the popup page and jog/homing in the calibration page — some operations that maintain running will not be stopped by the corresponding axis stop. They can only be stopped through the stop method on the corresponding interface.
Independent Axis Parameters
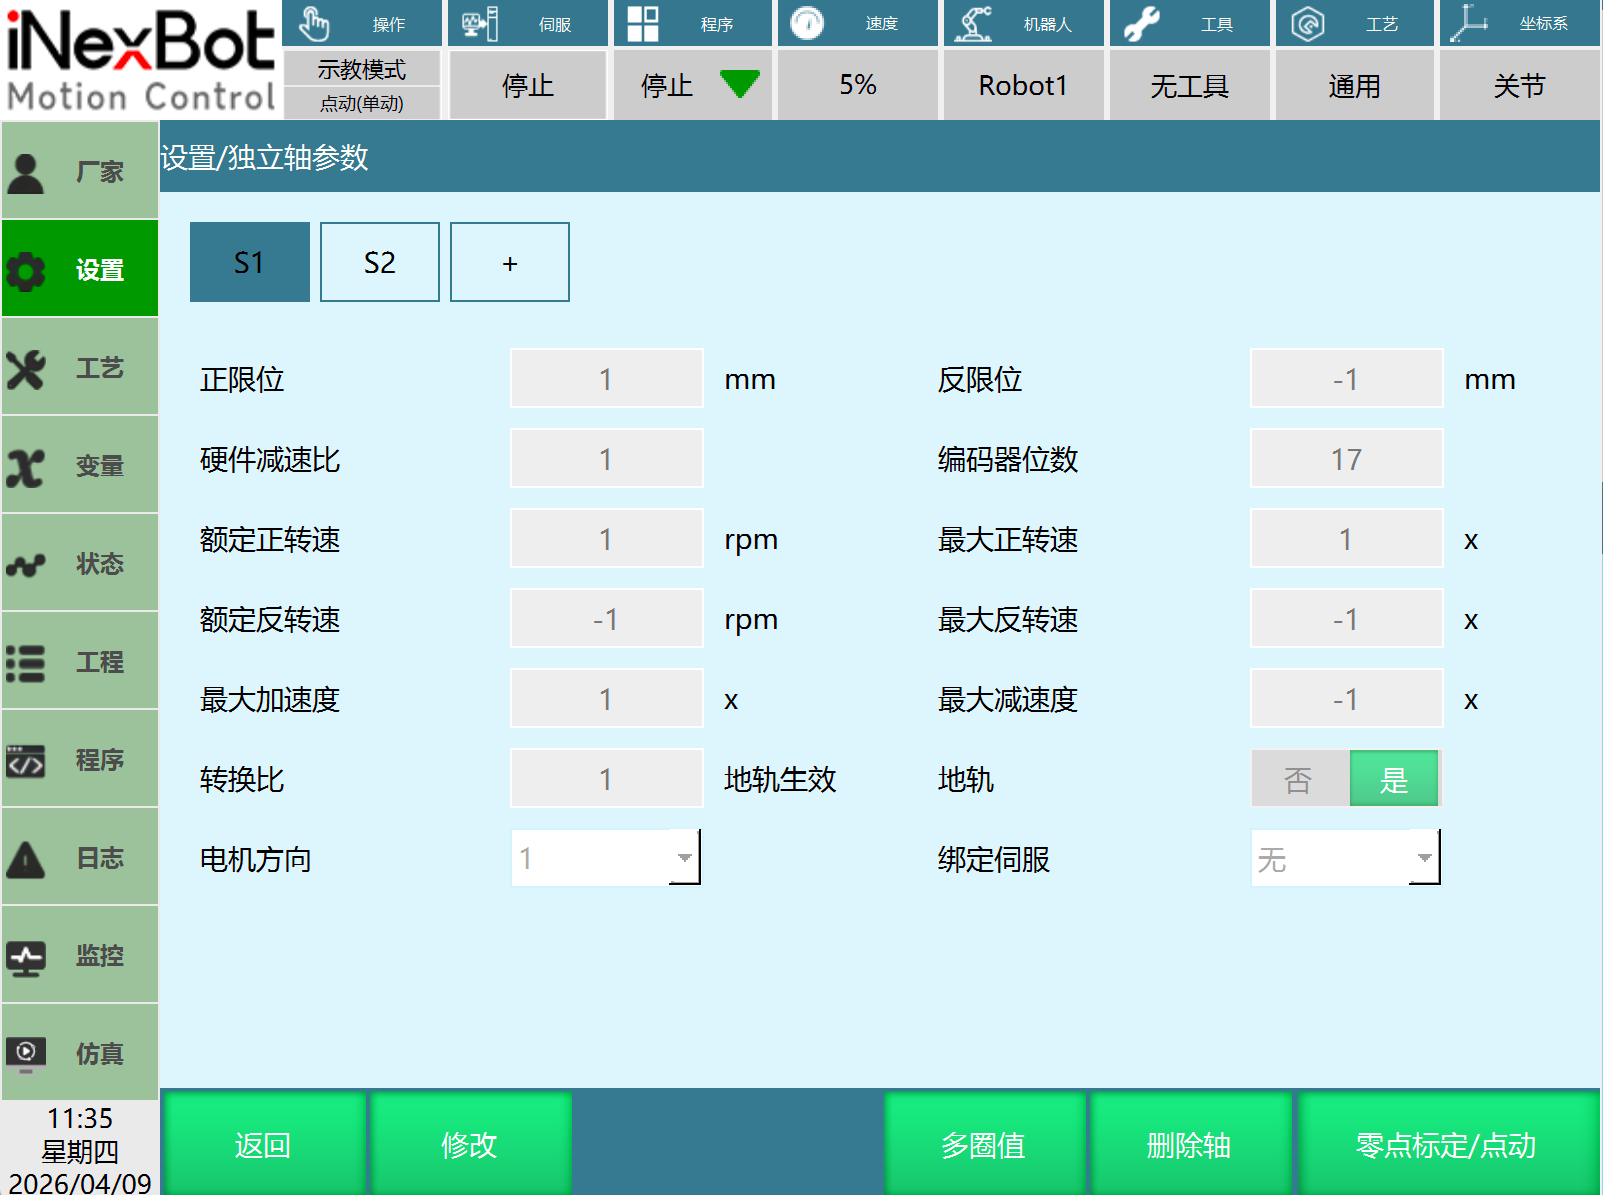
Independent Axis Parameter Settings
Open Settings — Independent Axis Parameters page to configure independent axis joint parameters:
Click the "+" button to create a new independent axis page and configure joint parameters (up to 10 independent axes can be created).
Click the "Modify" button to modify independent axis joint parameters.
Click "Delete Axis" to delete the currently selected independent axis.
Modify the motor direction to change the independent axis motion direction.
Select the linear rail based on actual usage. You need to fill in the angle-to-distance conversion ratio, and the position unit in instructions changes from ° to mm.
Homing / Jog
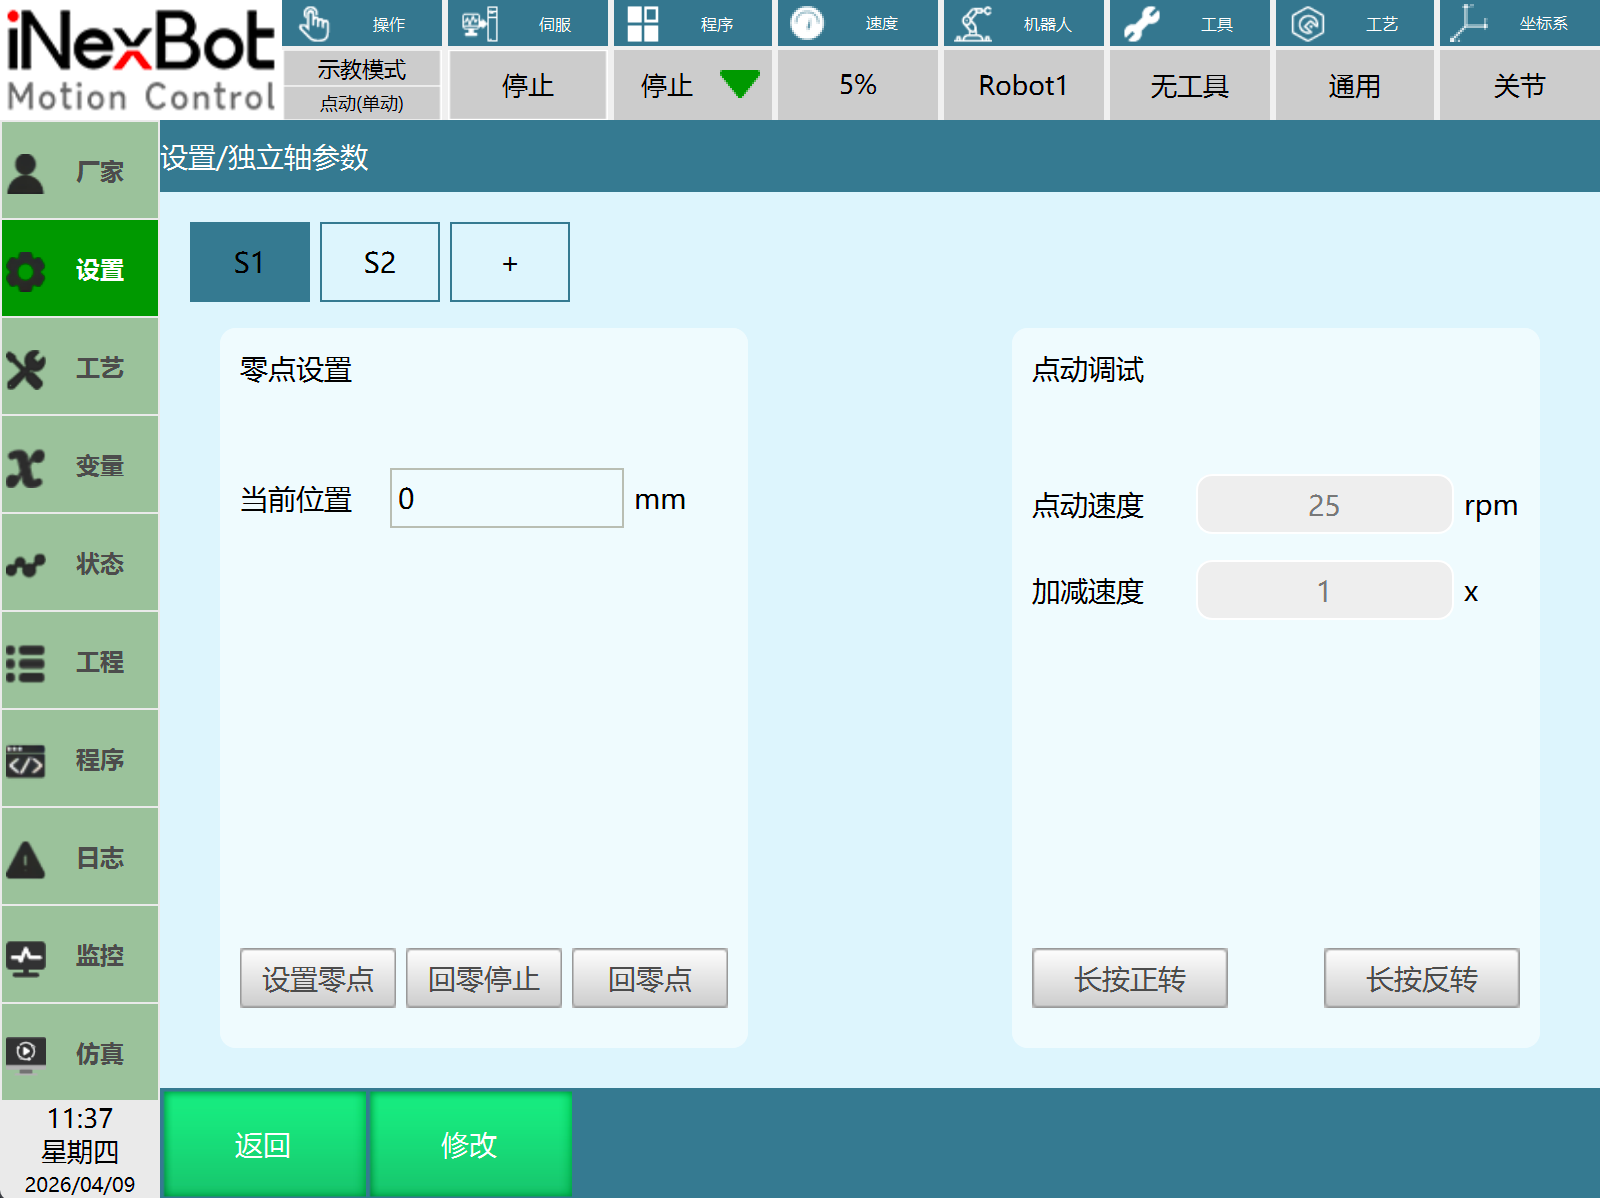
Open Settings — Independent Axis Parameters — Homing / Jog:
Current Position: Displays the current position of the independent axis. The unit is displayed based on the actual state. If the linear rail is selected in the independent axis parameters, the current position unit changes from ° to mm.
Home: Click Home to move the current independent axis to the zero position. PDO configuration is required for normal use.
Home Stop: Click Home Stop to stop the currently moving axis. PDO configuration is required for normal use.
Set Zero: Click Set Zero to set the current position of the independent axis as the zero position.
Jog Speed: Enter the speed used for jogging, range [0.001, 10000].
Acceleration/Deceleration: Enter the acceleration/deceleration multiplier used for jogging, range [1, 5].
Long Press Forward: After clicking Long Press Forward, the mapped axis of the current independent axis moves in the positive direction.
Long Press Reverse: After clicking Long Press Reverse, the mapped axis of the current independent axis moves in the negative direction.
Modify: After clicking Modify, you can fill in the jog speed and acceleration/deceleration. These two parameters are not saved and need to be reconfigured after restart.
Home: Uses CSP mode. CSP: 607A.
Jog Debug: Uses CSV mode. CSV: 60FF.
Multi-Turn Value
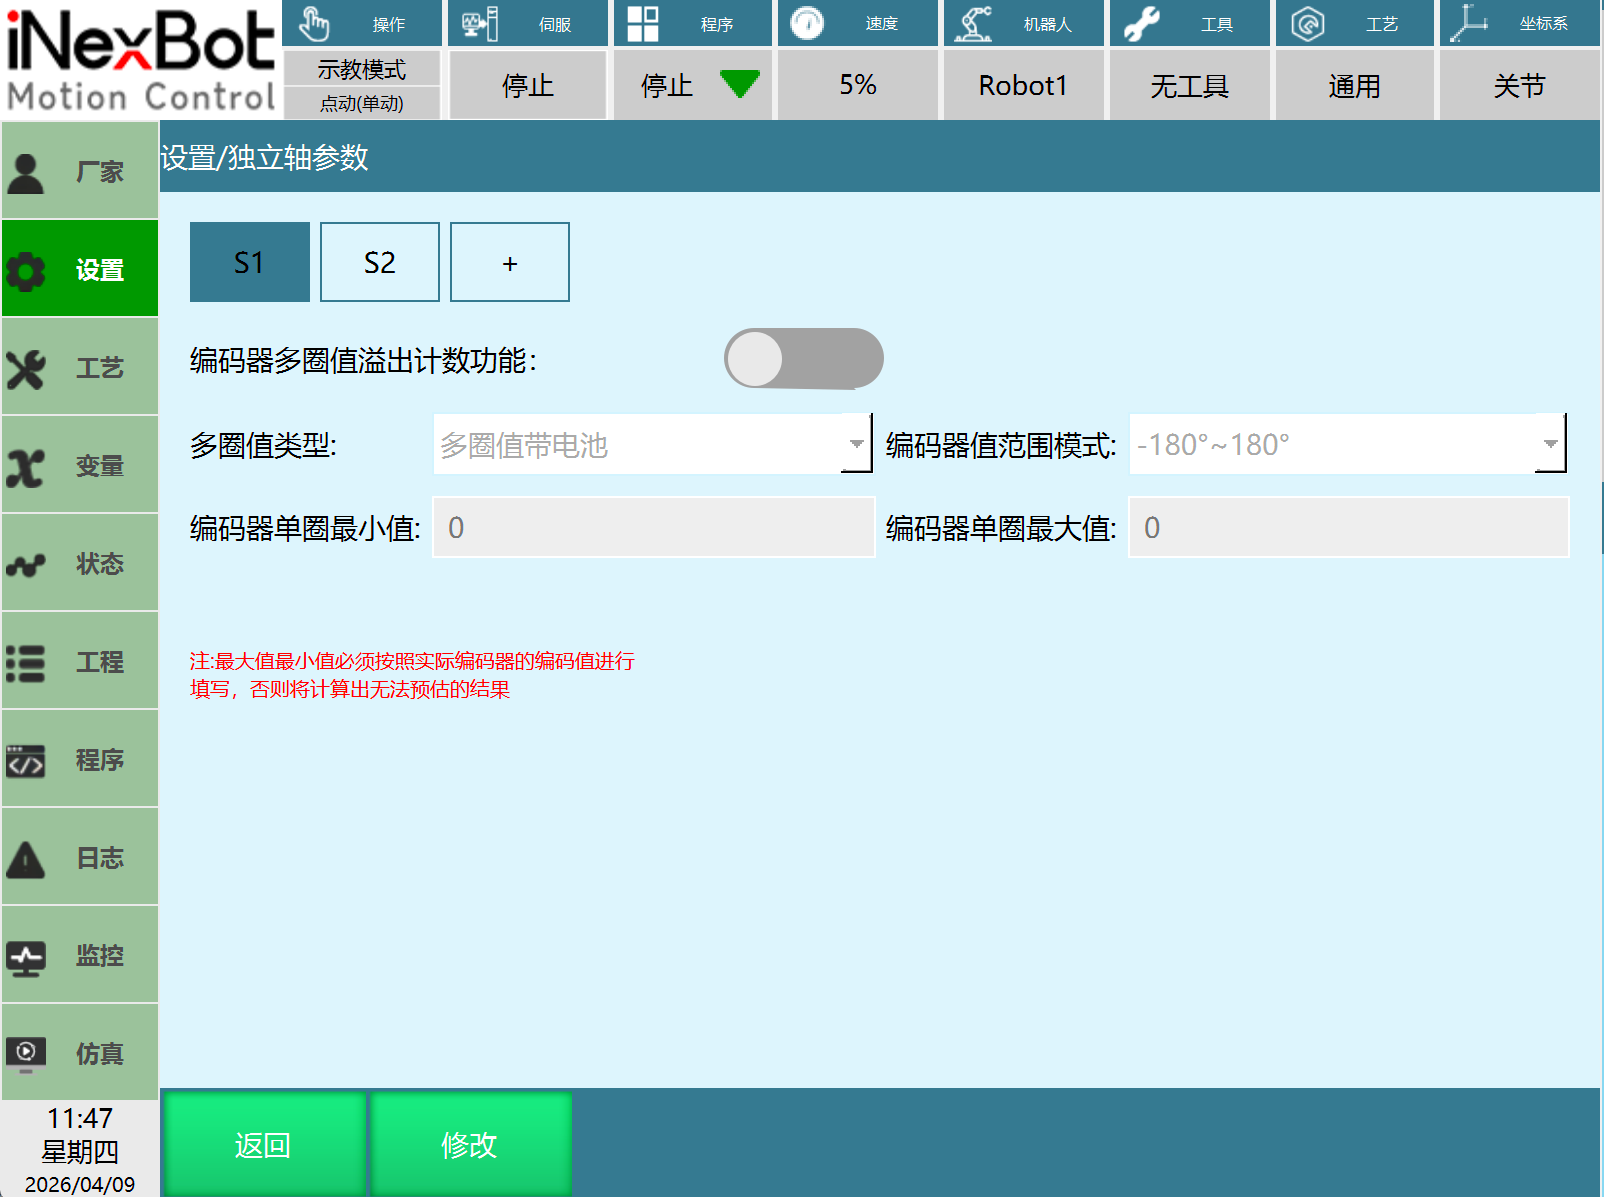
Open Settings — Independent Axis Parameters — Multi-Turn Value:
Function Introduction: Encoder multi-turn value overflow counting function: This function is used to eliminate the impact of jumps between the encoder's maximum and minimum values.
For example: The encoder multi-turn value range is [-2147483648, 2147483647]. If the current encoder multi-turn position is 2147483647, rotating one more unit in the positive direction results in -2147483648. If the system does not know the encoder multi-turn value range, it will assume the robot suddenly jumped, not knowing that it actually only rotated one unit. This can easily cause a runaway situation.
 This parameter must be filled in. Not filling it may cause the following problems: This parameter must be filled in. Not filling it may cause the following problems: 1. Large position jumps, e.g. suddenly changing from 4 degrees to 40 degrees. 2. Runaway. |
|---|
Encoder Multi-Turn Value Overflow Counting Function: When enabled, it eliminates the impact of jumps between the encoder's maximum and minimum values.
Multi-Turn Value Type: Select the encoder type. Confirm that the selection is correct.
- Multi-turn with battery
- Multi-turn without battery
- Single-turn
Encoder Value Range Mode: Select the encoder range type. Confirm that the selection is correct.
- -180° to 180°
- 0° to 360°
Encoder Single-Turn Minimum Value: Displays the corresponding encoder single-turn minimum value based on the multi-turn value type and encoder value range mode.
Encoder Single-Turn Maximum Value: Displays the corresponding encoder single-turn maximum value based on the multi-turn value type and encoder value range mode.
Axis Control Instructions in Detail
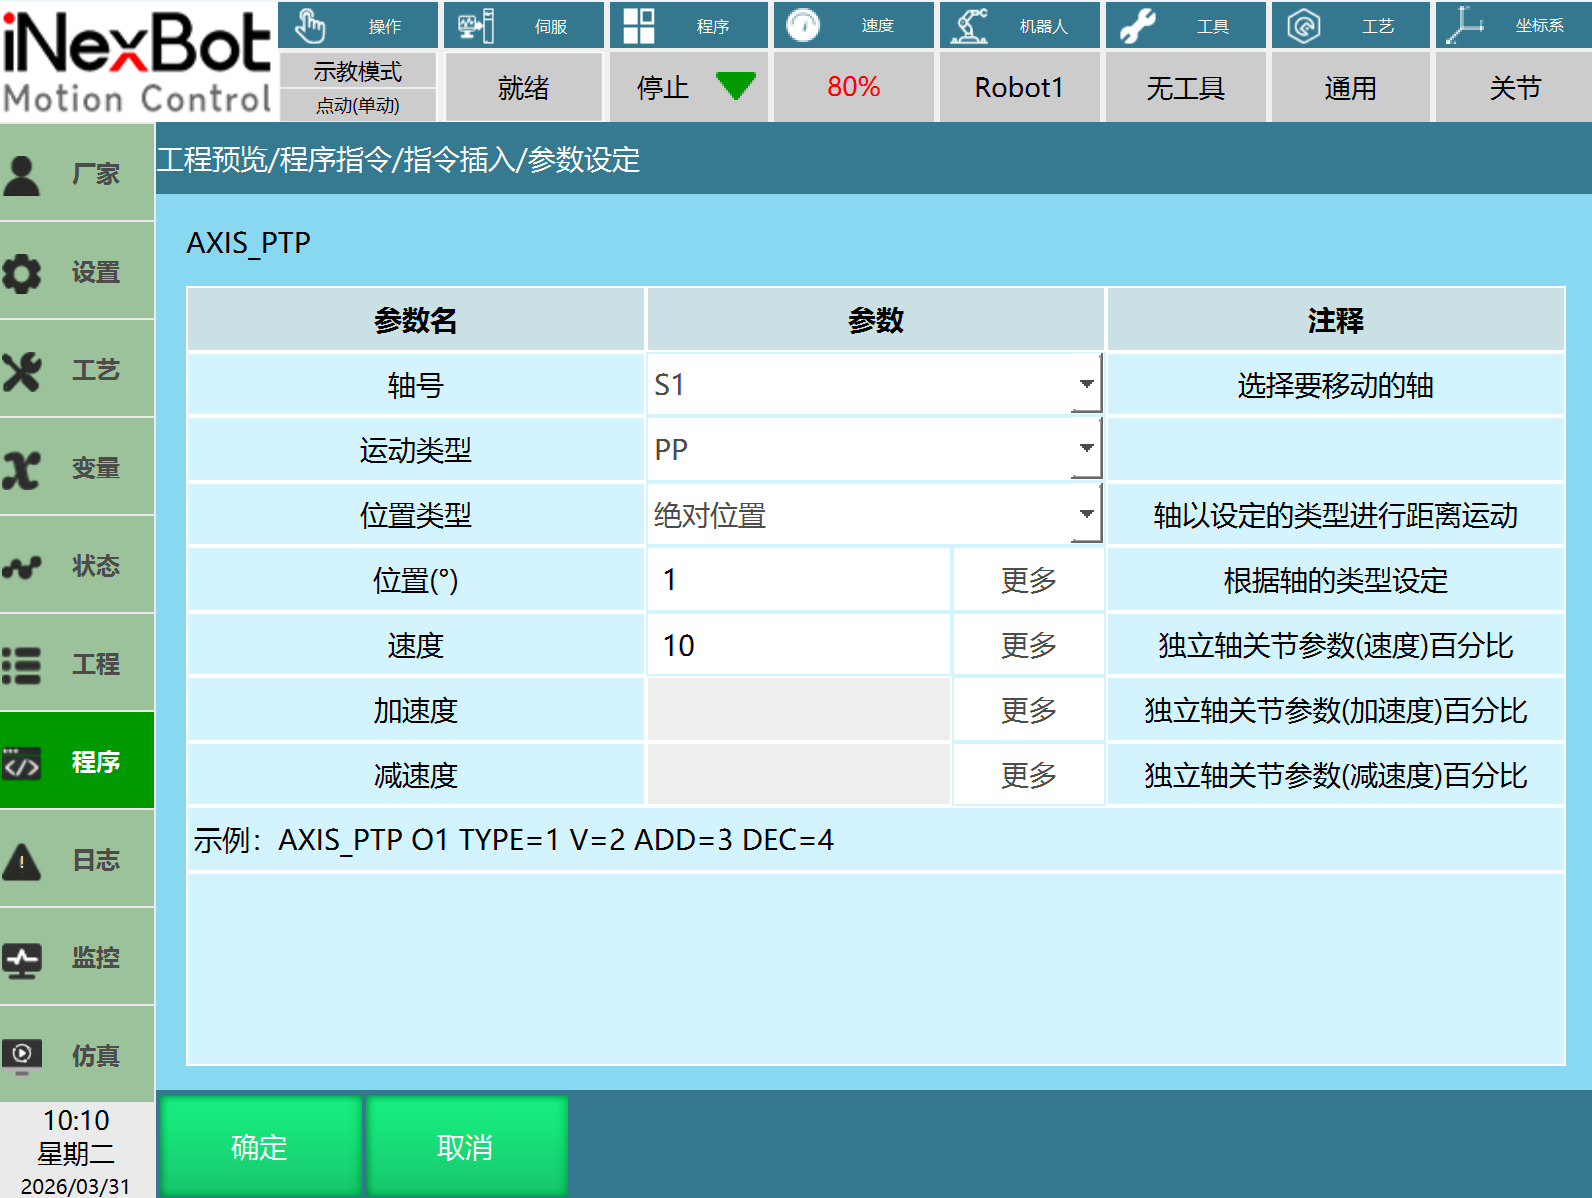
Axis Point-to-Point (AXIS_PTP)
Supported Types: External axis (O1, O2), Independent axis (S1, S2)
Motion Type: PP, CSP
Profile Position Mode (PP): The controller sends the target position, speed, and acceleration/deceleration to the driver. The driver internally completes position control, speed control, and torque control.
Cyclic Synchronous Position Mode (CSP): The controller completes position planning and periodically sends the planned target position to the driver. The driver internally completes position control, speed control, and torque control.
Position Type: Absolute, Incremental
- Absolute: Move to the set position
- Incremental: Move by a certain increment from the current position
Position: The position setting is a distance or angle. Positive/negative indicates the motion direction. The unit is mm or ° depending on the axis type.
Speed: Speed and acceleration/deceleration set the movement speed of the axis. The input range is 1-100% of the values set in the joint parameters (speed, acceleration/deceleration). Acceleration/deceleration is not used by default. You can select manual entry and choose from 8 numeric types including integer and float.
Blocking: This is a blocking motion. The next instruction runs only after the motion is complete.
PDO Required for Corresponding Mode (using Anchi as example):
- PP: 6081 6083 6084
- CSP: 607A
Usage Example:
NOP
AXIS_PTP AxisNum = 1 RunType = 1 PositionType = 1 PositionValue = 1000 V = 30 AccSpeed = [-] DecSpeed = [-]
AXIS_STOP 1
AXIS_PTP AxisNum = 1 RunType = 1 PositionType = 1 PositionValue = -1200 V = 30 AccSpeed = 50 DecSpeed = 30
AXIS_STOP 1
END
Axis Constant Speed (CONSTANTAXIS_VELOCITY)
Supported Types: External axis (O1, O2), Independent axis (S1, S2)
Motion Type: PV, CSV
Profile Velocity Mode (PV): The controller sends the target speed and acceleration/deceleration to the driver. Speed and torque adjustment is performed internally by the driver.
Cyclic Synchronous Velocity Mode (CSV): The controller completes target speed planning and periodically sends it to the driver. Speed and torque adjustment is performed internally by the driver.
Speed: The speed at which the axis moves at the set speed (motor RPM). Positive/negative indicates the motion direction. The unit is rpm or mm/min.
Acceleration/Deceleration: Calculated based on the speed. The unit is speed × multiplier/min². The default value type is "Don't use". When manual entry is selected, you can choose from 8 numeric types including integer and float.
Blocking: This is a non-blocking motion. The next instruction can be executed during motion until the next instruction runs.
PDO Required for Corresponding Mode (using Anchi as example):
- PV: 60FF 6083 6084
- CSV: 60FF
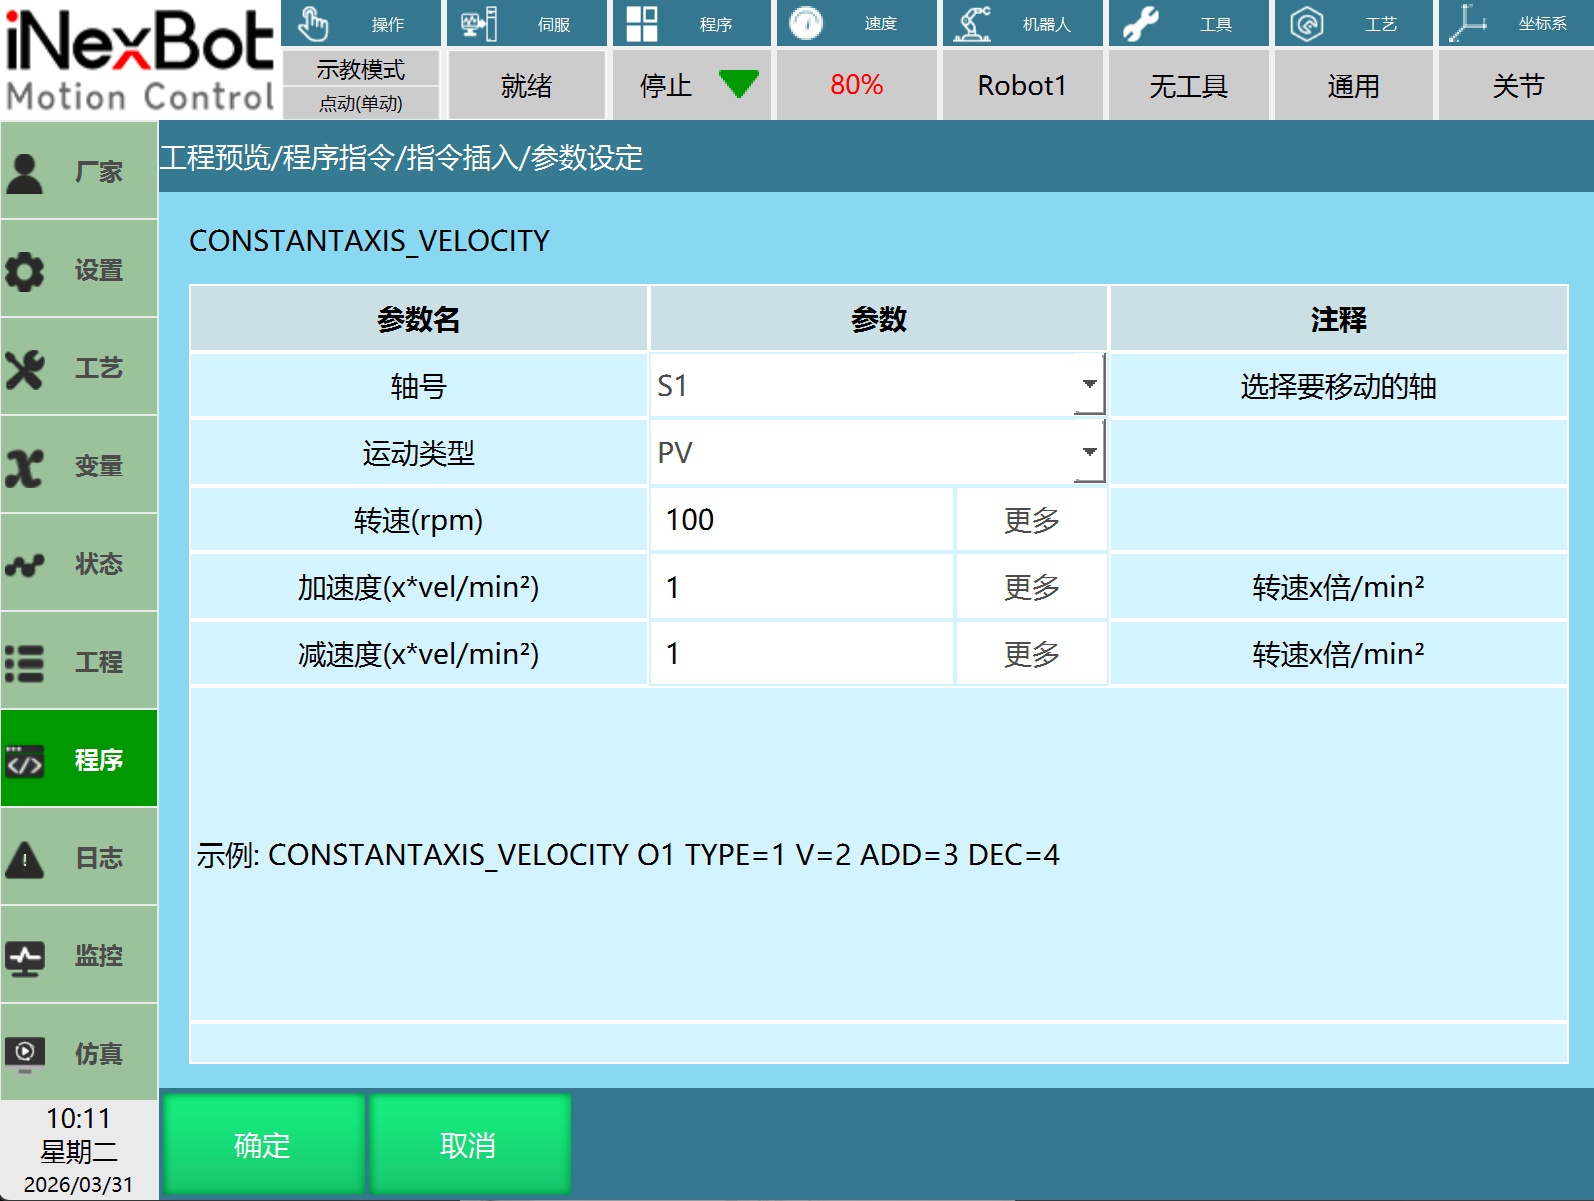
Usage Example:
NOP
CONSTANTAXIS_VELOCITY AxisNum = 1 RunType = 2 V = -2900 AccSpeed = 10 DecSpeed = 10
TIMER T = 3
AXIS_STOP 1
CONSTANTAXIS_VELOCITY AxisNum = 1 RunType = 2 V = 1000 AccSpeed = 10 DecSpeed = 10
TIMER T = 3
AXIS_STOP 1
END
Axis Constant Torque (CONSTANTAXIS_TORQUE)
Supported Types: External axis (O1, O2), Independent axis (S1, S2)
Motion Type: PT
Profile Torque Mode (PT): The controller sends the target torque and torque ramp value to the driver. Torque adjustment is executed internally by the driver.
Torque: The torque value is set as a percentage of the axis's rated torque. Positive/negative indicates the motion direction.
Torque Ramp: The torque ramp is the acceleration/deceleration of torque. The unit is %0.1/s. A smaller torque ramp value results in slower startup.
Blocking: This is a non-blocking motion. The next instruction can be executed during motion until the next instruction runs.
PDO Required for Corresponding Mode (using Anchi as example):
- PT: 6071
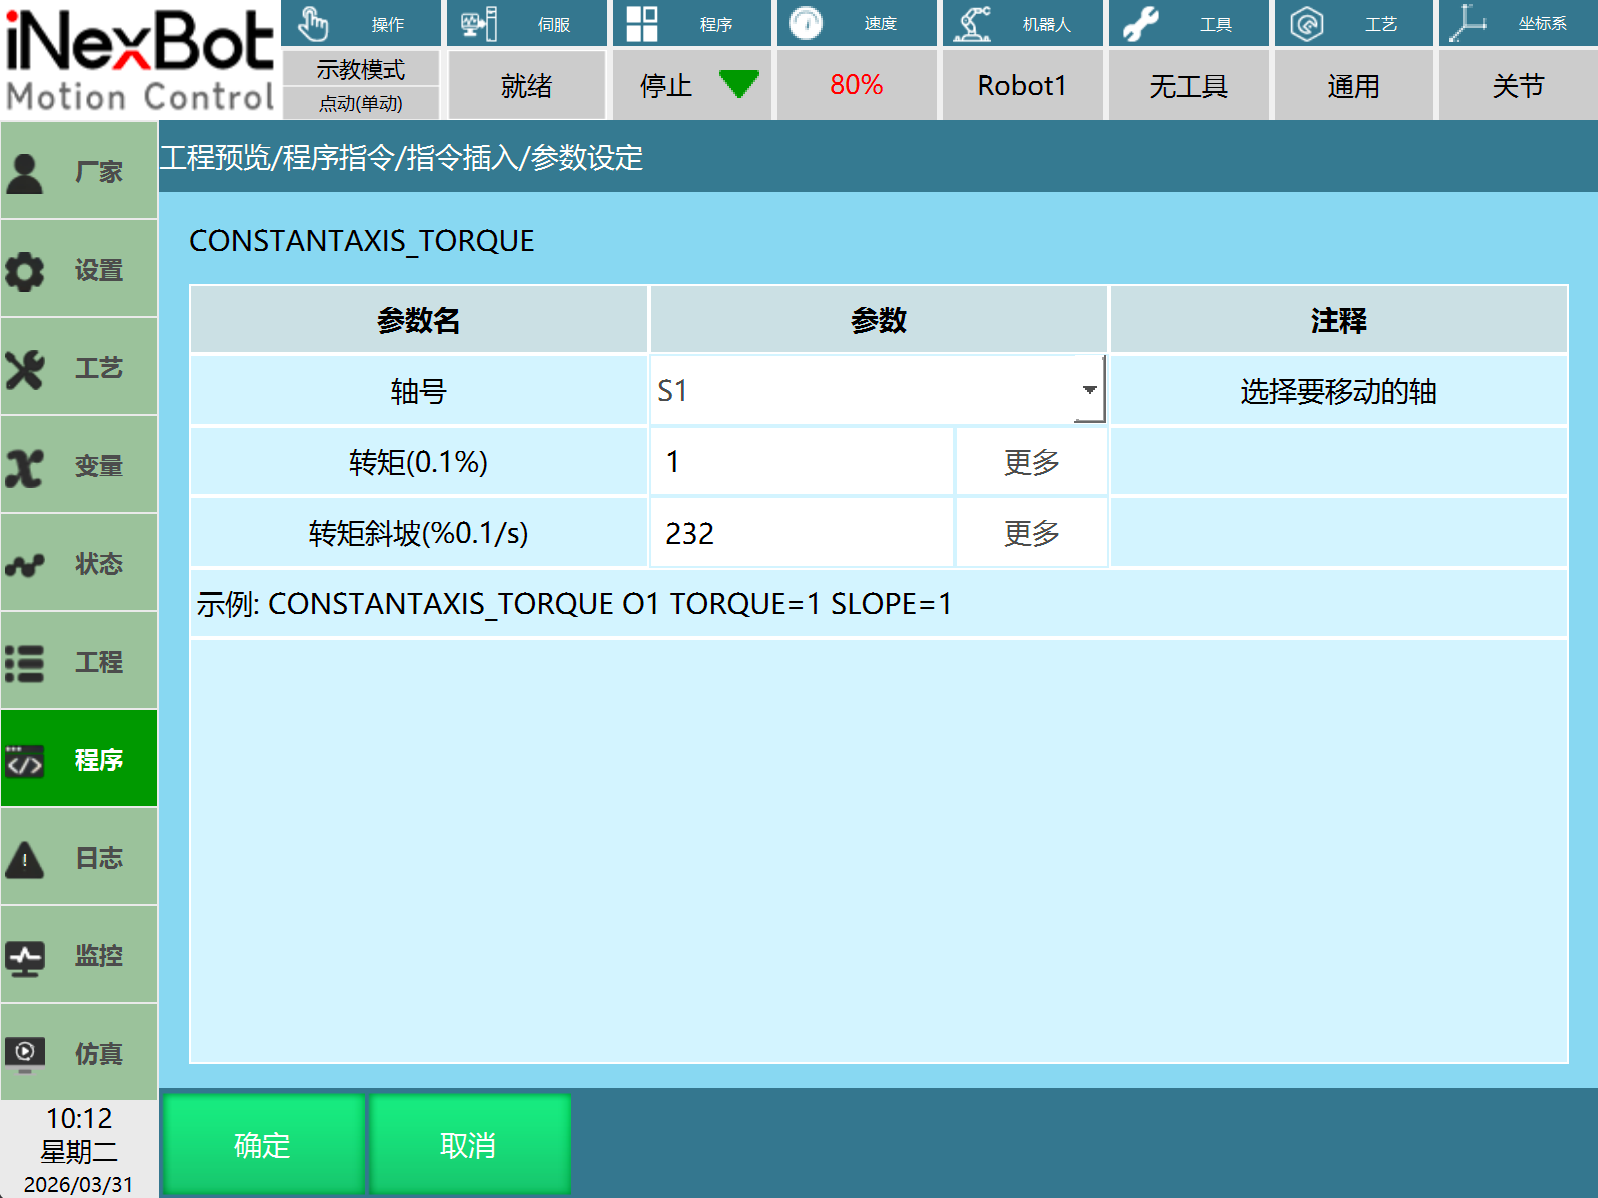
Usage Example:
NOP
CONSTANTAXIS_TORQUE 2 1000 232
TIMER T = 3
AXIS_STOP 2
CONSTANTAXIS_TORQUE 2 -1000 232
TIMER T = 3
AXIS_STOP 2
END
Axis Stop (AXIS_STOP)
Supported Types: External axis (O1, O2), Independent axis (S1, S2)
Axis Number: Select the axis number to stop. Can stop a running axis.
Notes:
- An axis stop instruction must be added after an axis control motion instruction. Run the axis stop instruction before running other axis control instructions.
Possible Issues:
- Not adding an axis stop instruction after an axis control motion instruction may cause the next axis control instruction to have incorrect motion direction or speed.
- Not adding an axis stop instruction after an axis control motion instruction may cause the moving independent axis to fail to stop normally.
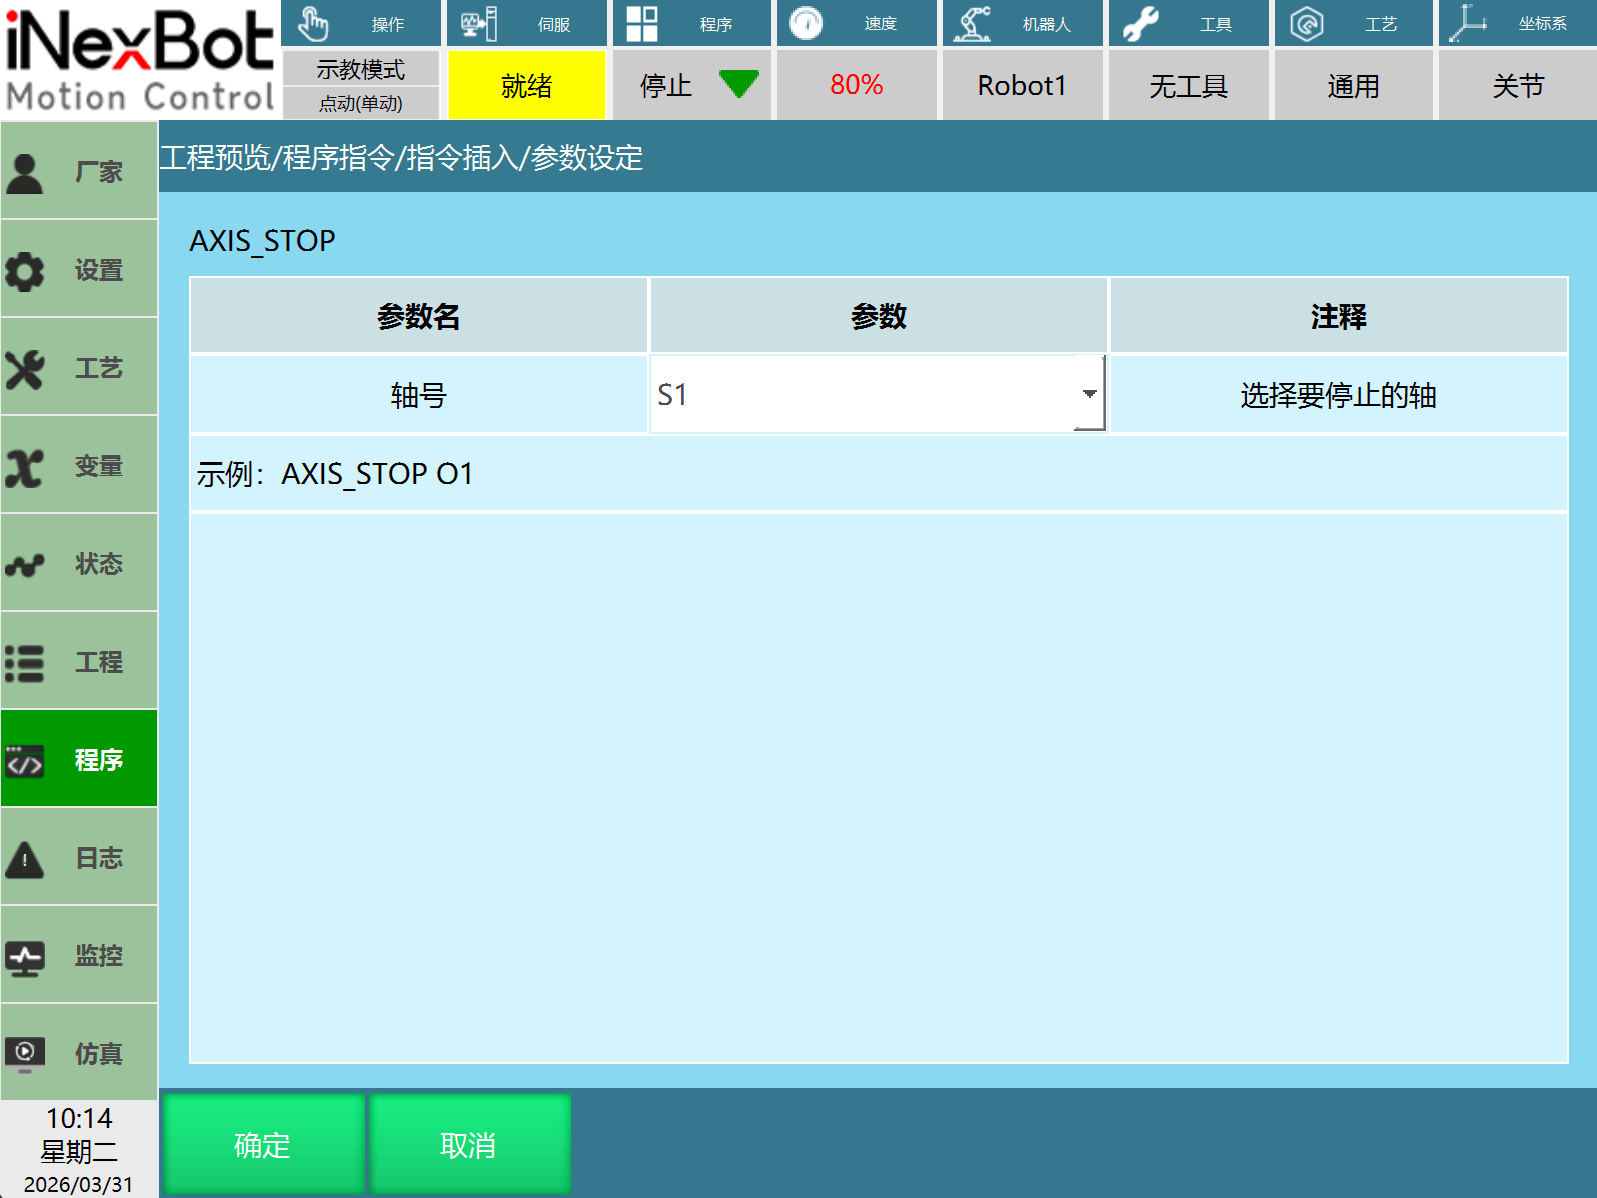
Usage Example:
NOP
CONSTANTAXIS_TORQUE 2 1000 232
TIMER T = 3
AXIS_STOP 2
END
NOP
AXIS_PTP AxisNum = 1 RunType = 1 PositionType = 1 PositionValue = 1000 V = 30 AccSpeed = [-] DecSpeed = [-]
AXIS_STOP 1
ENDCancel Independent Control (CancelIndependentControl)
Supported Types: External axis (O1, O2)
Axis Number: Select the axis number to cancel. Can rebind an already unbound axis. External axes can be used.
Notes:
- To rebind an unbound axis, run the cancel independent control instruction.
- If the axis is in motion, executing cancel independent control cannot rebind the unbound axis. Ensure the unbound axis is not moving.
Possible Issues:
- An unbound external axis cannot be jogged. It needs to be rebound first before jogging operations can be performed.
- Without running the cancel independent control instruction to rebind the unbound axis, joint parameters and servo mapping cannot be modified.
- The cancel independent control instruction can rebind an unbound axis. If there are motion control instructions below the cancel independent control instruction, an error will be reported indicating servo state inconsistency and job file startup failure. During job file execution, basic motion control instructions perform servo state detection, while axis control motion instructions do not.
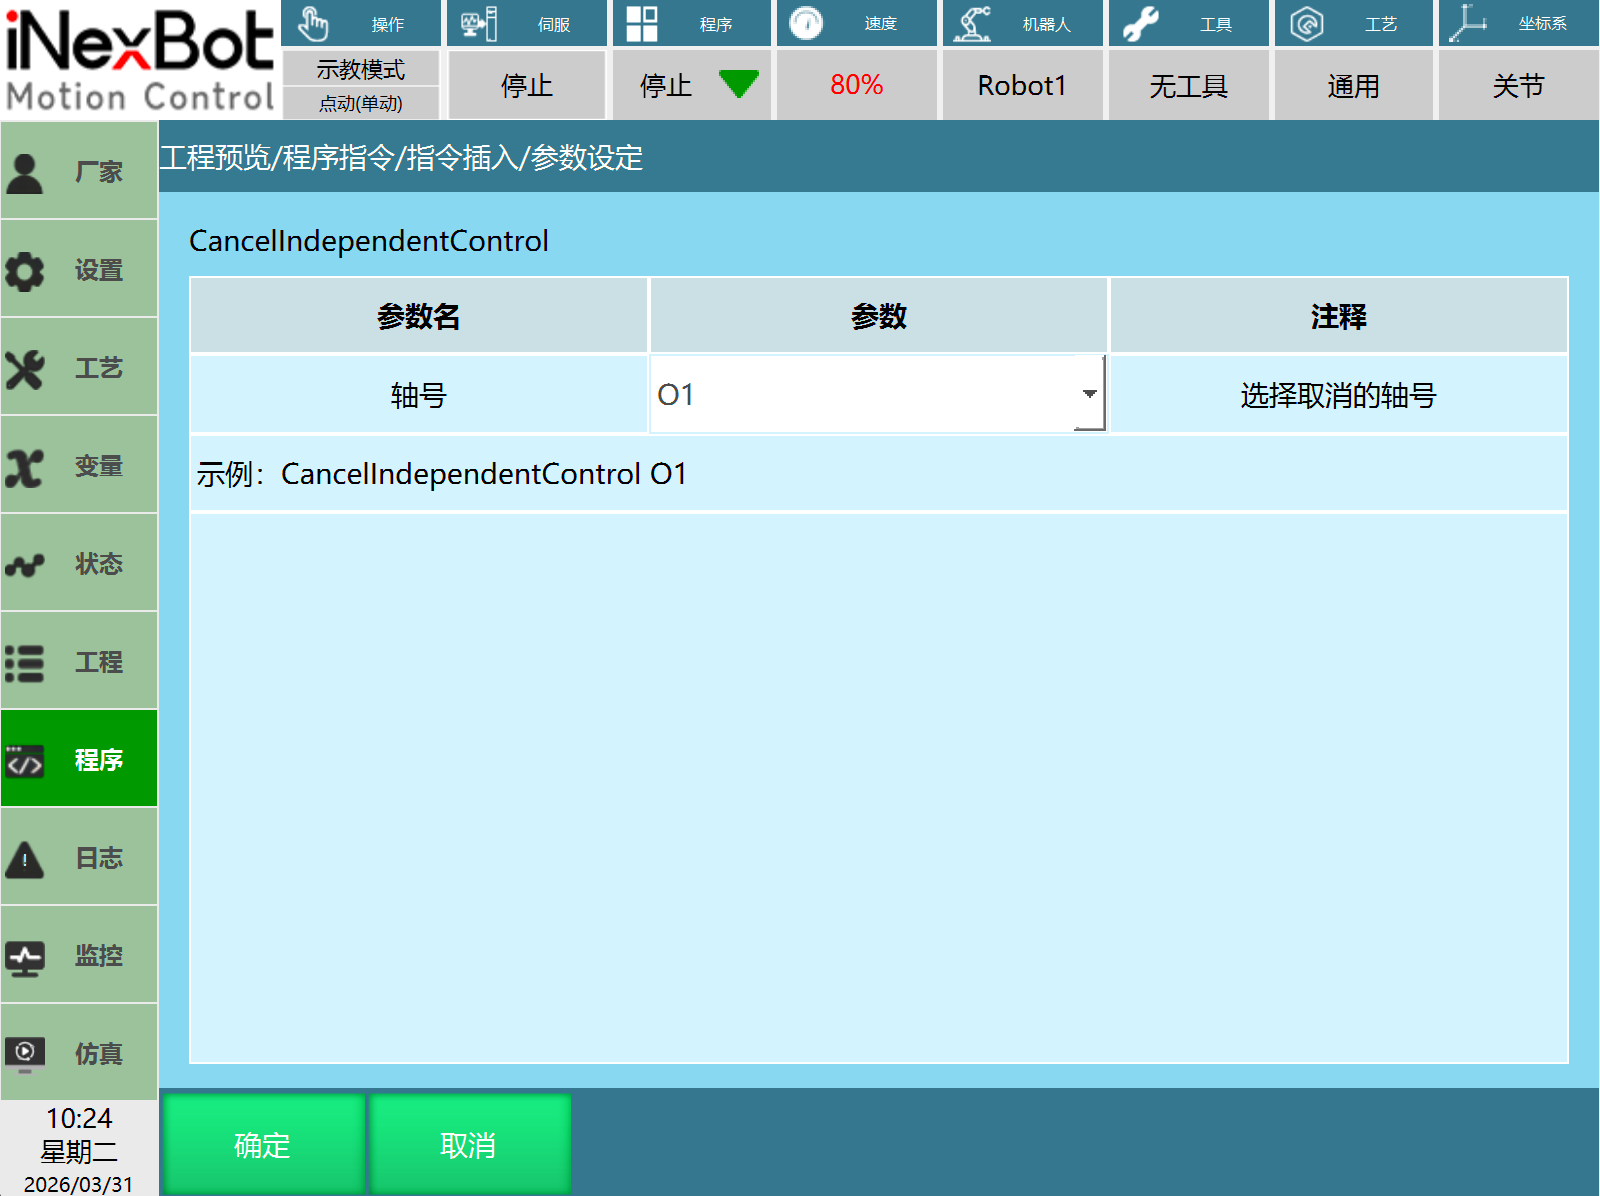
Usage Example:
NOP
CONSTANTAXIS_VELOCITY AxisNum = 1 RunType = 3 V = -50 AccSpeed = 10 DecSpeed = 10
TIMER T = 3
AXIS_STOP 1
CANCEL_INDEPENDENT_CONTROL 1
END
Axis Independent Control Window
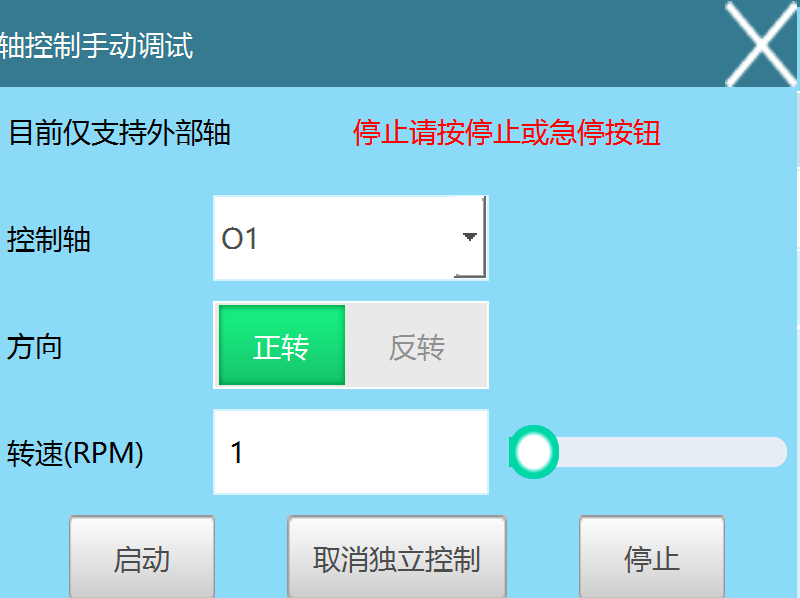
Open Settings — Operation Parameters, enable the Show Axis Control Interface option. The process popup displays "Axis Independent Control".
The axis independent control window supports the PV mode.
Control Axis: Select the axis to move/stop. Currently supports external axes.
Direction: Direction during motion.
Speed: Set the speed during motion.
Start: Click Start to run the axis motion (axis constant speed PV).
Stop: Click Stop to stop the running axis (axis stop).
Cancel Independent Control: Rebind the selected control axis (cancel independent control).
Q&A for Retrieval
Q: How do I use an independent axis? What preparation is needed before use?
A: Create as many independent axes as needed. Based on the configuration, fill in the mapped driver's encoder bit count, gear ratio, rated forward speed, and other parameters. Confirm whether the driver supports the desired mode. Configure PDO according to the driver manual.
Q: After configuring PDO, jogging has no response?
A: Confirm that the configured PDO is correct. Verify that the gear ratio, encoder bit count, rated speed, and other key parameters are correct. Check whether the axis motion is too slow to be visible.
Q: The axis constant speed motion is too slow?
A: Export the configuration via USB drive. Open the IndependentControlAxisConfig.json file and modify the pvAndPpModeMaxVel field. The specific value depends on the encoder bit count, with a maximum of 2^32 - 1.
Q: What types of axes does axis control support?
A: Supports external axes (O1, O2) and independent axes (S1, S2).
Q: What motion modes does axis control support?
A: Supports PP (Profile Position Mode), CSP (Cyclic Synchronous Position Mode), PV (Profile Velocity Mode), CSV (Cyclic Synchronous Velocity Mode), PT (Profile Torque Mode).
Q: What is the difference between PP mode and CSP mode?
A: In PP mode, the controller sends the target position, speed, and acceleration/deceleration to the driver, which internally completes position, speed, and torque control. In CSP mode, the controller completes position planning and periodically sends the planned target position to the driver, which internally completes position, speed, and torque control.
Q: What position types are available for axis point-to-point motion?
A: There are two types: absolute and incremental. Absolute moves to the set position, while incremental moves by a certain increment from the current position.
Q: What is the blocking characteristic of the axis constant speed instruction?
A: The axis constant speed instruction is non-blocking. The next instruction can be executed during motion until the axis stop instruction runs.
Q: The unbound external axis cannot be jogged. What should I do?
A: An unbound external axis cannot be jogged. It needs to be rebound first. Run the cancel independent control instruction.
Q: What happens if the cancel independent control instruction is not run to rebind the unbound axis?
A: Without running the cancel independent control instruction to rebind the unbound axis, joint parameters and servo mapping cannot be modified.
Q: Sudden position jumps occur during motion. What is the cause?
A: During independent axis motion, the encoder value is at the boundary between maximum and minimum values, and the multi-turn value function is not enabled, causing position jumps.