Multi-Robot Mode and Dual-Robot Collaboration Manual
1 Multi-Robot Mode
Multi-robot mode refers to controlling multiple robots by debugging one teach pendant. This product supports controlling up to 4 robots simultaneously. This chapter introduces how to set the number of simultaneously controlled robots, switch robots, dual-robot collaboration, and the methods and steps for running programs on multiple robots at the same time.
1.1 Slave Connection
The robot order is shown in the figure below:
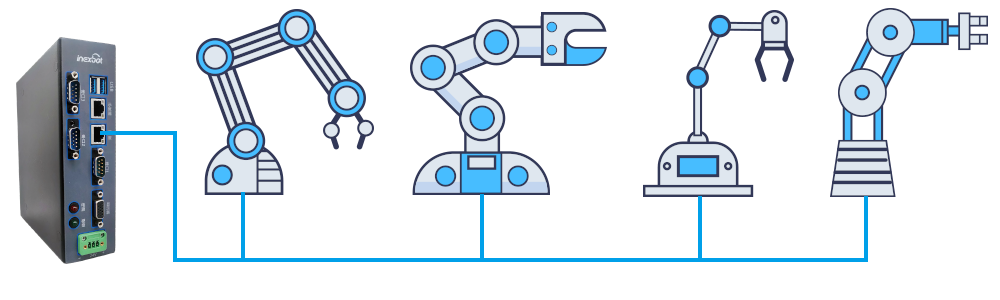
Note: When slaves are connected in series, they must be directly connected with an Ethernet cable. Do not use a switch (connecting via a switch may cause the robot to run away)!
1.1.1 Configuring Robots
In the robot selection screen under the settings screen, select the number of robots and the type of each robot.
Specific steps:
Switch the permission to "Administrator";
Enter "Settings/Robot Parameters/Slave Configuration";
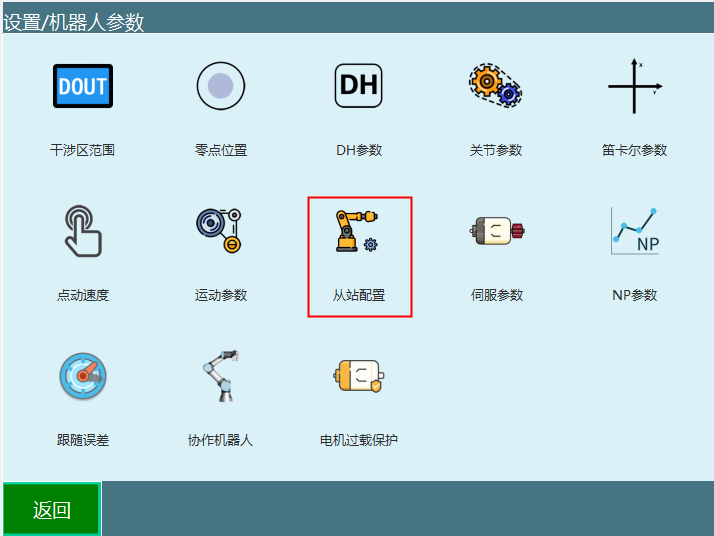
- Enter "Settings/Robot Parameters/Slave Configuration/Slave List";
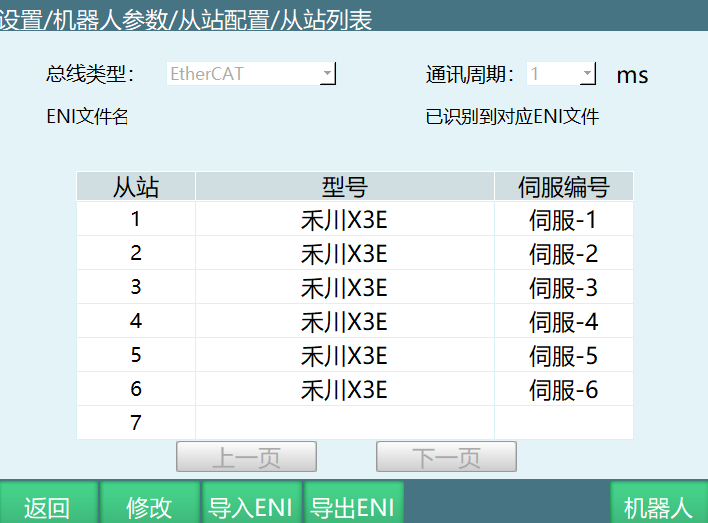
- Click "Robot" to enter the robot configuration screen. In the "Number of Robots" drop-down box, select the number of robots to control simultaneously, as shown below. Set the parameters according to the number of robots to be controlled and the robot types.
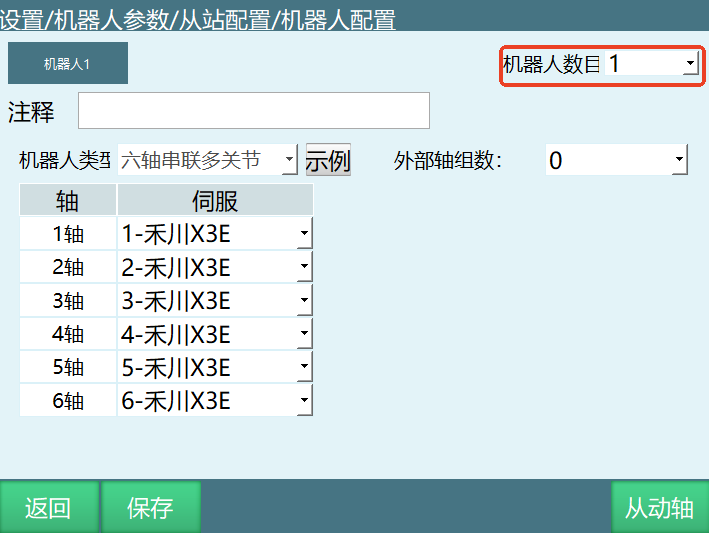
- After setting the number of robots, the robot configuration screen appears as shown below. Click the corresponding robot to select the robot type and its corresponding servo model. The robot order is determined by the order in which the controller is connected in series with the robots.
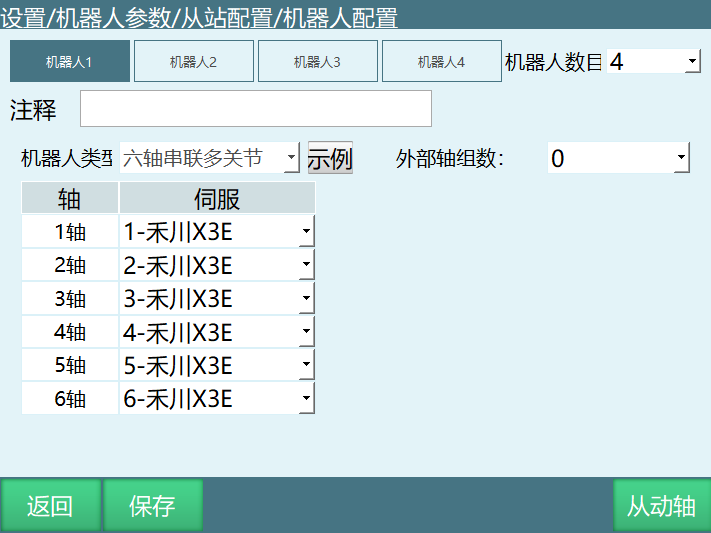
After all robot models and servo models are set, click Save.
Restart the system. After restarting, the robot configuration settings take effect.
1.1.2 Importing Robot Configuration
Import the configuration according to the robot types set in the robot configuration screen.
For example: Robot 1 and Robot 2 are six-axis serial multi-joint robots, and Robot 3 and Robot 4 are four-axis SCARA robots.
Configuration import steps:
- Create a new folder (the configFile folder).
Copy the six-axis serial multi-joint configuration file Robot_A.json corresponding to Robot 1 into this folder; copy the six-axis serial multi-joint configuration file Robot_A.json corresponding to Robot 2 into this folder and rename it to Robot_B.json; copy the SCARA robot configuration file Robot_A.json corresponding to Robot 3 into this folder and rename it to Robot_C.json; copy the SCARA robot configuration file Robot_A.json corresponding to Robot 4 into this folder and rename it to Robot_D.json.
- Insert the USB drive into the USB port of the teach pendant, click Settings - System Settings - Import Controller Configuration, select the configuration folder, and click [OK]. The operation is shown below.
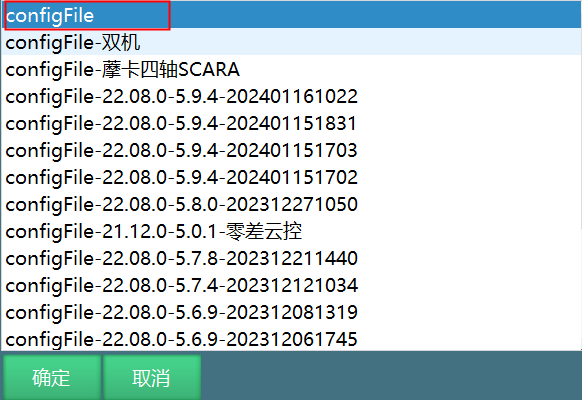
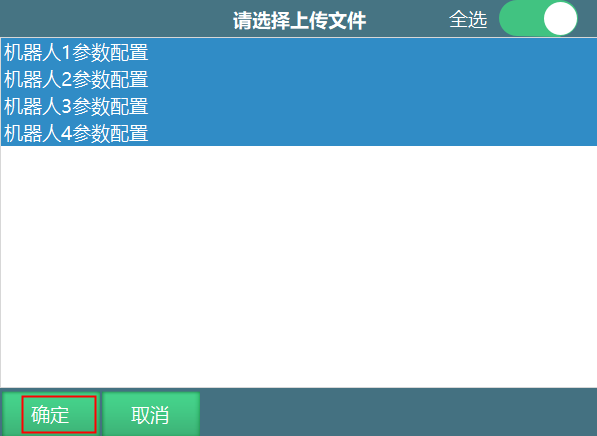
- Select the 4 parameter configuration files and click [OK]. After the configuration files are uploaded successfully, restart the controller.
- After restarting, check whether the robot joint parameters and DH parameters were imported successfully. After successful import, the robots can be operated.
1.1.3 Switching Robots in Multi-Robot Mode
When the mode selection key is at "Teach Mode", press the [Robot] key on the left side of the teach pendant to switch between robots and teach them separately. At this time, the "Robot" column in the upper status bar displays the sequence number of the currently operated robot.
Job files are not shared between robots; the job file also switches when switching robots.
When switching to a different robot type, the related screens also change. When the switched robot type is a four-axis SCARA robot, screens such as "DH Parameter Settings", "User Coordinate System Settings", "Joint Parameter Settings", "Robot Zero Position", "Servo Status" and "IMOV Instruction Insertion" switch to the mode of the current robot's axis count;
The coordinate system on the right side of the screen also changes. The number of axes displayed there equals the number of axes the current robot has.
1.1.4 Running Programs in Multi-Robot Mode
When the mode selection is at "Run Mode", press the [Robot] key to switch between robots. Click [robotall] to enter multi-robot mode. At this time, the screen is as follows:
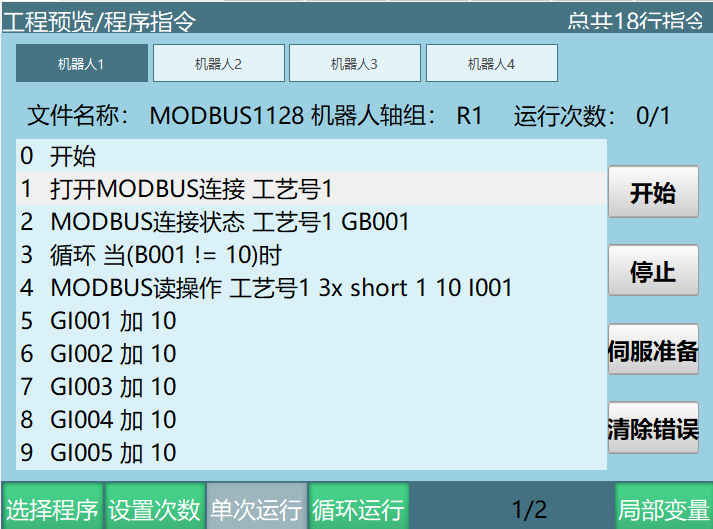
In this mode, only start and stop program operations can be performed.
Click the [Robot 1], [Robot 2], [Robot 3] and [Robot 4] buttons in the operation area at the top of the screen to switch the display screen of each robot.
Click the [Start] button in the operation area on the right side of the screen to run the selected program for the current robot.
Click the [Stop] button in the operation area on the right side of the screen to stop the current robot during operation.
Click the [Servo Ready] button in the operation area on the right side of the screen to put the current robot into the servo ready state.
Click the [Clear Error] button in the operation area on the right side of the screen to clear the servo error that occurred on the current robot.
Click the [Set Count] button in the operation area at the bottom of the screen to stop the current robot after running the set number of times.
Click the [Loop Run] button in the operation area at the bottom of the screen to set the current robot to run continuously.
Click the [Select Program] button in the operation area at the bottom of the screen to set the program to be run on the current robot.
The [START] and [STOP] physical keys on the teach pendant apply to all robots; pressing them starts or stops all robots.
2 Dual-Robot Collaboration
Dual-robot collaboration requires two identical six-axis serial robots. The dual-robot parameter configuration can refer to the robot configuration in multi-robot mode.
To enable dual-robot collaboration, turn on the dual-robot collaboration enable in "Settings - Robot Parameters - Motion Parameters".
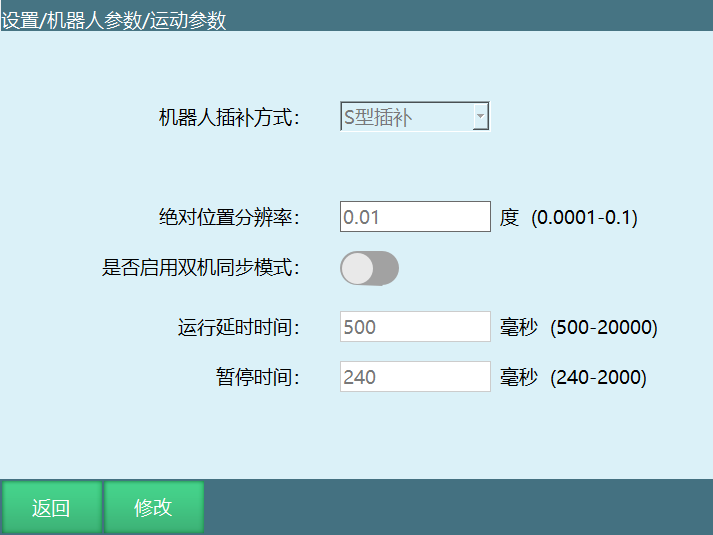
Important notes:
- Turning off the dual-robot collaboration button requires restarting the controller system; turning it on does not require a restart
- If the number of robots is greater than 2, the dual-robot collaboration function will be automatically turned off at restart
- Dual-robot collaboration cannot be used together with multi-robot mode!
- Dual-robot mode and external axes cannot be used at the same time!
After turning on the dual-robot collaboration enable, Robot1 is the master robot and Robot2 is the slave robot. Use the [Robot] key on the left side of the teach pendant to switch the master/slave robot for teaching. After switching to the slave robot, "Robot1/Robot2" is displayed at the current operated robot position in the upper status bar of the teach pendant. Do not use the [External Axis] key to switch to Robot 2 for teaching.
2.1 Dual-Robot Instructions
The instructions for controlling the simultaneous motion of two robots are MOVJDOUBLE, MOVLDOUBLE, MOVCDOUBLE and MOVCADOUBLE, which respectively make both robots move to the position point with joint interpolation and with linear interpolation.
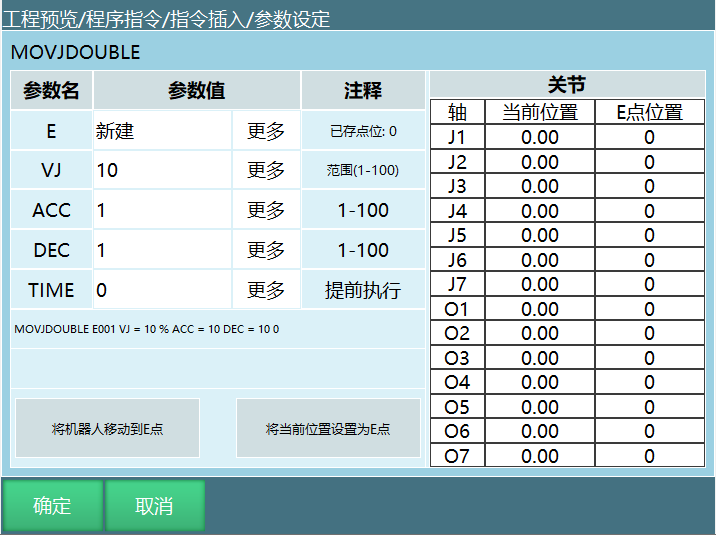
2.1.1 MOVJDOUBLE - Dual-Robot Point-to-Point
Format: MOVJDOUBLE【Instruction Name】E/GE【Variable】 VJ 【Speed】 ACC【Acceleration Ratio】 DEC【Deceleration Ratio】 TIME 【Advance Execution Time, displayed as 0 if not set】
Function: Both robots move from one point to another via joint interpolation.
Parameter description:
| Parameter | Description |
|---|---|
| E/GE | The variable recording robot position data. When the value is "New", inserting this instruction creates a new E variable and records the current robot position into that E variable |
| VJ | Joint interpolation speed, range: [1,100] |
| ACC | Acceleration ratio, range [1,100] |
| DEC | Deceleration ratio, range [1,100] |
| TIME | Advance execution time, unit ms |
Example:
NOP
MOVJDOUBLE E0001 VJ = 10 % PL = 0 ACC= 10 DEC = 10 0
MOVJDOUBLE E0002 VJ = 15 % PL = 0 ACC= 10 DEC = 10 0
END
Example description: At program startup, the two robots move from E0001 to E0002 via joint interpolation according to the taught points.
2.1.2 MOVLDOUBLE - Dual-Robot Linear
Format: MOVLDOUBLE【Instruction Name】E/GE【Variable】 V 【Speed】 ACC【Acceleration Ratio】 DEC【Deceleration Ratio】 TIME 【Advance Execution Time, displayed as 0 if not set】
Function: Control both robots to run to the target point via linear interpolation. The trajectory of the robot end motion is a straight line.
Parameter description:
| Parameter | Description |
|---|---|
| E/GE | The variable recording robot position data. When the value is "New", inserting this instruction creates a new E variable and records the current robot position into that E variable |
| V | Linear interpolation speed, range 1-1000 (the default maximum Cartesian speed is 1000; the range varies according to the actually filled-in Cartesian parameters), unit mm/s |
| ACC | Acceleration ratio, range [1,100] |
| DEC | Deceleration ratio, range [1,100] |
| TIME | Advance execution time, unit ms |
Example:
NOP
MOVLDOUBLE E0001 V = 100 mm/s PL = 0 ACC= 10 DEC = 10 0
MOVLDOUBLE E0002 V = 50 mm/s PL = 0 ACC= 10 DEC = 10 0
MOVLDOUBLE E0003 V = 50 mm/s PL = 0 ACC= 10 DEC = 10 0
MOVLDOUBLE E0004 V = 50 mm/s PL = 0 ACC= 10 DEC = 10 0
END
Example description: At program startup, the two robots move from E0001 to E0004 via linear interpolation according to the taught points, and the trajectory of the robot end motion is a straight line.
2.1.3 MOVCDOUBLE - Dual-Robot Arc
Format: MOVCDOUBLE【Instruction Name】E/GE【Variable】 V 【Speed】 ACC【Acceleration Ratio】 DEC【Deceleration Ratio】 TIME 【Advance Execution Time, displayed as 0 if not set】
Function: The two robots run an arc trajectory at program startup.
Parameter description:
| Parameter | Description |
|---|---|
| E/GE | The variable recording robot position data. When the value is "New", inserting this instruction creates a new E variable and records the current robot position into that E variable |
| V | Linear interpolation speed, range 1-1000 (the default maximum Cartesian speed is 1000; the range varies according to the actually filled-in Cartesian parameters), unit mm/s |
| ACC | Acceleration ratio, range [1,100] |
| DEC | Deceleration ratio, range [1,100] |
| TIME | Advance execution time, unit ms |
Example:
NOP
MOVLDOUBLE E0001 V = 10 % PL = 0 ACC= 10 DEC = 10 0
MOVLDOUBLE E0002 V = 10 % PL = 0 ACC= 10 DEC = 10 0 ; 圆弧起始点
MOVCDOUBLE E0003 V = 100 mm/s PL = 0 ACC= 10 DEC = 10 0 ; 圆弧过渡点
MOVCDOUBLE E0004 V = 100mm/s PL = 0 ACC= 10 DEC = 10 0 ; 圆弧终点
END
Example description: At program startup, the two robots move from E0001 to E0002 via linear interpolation according to the taught points, and run the entire arc trajectory at E0002.
2.1.4 MOVCADOUBLE - Dual-Robot Full Circle
Format: MOVCADOUBLE【Instruction Name】E/GE【Variable】 V 【Speed】 ACC【Acceleration Ratio】 DEC【Deceleration Ratio】 TIME 【Advance Execution Time, displayed as 0 if not set】
Function: The two robots run a full circle trajectory simultaneously through dual-robot collaboration.
Parameter description:
| Parameter | Description |
|---|---|
| E/GE | The variable recording robot position data. When the value is "New", inserting this instruction creates a new E variable and records the current robot position into that E variable |
| V | Linear interpolation speed, range 1-1000 (the default maximum Cartesian speed is 1000; the range varies according to the actually filled-in Cartesian parameters), unit mm/s |
| ACC | Acceleration ratio, range [1,100] |
| DEC | Deceleration ratio, range [1,100] |
| TIME | Advance execution time, unit ms |
| SPIN | Robot end rotation: Pose unchanged: The pose of the full circle run is the same as the pose taught at the first point (the calibration pose of MOVJ/MOVL), and the entire circle trajectory is run with this pose Six axes fixed: The full circle run moves according to the pose taught at each point, while the six axes remain fixed Six axes rotating: The full circle run moves according to the pose taught at each point |
Example:
NOP
MOVLDOUBLE E0001 V = 10 % PL = 0 ACC= 10 DEC = 10 0
MOVLDOUBLE E0002 V = 10 % PL = 0 ACC= 10 DEC = 10 0 ; 整圆起始点
MOVCADOUBLE E0003 V = 25 mm/s PL = 0 ACC= 10 DEC = 10 0 ; 整圆过渡点
MOVCADOUBLE E0004 V = 25 mm/s PL = 0 ACC= 10 DEC = 10 0 ; 整圆终点
END
Example description: At program startup, the two robots move from E0001 to E0002 via linear interpolation according to the taught points, and run the entire full circle trajectory at E0002.
2.2 Running Programs in Dual-Robot Mode
Dual-robot instructions can only be inserted on Robot 1. As shown in the figure, click Robot1 to enter the Robot 1 program editing screen. After the job file programming is complete, first step through the instructions in teach mode to confirm the program is correct, then switch to run mode to run the program.
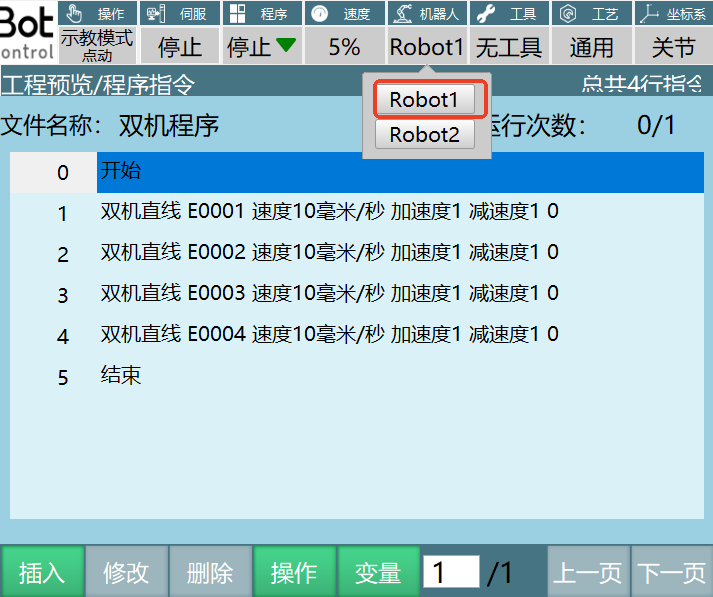
Note: Dual-robot mode cannot enter multi-robot mode to run programs!
3 Copying Parameters
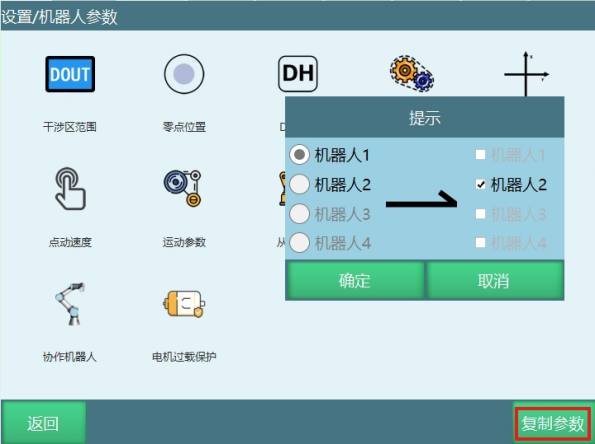
Function: Copy the parameters of the current robot to other robots. Click Copy Parameters, select the source robot and target robot, and click [OK] in the prompt box to copy the parameters successfully.
Precautions:
The copied parameters do not include: robot zero position, slave configuration, NP parameters, servo parameters, and collaborative robot parameters.
The copy parameters function can only be used when the number of robots is greater than 1.
The current robot cannot be selected for copying parameters. For example, the parameters of Robot 1 can only be copied to Robot 2, Robot 3 or Robot 4.
Q&A
Q: How many robots can multi-robot mode control simultaneously at most?
A: This product supports controlling up to 4 robots simultaneously.
Q: What should be noted when slaves are connected in series?
A: When slaves are connected in series, they must be directly connected with an Ethernet cable. Do not use a switch, as connecting via a switch may cause the robot to run away.
Q: What kind of robots does dual-robot collaboration require?
A: Dual-robot collaboration requires two identical six-axis serial robots.
Q: How do I enable the dual-robot collaboration function?
A: Turn on the dual-robot collaboration enable button in "Settings - Robot Parameters - Motion Parameters". Note that turning off the dual-robot collaboration button requires restarting the controller system.
Q: Can dual-robot collaboration and multi-robot mode be used at the same time?
A: No. Dual-robot collaboration cannot be used together with multi-robot mode.
Q: Can dual-robot mode and external axes be used at the same time?
A: No. Dual-robot mode and external axes cannot be used at the same time.
Q: On which robot can the dual-robot instructions be inserted?
A: Dual-robot instructions can only be inserted on Robot 1.
Q: What do the copied parameters include?
A: The copied parameters do not include: robot zero position, slave configuration, NP parameters, servo parameters, and collaborative robot parameters.
Q: When can the copy parameters function be used?
A: The copy parameters function can only be used when the number of robots is greater than 1.