1. System Settings
This chapter mainly introduces the viewing and upgrading of the software version, the setting of the system date and time, and the method of setting the controller IP.
Making a FAT32-formatted USB drive
In this system, upgrading programs and importing/exporting parameters and programs all require a FAT32-formatted USB drive. The steps for making a FAT32-formatted USB drive are as follows:
Prepare a computer and a USB drive. Note that the process will completely and irreversibly erase all contents of the USB drive, so please back up the contents of the USB drive;
Insert the USB drive into the USB port of the computer;
Open "My Computer" on the computer, or the "This PC" screen on WIN10 systems.

- At this point, the drive letter of the USB drive should be present. If it does not appear, unplug and re-insert the USB drive; if it still does not appear, replace the USB drive;

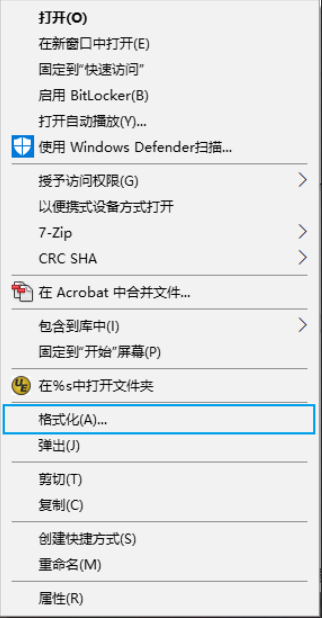
- Right-click the drive letter and click "Format" in the menu that appears;
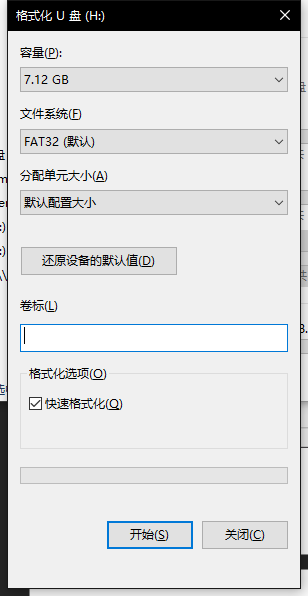
- Set the pop-up screen as shown below;
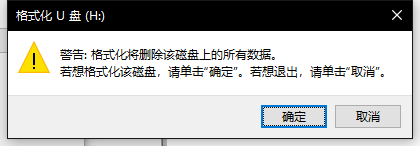
- Click the Start button, and click the [OK] button in the confirmation box that pops up;
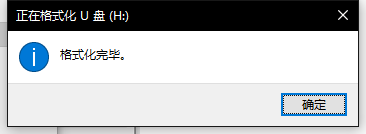
- When the "Format Complete" window pops up, the FAT32-formatted USB drive is ready.
1.1 Version Viewing and Upgrading
In the Settings - System Settings - Version Upgrade viewing screen, the teach pendant and controller software versions can be viewed, and the teach pendant software upgrade operation can be performed.
1.1.1 Check for Upgrade
The operation steps for teach pendant software upgrade are as follows:
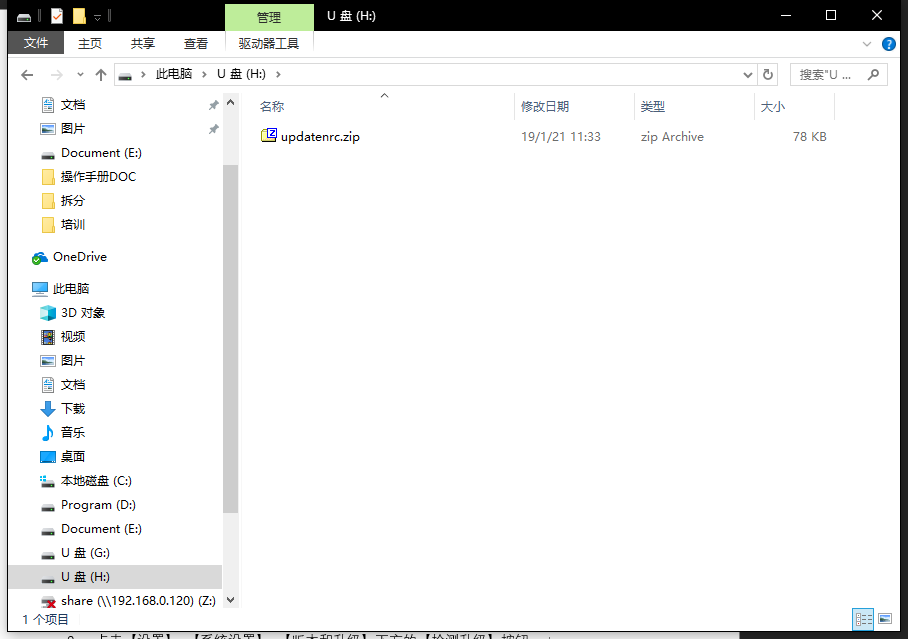
- Put the upgrade file (.zip format, no need to decompress, and the file name must not contain special characters such as parentheses) into the root directory of the USB drive (the USB drive must be FAT32 format), and insert the USB drive into the USB port of the teach pendant.
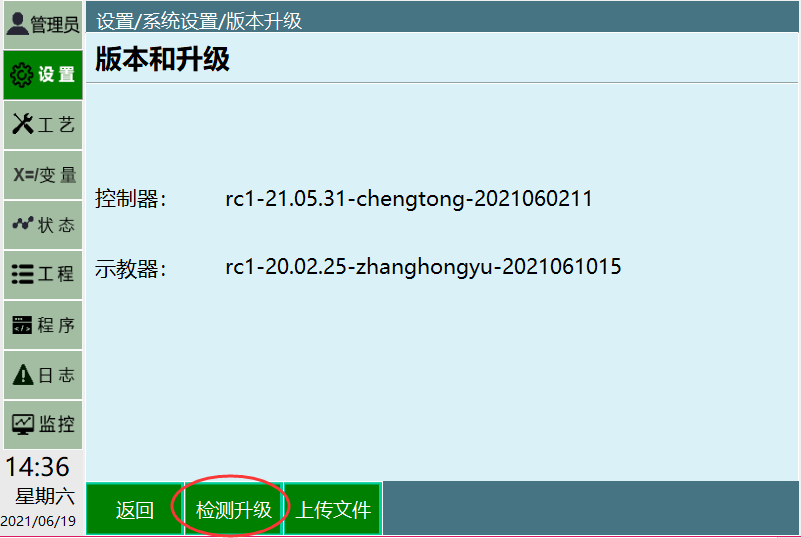
- Click the [Check for Upgrade] button below [Settings] - [System Settings] - [Version and Upgrade].
Select the automatically detected upgrade file from the list.
Click the [OK] button.
After a successful upgrade, the teach pendant restarts automatically. After the restart, the upgrade is successful.
1.1.2 Upload File
To upload files such as ENI files to the controller, follow these steps:
Prepare a computer and a USB drive;
Create a new folder named upgrade on the USB drive;
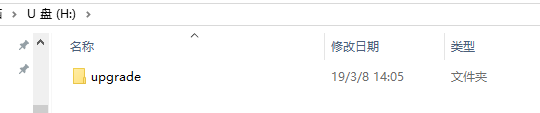
- Put the file to be uploaded into the upgrade folder;

Insert the USB drive into the USB port of the teach pendant;
Open the Settings - System Settings - Version Upgrade screen;
Click the Upload File button;
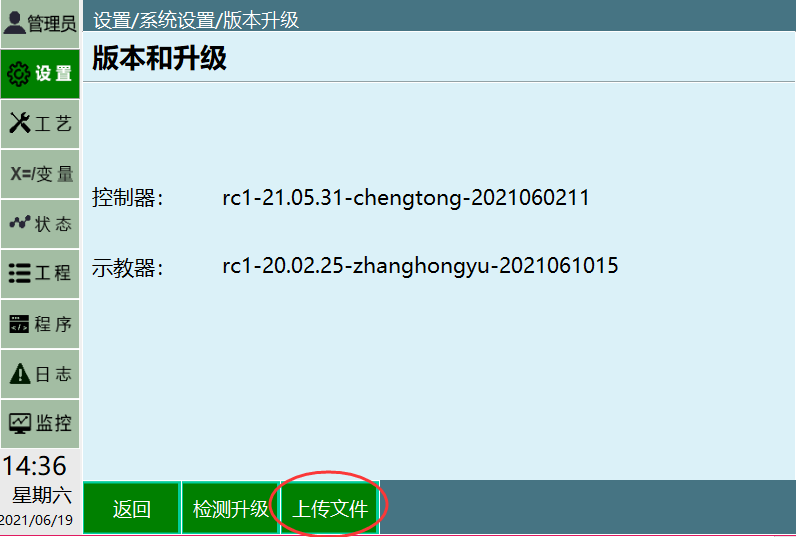
- In the pop-up detected files, select the file to upload and click the OK button.
1.2 Time Setting
The system date and time can be set on the system settings screen.
The specific steps are as follows:
Open the Settings - System Settings - Time Setting screen.
Click the [Modify] button.
Select the year, month, day, hour and minute in the date setting and time setting.
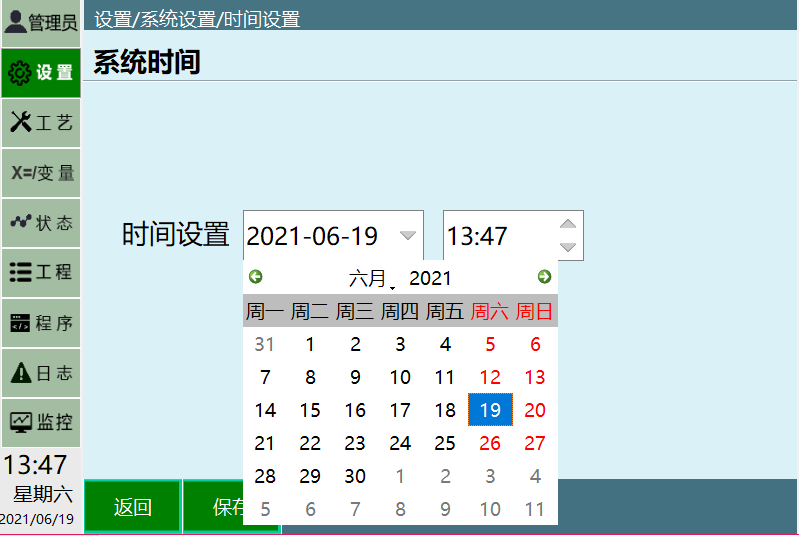
- Click the [Save] button.
1.3 IP Settings
The controller IP, the teach pendant IP and the IP connected by the teach pendant can be modified on the Settings - System Settings - IP Settings screen.
Please do not modify the IP unless necessary, to avoid usage failures.
[If the controller IP is modified to a non-default value (192.168.1.13), please record the IP of this controller yourself.]
The teach pendant connection IP is used for switching when one teach pendant connects to multiple controllers at the same time.
The "Reset Network Configuration" function only applies to the T20.
The specific steps for modifying the [current connection IP]{.underline} are as follows:
Click [System Settings] - [IP Settings].
Click the [Modify] button corresponding to "Connection IP";
Change it to the desired IP address; it takes effect immediately.
Modify the connection IP to the IP filled in step 3
The specific steps for modifying the [IP of the current controller]{.underline} are as follows:
Click [System Settings] - [IP Settings].
Click the [Modify] button corresponding to "Modify Controller IP";
Change it to the desired IP address; it takes effect immediately.
Modify the connection IP to the IP filled in step 3
The specific steps for modifying the [IP of the teach pendant itself]{.underline} are as follows:
Click [System Settings] - [IP Settings].
Click the [Modify] button corresponding to "Teach Pendant IP";
Change it to the desired IP address; restart the teach pendant for it to take effect.
Modify the connection IP to the IP filled in step 3
1.4 Export Programs
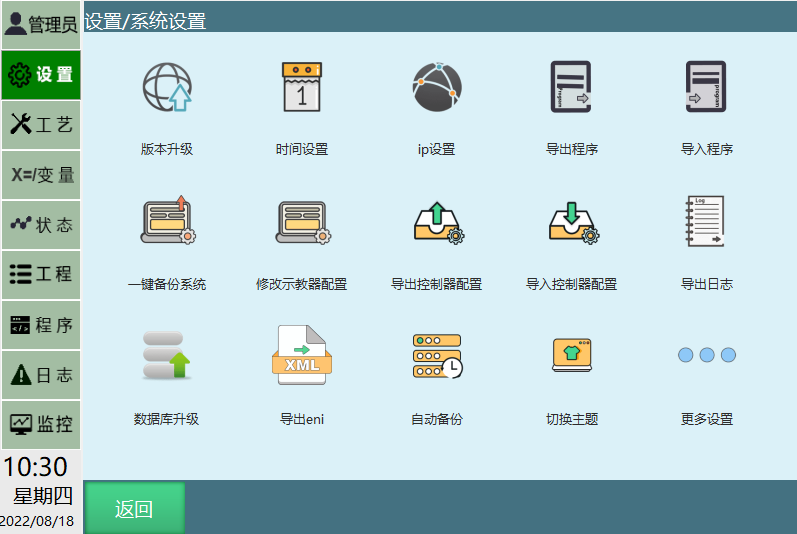
Click the [Export Programs] button on the system settings screen to export programs to the USB drive.
The specific steps are as follows:
Insert the USB drive (must be FAT32 format) into the USB port of the teach pendant.
Click [Settings] - [System Settings] - [Export Programs]
The exported programs are separated by date and type and exported to the "robotJobxx-xx-xx-xx (current date and time)" directory in the root directory of the USB drive.
1.5 Import Programs
Click the [Import Programs] button at the bottom of the system settings screen to import programs into the teach pendant.
The specific steps are as follows:
Create a new folder named "robotJobxxx (number)" on the USB drive, and create a new folder named "R1" inside that folder;
Put the programs with the ".JBR" extension into the R1 folder;
Insert the USB drive (must be FAT32 format) into the USB port of the teach pendant;
Click [Settings] - [System Settings] - [Import Programs];
The system pops up all related directories on the USB drive. Select the program directory to import. At this time, R1-R4 is displayed according to the actual number of robots configured on the teach pendant. If there are corresponding robot job files on the USB drive, they are displayed in the white dialog box below. Click Select All to select the job files of all robots, or customize the selection of the needed files, then click the [OK] button to import the job files.
1.6 One-Key System Backup
Click the [One-Key System Backup] button on the system settings screen to back up all related files such as job files, teach pendant programs, controller programs and robot configurations to the USB drive at once.
The specific steps are as follows:
Insert the USB drive into the USB port of the teach pendant.
Click [Settings] - [System Settings] - [One-Key System Backup]
Modifying the teach pendant configuration
Click the [Modify Teach Pendant Configuration] button on the system settings screen to modify some function parameters saved on the teach pendant.
The specific steps are as follows:
Click the Modify button, modify the parameters, and save
Exporting the controller configuration
Click the [Export Configuration Parameters] button at the bottom of the system settings screen to export the controller configuration parameters to the USB drive.
The controller configuration parameters saved include configuration parameters such as robots, IO, external axes and process parameters.
The specific steps are as follows:
Insert the USB drive into the USB port of the teach pendant.
Click the [Settings] - [Export Configuration Parameters] button.
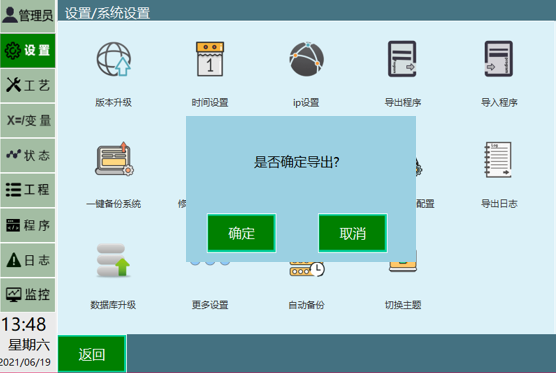
Click the [OK] button.
Wait for the export.
1.7 Importing the Controller Configuration
Click the [Import Configuration Parameters] button at the bottom of the system settings screen to import the local configuration parameters into the teach pendant.
The specific steps are as follows:
Insert the USB drive into the USB port of the teach pendant.
Click the [Settings] - [Import Configuration Parameters] button
The system pops up all related directories on the USB drive. Select the program directory to import. If there are configuration files of the corresponding robots on the USB drive, they are displayed in the white dialog box below. Click the configuration file of the needed robot, then click [OK] to enter the detailed configuration parameter selection. You can select all or select the needed configuration parameters. Click the [OK] button
Wait for the import.
1.8 Export Logs
Log export is divided into teach pendant logs and controller logs;
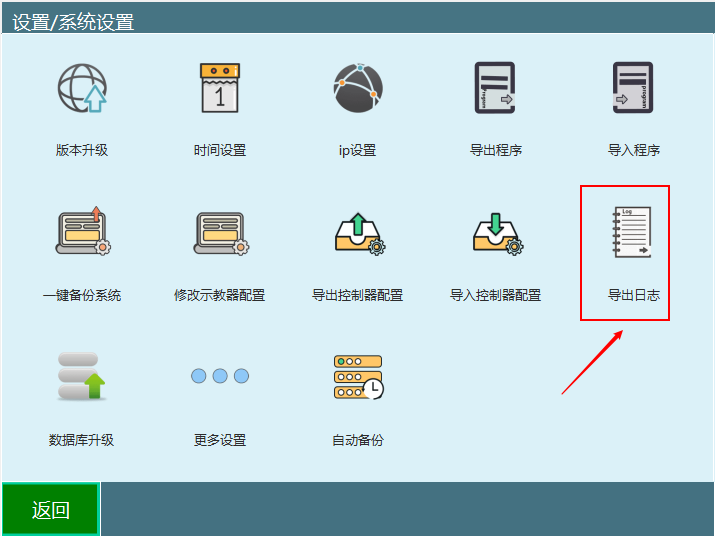
Click the [Export Logs] button on the system settings screen / the [Export] button on the log screen to export logs, crash logs, robot parameter configurations and job files to the USB drive. *When we look for the cause of a robot error, the controller log is the most commonly used. The specific steps are as follows:
Insert a "FAT32"-formatted USB drive into the USB port of the teach pendant;
Enter the "Settings - System Settings" screen / "Logs" screen of the teach pendant;
Click the [Export Controller Logs] button on the system settings screen / the [Export] button on the log screen to select exporting 5/30/100/500 logs;
After the export is complete, there will be four folders on the USB drive. The controller logs, the crash logs generated when the program crashes (dumplog), the configuration and the job files are saved in the "controllerLogs-current date and time" directory on the USB drive;
The controller configuration file configFile-version information-current date and time;
The job files robotJob-current date and time;
The teach pendant logs are saved in the teachbox.db file in the "controllerLogs-current date and time" directory.
The crash logs generated when the program crashes (dumplog) are saved in the "dumplog-current time" file
1.9 Language Change
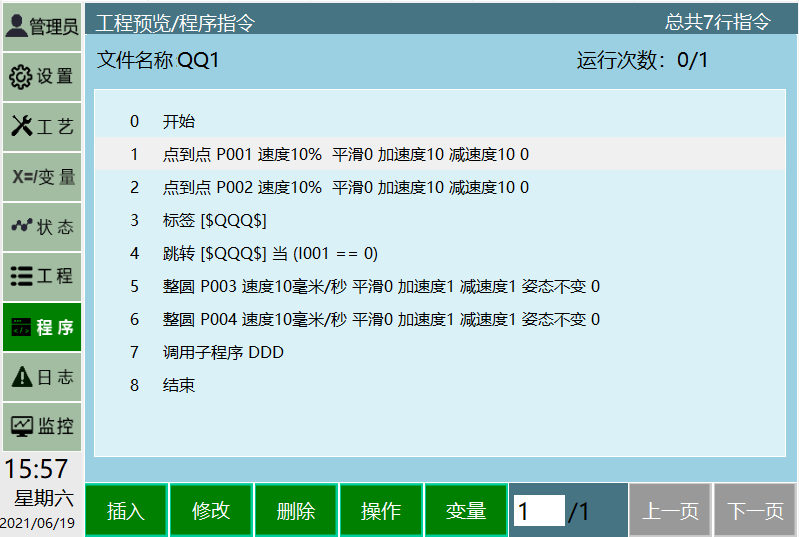
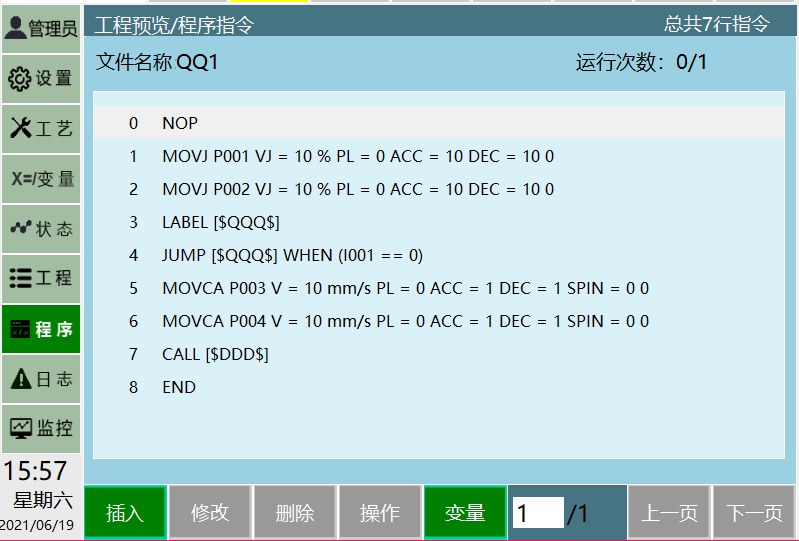
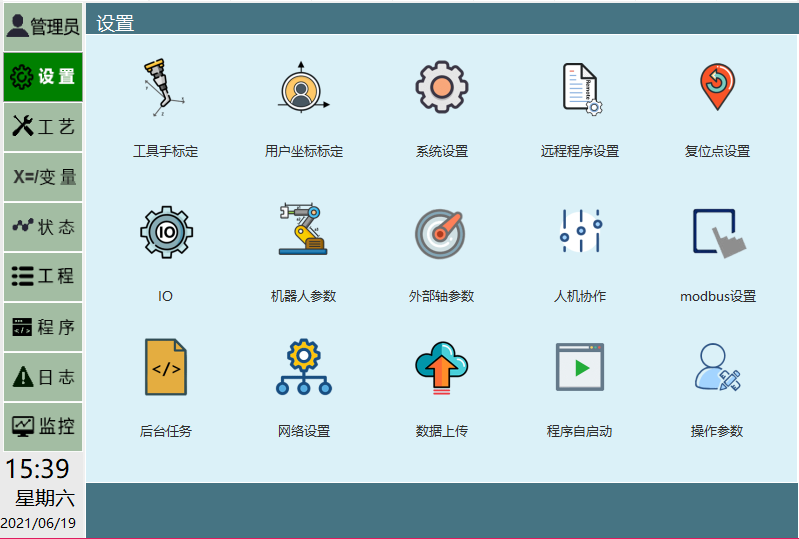
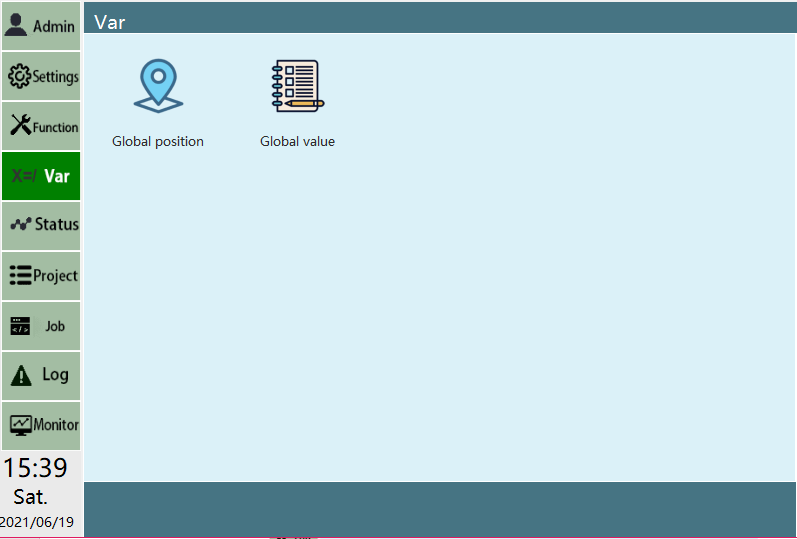
The instructions and screens of this system can be switched between Chinese, English and Korean respectively. To switch the language, follow these steps:
- Enter Settings - System Settings - Modify Teach Pendant Configuration;

Click the Modify button;
Select the desired instruction language or screen language;
Click Save. After saving, the instruction language takes effect immediately, and the screen language takes effect only after restarting.
Chinese language instructions
English language instructions
Chinese language screen
English language screen
Korean language screen
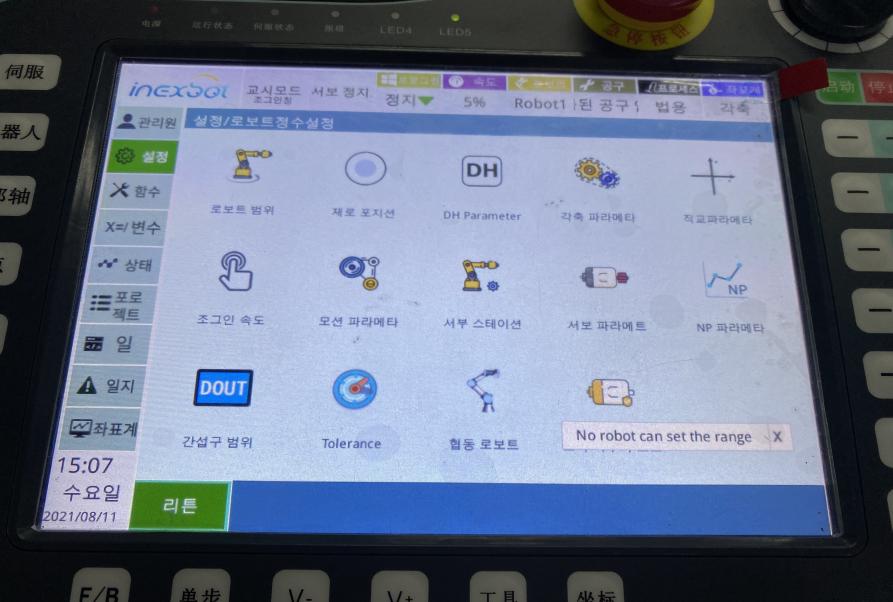
1.10 Database Upgrade
Used to upgrade the config.db file, which saves the teach pendant configuration, such as the IP and some parameters in the operation parameters.
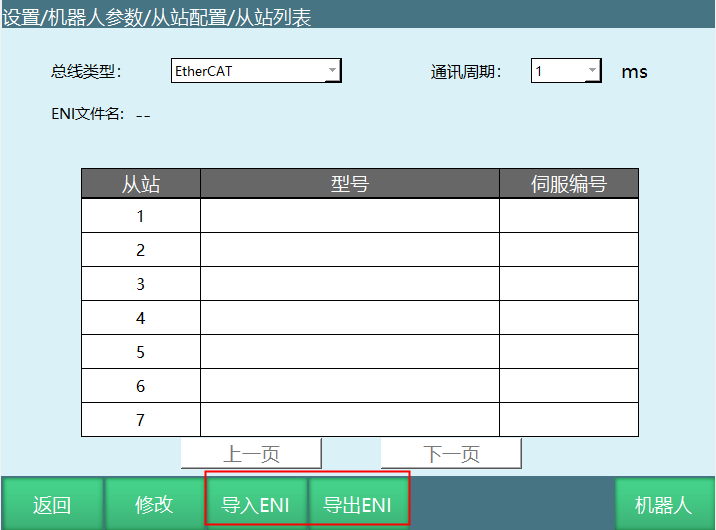
1.11 Import/Export ENI
When the robot eni file does not exist, the eni file needs to be imported. When [Importing ENI], make sure there is an eni file on the USB drive.
Create a new upgrade folder on the USB drive and upload the eni file to the upgrade folder.
Insert the USB drive into the USB port of the teach pendant.
Click the [Settings] - [Robot Parameters] - [Slave Configuration] button.
Click [Import ENI], then select the ENI file to import in the USB drive directory to start the import.
Wait for the import.
[Export ENI] is used to export the eni currently used by the system. When preparing to replace the eni or replace the controller, this function can be used to export the eni in use for backup purposes. To import/export eni, follow these steps:
Insert the USB drive into the USB port of the teach pendant.
Click the [Settings] - [Robot Parameters] - [Slave Configuration] button.
Click [Export ENI] to start the export.
Wait for the export.
1.12 Clear Programs
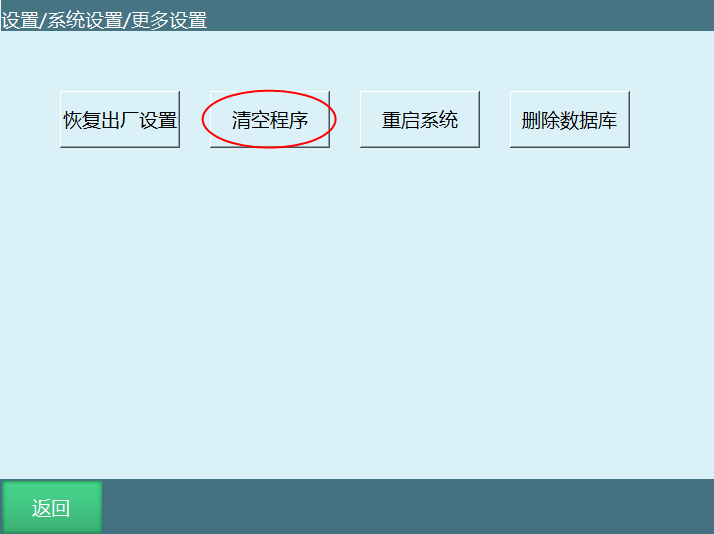
The clear programs function can clear all programs in the system at once, used when there are many useless programs.
The clearing steps are as follows:
Enter the Settings - System Settings - More Settings screen;
Click the Clear Programs button;
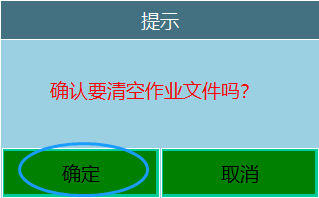
- Click the OK button in the pop-up dialog box.
1.13 Factory Reset
Factory reset will clear all robot parameters, programs, etc. Please operate with caution! Be sure to back up all parameters and program files before performing this operation!
The steps are as follows:
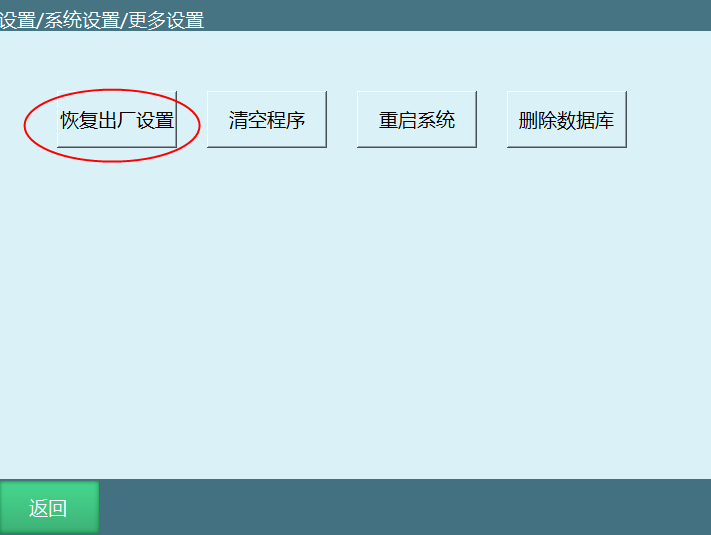
Enter the Settings - System Settings - More Settings screen;
Click the [Factory Reset] button;
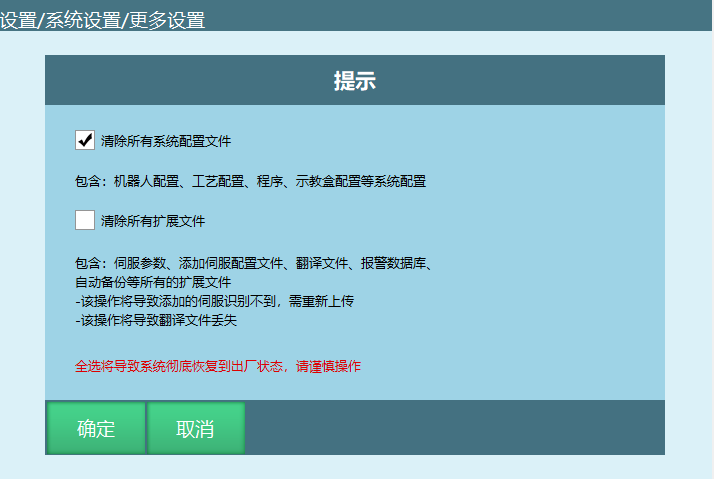
- There are two options in the pop-up prompt window, which can clear the system configuration files and all extension files. The configuration files to be cleared can be selected by yourself
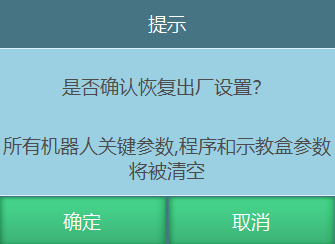
- Click the OK button, and the selected configuration files are restored to factory defaults.
1.14 Delete Database
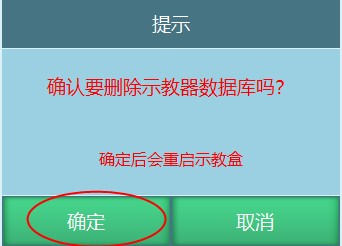
Function: Clicking it deletes the database of the teach pendant, generally including the user-side information. The created users and all passwords are reset, the connected controller IP is reset, the current voice settings are reset, and the color theme of the teach pendant is reset
The steps are as follows:
Enter the Settings - System Settings - More Settings screen;
Click the [Delete Database] button;
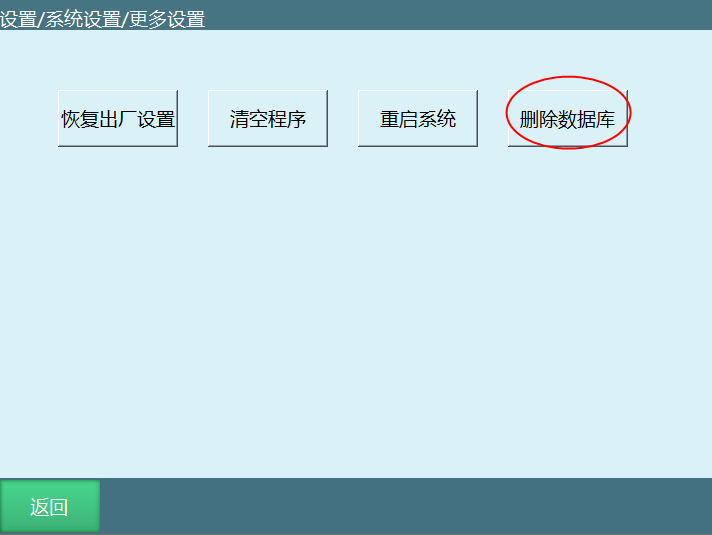
- Click the OK button, and the data is reset.
1.15 Screen Calibration
The screen calibration function applies to the T30 teach pendant.
The steps are as follows:
While powered on, simultaneously press the [O] key on the left + the [Coordinates] key in the middle + the [STOP] key on the right. The teach pendant pops up the prompt "Calibration file deleted; restart the teach pendant for it to take effect". After manually restarting the teach pendant, the calibration screen is entered
Use the stylus to click the crosshair centers of points 1-5 respectively as shown in the example to complete the calibration.

1.16 Auto Backup
Controller auto backup function
Backup contents: programs, parameters, software (nrc.out)
Number of backups: maximum 10; the newest replaces the oldest
Backup naming: named by premise, version and time
Example: parameters modified at 13:10 on September 10, 2020, backup name "参数-20.04-3.3.7-202009101310"
Prerequisites for triggering a backup: power-on, parameter modification, program modification, upgrade
Backup frequency:
After power-on, once the version and parameters are confirmed normal, back up once;
If no parameters are modified within 5 minutes after a parameter modification, back up once;
If no program is modified within 5 minutes after a program modification (inserting instructions, modifying instructions), back up once;
Back up once before upgrading
Restore backup method
- Select the backup to restore; after selection, a cursor is displayed.
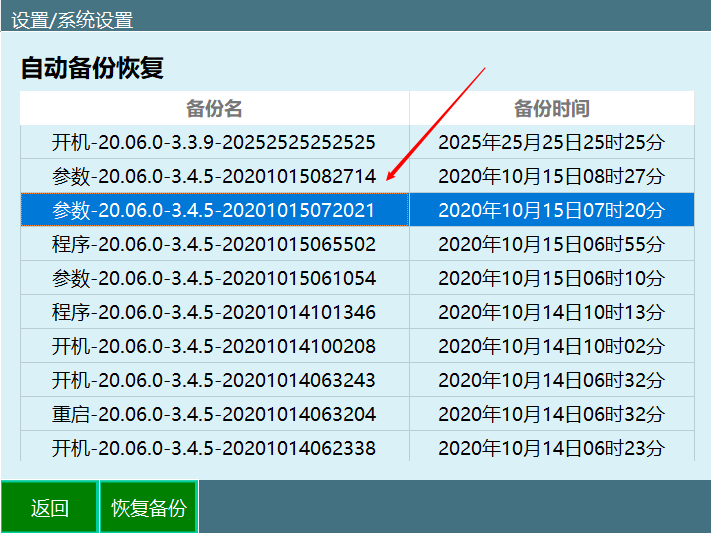
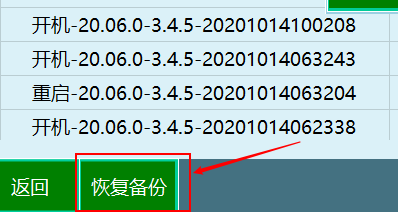
- Click the "Restore Backup" button
- A popup prompts; click Confirm
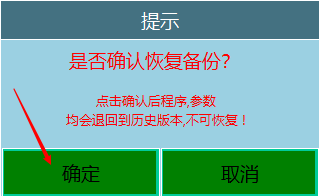
- During the restore process, do not power off
1.17 Switch Theme
Customize the background colors of different areas; RGB is supported.
After setting, the teach pendant needs to be restarted to take effect. After clicking Confirm for modification, it restarts automatically; the PC version requires manually restarting the teach pendant.
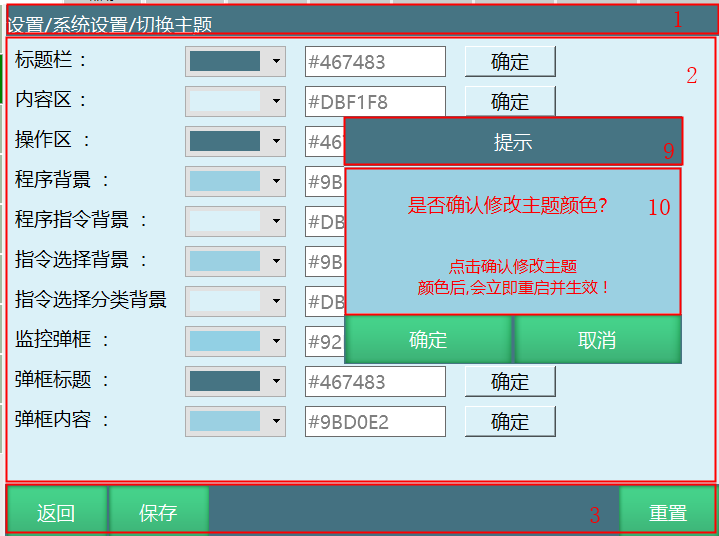
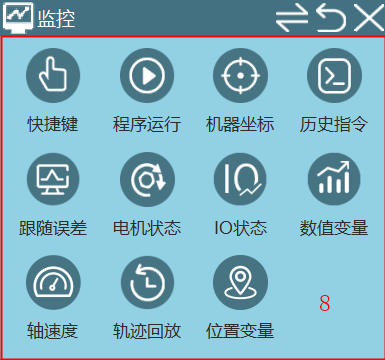
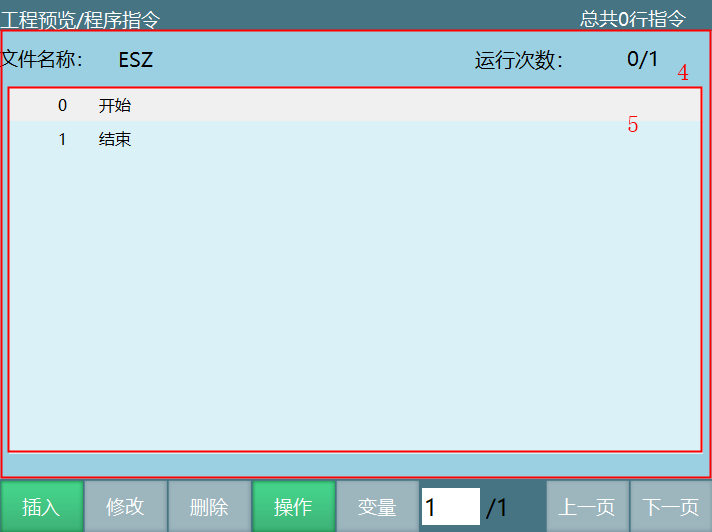
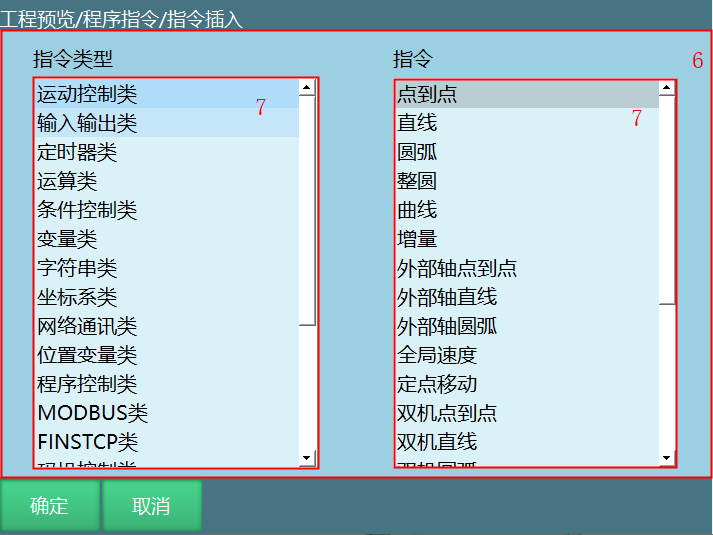
Title area
Content area
Operation area
Program background
Program instruction background
Instruction selection background
Instruction selection category background
Monitor popup
Popup title
Popup content
1.18 Operation Parameters
This chapter mainly introduces the usage and precautions of each parameter in the operation parameters.
1.18.1 Reservation Mode
Reservation mode uses digital IO to control program operation. This mechanism works by setting (reserving) in advance, in remote mode, the programs to be started via IO and the number of runs, and numbering them. After switching to remote mode, the set programs are sequenced through IO signals. After pressing Run, the programs run according to the sequenced programs and number of runs. When all programs have finished running, the run stops. To run again, re-sequencing is required.
To make a single program run in an infinite loop, set the number of runs of that program to 0 when reserving.
Enable description
With reservation mode on, the operation flow is: trigger the remote IO program 1 signal → trigger the start signal → the robot runs; at this time, if the remote IO program 2 signal is triggered, remote IO program 2 is queued, and remote IO program 2 is executed after remote IO program 1 finishes.
With reservation mode off, the operation flow is: trigger the remote IO program 1 signal → the robot runs; at this time, if the remote IO program 2 signal is triggered, it is invalid; remote IO program 2 can only run after remote IO program 1 finishes.
When turned on, remote mode IO control is reservation mode; when turned off, it is non-reservation mode
Default is on
Setting steps
The steps for reserving programs are as follows:
Enter Settings - Remote Program Settings;
Set up the 5 reserved programs and the number of runs;
In Settings - Remote Program Settings - Robot 1 - Remote IO Function, set the function of each IO input port, where program 1 - program 5 correspond to the sequencing functions of the five programs in the remote program settings screen;
Switch to remote mode;
Give the IO corresponding to the program sequence number a high level lasting 2 seconds (set as high-level active) and then release it; the program then enters the queue;
After sequencing, to cancel the sequencing of a program, give the IO corresponding to the program sequence number a high level lasting 2 seconds (set as high-level active) again and then release it;
Give the IO port corresponding to program start a rising edge (set as high-level active), and the system starts running according to the number of runs of the queued programs;
Sequencing and queue cancellation can also be performed during operation.
[*If the reserve-and-run switch is turned on, the first reserved program starts running immediately after being reserved]
[*After turning off reservation mode in Settings - Operation Parameters, remote mode has no reservation queue, and only one program can run at a time]
1.18.2 Disable Homing Key
When turned on, the homing key is disabled
Default is off
1.18.3 Process Selection
General process, dedicated process, palletizing process, welding process and cutting process can be set
Default is general process
1.18.4 Disable Scroll Wheel Key
When turned on, the scroll wheel key is disabled
Default is off
1.18.5 Auto Power-On When Switching to Run Mode
When turned on, switching to run mode powers on automatically
Default is off
1.18.6 Pose Value
Radian system, degree system
Default is radian system
1.18.7 Remote IO Breakpoint Execution
When turned on, breakpoint execution is used; when off, it is not used
Default is on
1.18.8 Remote IO Current Line Execution
When turned on, current line execution is used; when off, it is not used
Default is off
1.18.9 Switch Back to User Permission After Running
While running, switch to operator permission at the set time.
The default parameter value is 0, which means no switching.
1.18.10 Actual Joint Direction
When turned on, the actual joint direction parameter is displayed on the robot and external axis joint parameter setting screens.
Default is off.
1.18.11 Remote Mode Without Teach Pendant
When turned on, if the remote IO control signal is triggered without a teach pendant connected, the system automatically switches to remote mode
Default is on.
1.18.12 Re-Reservation During Remote IO Program Running
When turned on, a reserved program can be reserved again while it is running;
When turned off, a reserved program cannot be reserved again while it is running; reservation is only possible when the program is in the "Reserved" or "Not Reserved" state
Default is on.
1.18.13 Single-Step/Homing/Reset Point Run Operation Method
Single press: press the corresponding key once and the robot performs the corresponding function
Press and hold: the robot performs the corresponding function only while the corresponding key is held down
1.18.14 Default Speed at Boot in Run Mode
When turned on, the starting speed set by the system is applied each time the system boots and switches to run mode
1.18.15 Sync Operation Mode When Connecting to the Controller
Function: synchronize the operation mode at the first connection between the controller and the teach pendant
Follow controller: When the controller and the teach pendant are connected normally, the teach pendant follows the mode sent by the controller
Follow mode knob: When the controller and the teach pendant are connected normally, switch the operation mode via the knob
Special case: when the program is running and the teach pendant reconnects to the controller normally, switching the mode directly with the knob is also supported
Note: 1. After the teach pendant reconnects to the controller normally, a popup prompt appears: the robot is running; to confirm the sync, press the Confirm key. After clicking Confirm, the teach pendant syncs with the knob operation mode
- Before the popup disappears: only the Confirm key + Stop key + knob are usable; everything else cannot be operated
Default is follow controller
1.18.16 Safety Light Curtain Ineffective in Teach Mode
Function: when enabled, teach mode shields the safety light curtain limit, and alarms remain normally usable (default off)
Default is not enabled
1.18.17 Disable Start Key Function in Motion Mode
Function: when the function enable is turned on, after the teach pendant switches to run mode, the Run in the status, the physical key start, and including the START key of the PC version cannot be clicked (default off)
Note: The PC version START key is also disabled
Default off
1.18.18 NP Parameters
Function: when turned on, [Settings] - [Robot Parameters] - [NP Parameters] is displayed; when off, it is hidden
Default off
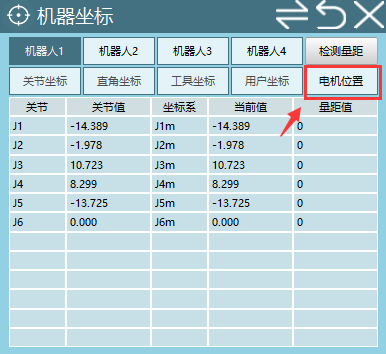
1.18.19 Display Motor Coordinate Position and Calibration Button
Function: when turned on, [Settings] - [Robot Parameters] - [Zero Position] - [Mark No-Backlash Direction] is displayed
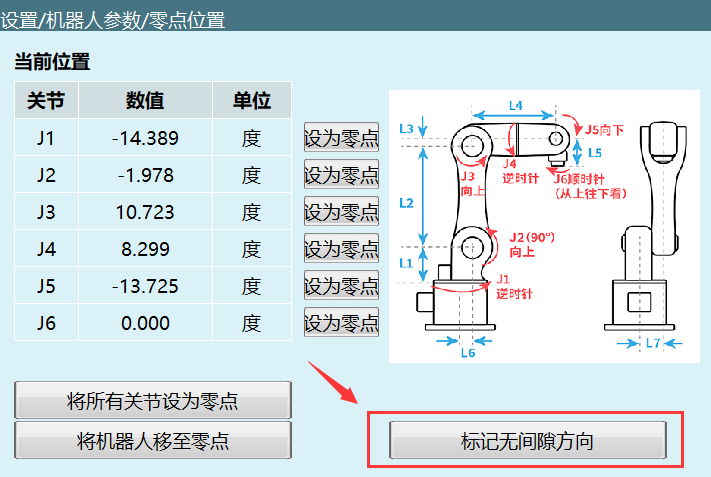
and [Monitor] - [Machine Coordinates] - [Motor Position]; when off, it is hidden
Default is off
2 Robot Logs
The logs of this system are divided into teach pendant logs and controller logs. The teach pendant logs mainly save the logs generated by operations on the teach pendant. The controller logs save all logs such as robot operation and parameter modification.
Note: For log export, please refer to System Settings - Log Export;
Teach pendant log viewing
Operation and error logs can be viewed on the log screen.
The specific viewing steps are as follows:
- Click [Logs] to open the log viewing screen. If there is no error information, directly enter the historical logs, which by default display error-type logs;
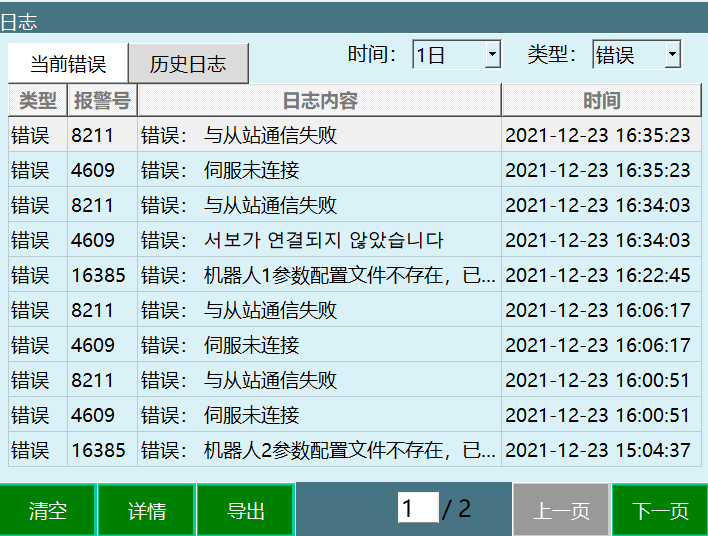
[Note: When entering the log screen, "error" type logs are displayed first]{.underline}
If there is current error information, clicking [Logs] enters the current error screen
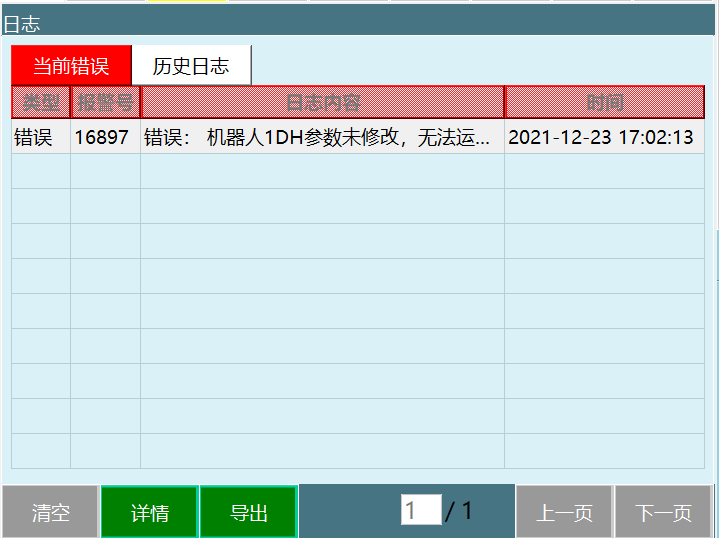
Click the "Type" tab at the top to switch the log type being viewed.
After selecting a log entry, click the [Details] button below to view the log details;
Historical log details screen:
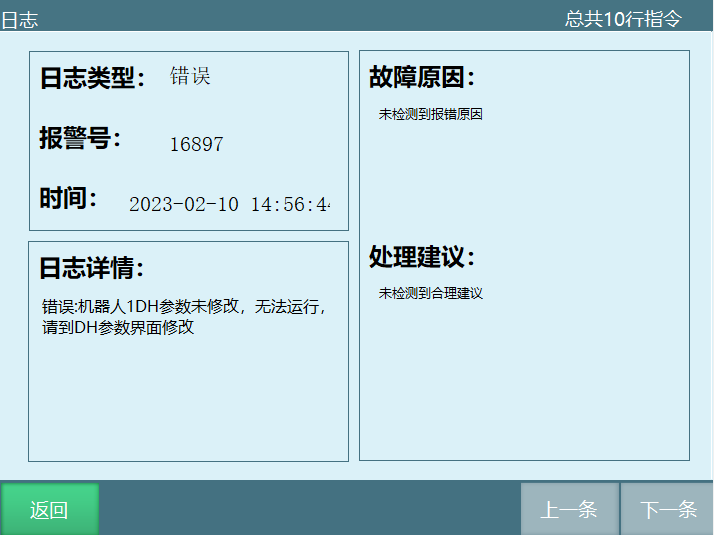
Current error details screen:
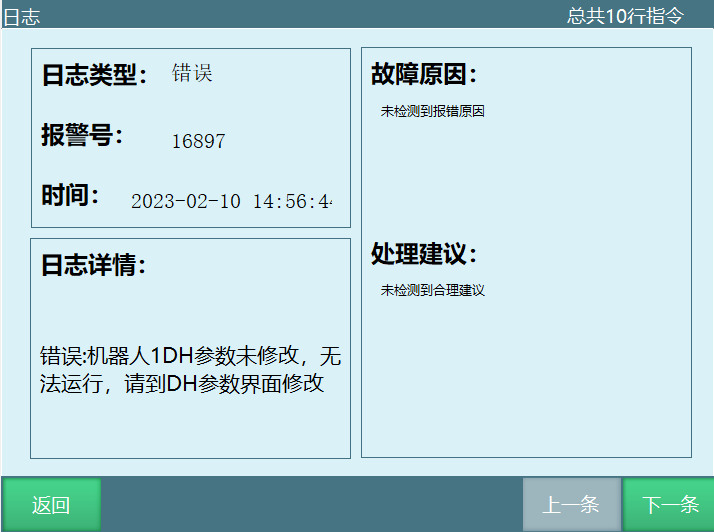
[Note: The corresponding database needs to be uploaded for the fault cause and handling suggestions]{.underline}
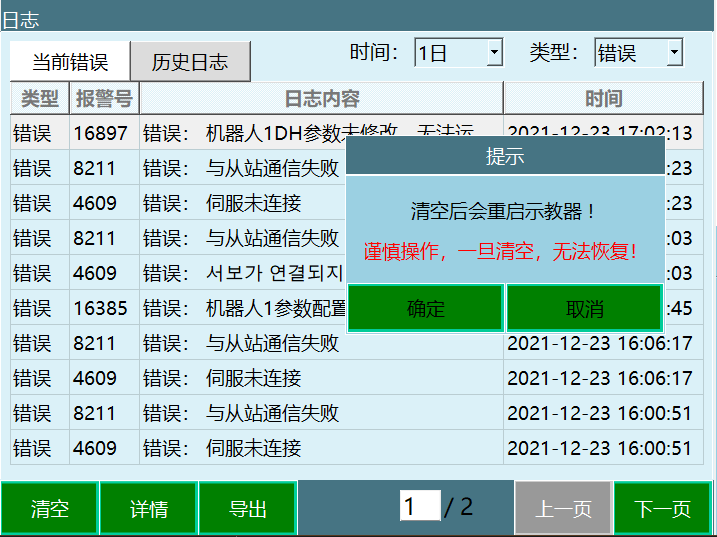
Clear logs:
Click the Clear button, and a prompt box will prompt that after clearing, the teach pendant will restart and the logs cannot be recovered after clearing
Log types
Log types include All, Message, Operation, Warning and Error. Mainly view the "Operation Logs" and "Error Logs"
Operation logs: This type of log saves the user's basic operations, such as creating programs, renaming programs, inserting instructions, etc.
Error logs: This type of log saves all system errors and servo error information, including information such as error codes, error time, error type, error content and solutions.
Fault handling
Encoder battery undervoltage error
Note: The following operations will lose the zero point, and the robot points must be set again
Operation steps:
Disconnect the power of the undervoltage robot's controller, control cabinet, robot and other equipment. With safety ensured, have a professional replace the robot battery. After replacement, reconnect the power and start the controller system.
After waiting for the teach pendant and controller to boot normally, the popup error still appears
Click the clear-error button on the teach pendant, and a Confirm button appears in the popup
Click the Confirm button to enter the zero-point calibration screen
After re-calibrating the zero point, normal operation is restored
Check all points usable in the program to ensure the point positions are normal and the points set in the process are normal
Q&A
Q: How do I make a FAT32-formatted USB drive?
A: Insert the USB drive into the computer, right-click the USB drive letter in My Computer, select "Format", set the file system to FAT32, and click Start to complete. Note that formatting clears all data on the USB drive.
Q: What are the steps for upgrading the teach pendant software?
A: Put the .zip format upgrade file into the root directory of a FAT32-formatted USB drive (the file name must not contain special characters), insert it into the USB port of the teach pendant, enter the Settings - System Settings - Version and Upgrade screen, click Check for Upgrade, select the upgrade file and click OK. After a successful upgrade, the teach pendant restarts automatically.
Q: How do I export programs?
A: Insert a FAT32-formatted USB drive into the USB port of the teach pendant, click Settings - System Settings - Export Programs, and the programs are exported by date and type to the "robotJobxx-xx-xx-xx" directory in the root directory of the USB drive.
Q: How do I import programs?
A: Create a new folder named "robotJobxxx" in the root directory of the USB drive, create a new "R1" folder inside it, put the program files with the .JBR extension into the R1 folder, insert the USB drive into the teach pendant, enter Settings - System Settings - Import Programs, select the directory and confirm the import.
Q: What does the one-key system backup include?
A: One-key backup backs up all related files such as job files, teach pendant programs, controller programs and robot configurations to the USB drive at the same time.
Q: How do I export controller logs?
A: Insert a FAT32-formatted USB drive into the teach pendant, enter the Settings - System Settings screen or the log screen, click the Export Controller Logs button, select exporting 5/30/100/500 logs. After the export is complete, a controllerLogs directory is generated on the USB drive, containing the controller logs, crash logs, configuration and job files.
Q: How do I switch the screen language?
A: Enter Settings - System Settings - Modify Teach Pendant Configuration, click the Modify button, select the desired instruction language or screen language. After saving, the instruction language takes effect immediately, and the screen language takes effect after restarting the teach pendant.
Q: What are the risks of factory reset?
A: Factory reset clears all robot parameters, programs, etc. Be sure to back up all parameters and program files before the operation.
Q: What are the trigger conditions for the controller auto backup?
A: Auto backup is triggered in the following situations: after power-on once the version and parameters are confirmed normal, within 5 minutes after a parameter modification without further modification, within 5 minutes after a program modification without further modification, and before upgrading. Up to 10 backups are kept, and a new backup replaces the oldest backup.
Q: What is the difference between reservation mode and non-reservation mode?
A: When reservation mode is on, multiple programs can be sequenced and queued via IO signals and executed in order; when off, only one program can run at a time, and the next program can only run after the current program finishes.